Are you a woodworker looking to take your craft to the next level? Have you ever wondered how to build a kiln for wood, allowing you to dry and cure your lumber with precision? Look no further, as in this guide, we will explore the step-by-step process of constructing your very own kiln.
A kiln is an essential tool for any woodworker aiming to produce high-quality, stable lumber. By controlling the temperature, humidity, and airflow, a kiln ensures that your wood dries evenly and thoroughly, minimizing the risk of warping or cracking. Whether you’re a hobbyist or a professional, understanding how to build a kiln will unlock new possibilities for your woodworking projects. So, let’s dive in and learn the secrets of creating a reliable and efficient kiln for wood.
How to Build a Kiln for Wood:
- Determine the size and type of kiln you need.
- Gather the necessary materials, including bricks, cement, and a heating source.
- Construct the kiln structure, ensuring proper ventilation and insulation.
- Add the heating source, such as a wood-burning stove or electric heater.
- Install temperature and humidity controls for optimal wood drying.
- Test the kiln for functionality and make any necessary adjustments.
- Start using your homemade kiln to dry and cure wood for various projects!

How to Build a Kiln for Wood
In this article, we will provide you with step-by-step instructions on how to build a kiln for wood. A kiln is a structure used for drying and curing wood, and it is an essential tool for any woodworker or carpenter. By building your own kiln, you can have full control over the drying process and ensure that your wood is properly seasoned and ready for use.
Step 1: Planning and Design
The first step in building a kiln for wood is to carefully plan and design your structure. Consider factors such as the size of the kiln, the type of wood you will be drying, and the available space in your workshop or backyard. It is important to have a clear idea of the dimensions and layout of the kiln before starting the construction process.
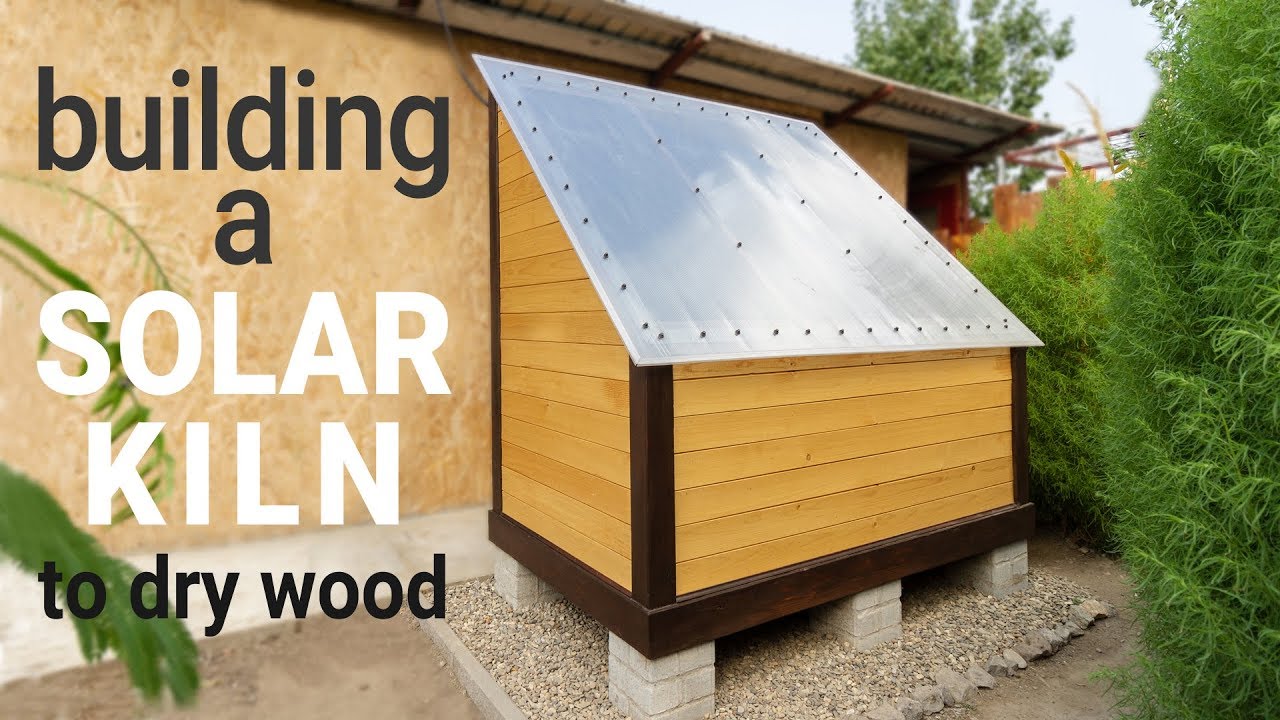
Additionally, you will need to decide on the type of kiln you want to build. There are several options to choose from, including solar kilns, dehumidification kilns, and conventional lumber dry kilns. Each type has its advantages and disadvantages, so research and choose the one that best suits your needs and budget.
Step 2: Gathering Materials
Once you have a solid plan in place, it’s time to gather the materials needed for your kiln. The exact materials will depend on the design and type of kiln you have chosen, but some common items include lumber, plywood, insulation, screws, and a vapor barrier. You may also need to purchase or repurpose a heat source, such as a heater or a solar panel system.

It is crucial to use high-quality materials that can withstand the high temperatures and moisture levels inside the kiln. Make sure to measure and cut your lumber accurately to ensure a sturdy and well-built structure. Additionally, consider investing in insulation materials that provide proper heat retention and energy efficiency.
Step 3: Building the Kiln Frame
With all the materials gathered, it’s time to start building the kiln frame. Begin by constructing the base using the lumber and plywood, ensuring it is level and stable. Next, assemble the walls and roof, securing them with screws or nails. Take care to leave openings for the doors and vents, which will allow for proper airflow and temperature control.
Once the frame is complete, install the insulation material, making sure to cover all the walls, roof, and floor. This step is crucial for maintaining a consistent and controlled environment inside the kiln. Finally, add the vapor barrier on top of the insulation, ensuring it is properly sealed to prevent moisture from escaping.
Step 4: Installing the Heat Source and Controls
After the kiln frame is built and insulated, it’s time to install the heat source and controls. If you are using a solar kiln, position the solar panel system in a location that receives maximum sunlight. For other types of kilns, install the chosen heat source, such as a heater or dehumidifier, according to the manufacturer’s instructions.
Additionally, you will need to install temperature and humidity controls to monitor and regulate the drying process. These can be manual or automated systems, depending on your preference and budget. Ensure that the controls are properly calibrated and functioning before proceeding to the next step.
Step 5: Testing and Fine-tuning
With the kiln fully constructed, it’s time to test it and make any necessary adjustments. Start by running a test batch of wood through the drying process, monitoring the temperature, humidity, and drying time. Make note of any issues or inconsistencies and make the necessary changes to improve the kiln’s performance.
It may take a few trial runs to achieve optimal results, so be patient and willing to make adjustments as needed. Regularly monitor and maintain your kiln to ensure it is operating efficiently and providing the desired drying conditions for your wood.
Step 6: Using Your Kiln
Once your kiln is fully operational and producing satisfactory results, you can start using it to dry and cure your wood. Remember to follow proper safety precautions when loading and unloading wood, as well as when operating the kiln. Avoid overloading the kiln and ensure proper airflow to achieve consistent and thorough drying.
Regularly inspect and maintain your kiln to prolong its lifespan and optimize its performance. Clean the interior, replace any worn-out parts, and address any issues promptly to prevent further damage. With proper care and maintenance, your kiln can provide you with years of reliable wood drying.
Frequently Asked Questions
Here are some frequently asked questions about how to build a kiln for wood:
Q: What materials do I need to build a kiln for wood?
To build a kiln for wood, you will need the following materials:
– Concrete blocks or bricks to construct the walls of the kiln.
– Metal sheets or aluminum foil to create a roof for the kiln.
– Insulation material such as ceramic fiber blanket or refractory bricks to line the interior of the kiln.
– A heating source, such as a wood-burning stove or gas burner.
– Ventilation system, including vents and fans to regulate airflow.
– Thermometers or temperature sensors to monitor the kiln’s temperature.
It is important to ensure that all materials used are heat-resistant and suitable for the purpose of building a kiln for wood.
Q: What are the key steps involved in building a kiln for wood?
Building a kiln for wood involves several key steps, including:
1. Planning and designing the kiln: Determine the size and capacity of the kiln based on your wood drying needs and available space.
2. Constructing the kiln structure: Lay the foundation and build the walls using concrete blocks or bricks, ensuring proper insulation.
3. Installing the roof: Use metal sheets or aluminum foil to create a roof that is both watertight and allows for proper ventilation.
4. Adding insulation: Line the interior of the kiln with insulation material, such as ceramic fiber blanket or refractory bricks, to ensure efficient heat retention.
5. Installing the heating source and ventilation system: Place the wood-burning stove or gas burner inside the kiln and set up the ventilation system to regulate airflow.
6. Testing and fine-tuning: Before using the kiln, test its functionality and make any necessary adjustments to ensure optimal performance.
Q: How much space do I need to build a kiln for wood?
The amount of space needed to build a kiln for wood depends on the desired capacity of the kiln and the size of the wood pieces you intend to dry. Generally, a small-scale kiln can be constructed in an area as small as a few square meters, while larger kilns may require several hundred square meters of space. It is important to consider both the footprint of the kiln structure and the surrounding area for safe operation and proper ventilation.
Q: How long does it take to build a kiln for wood?
The time required to build a kiln for wood can vary depending on factors such as the complexity of the design, the availability of materials, and the level of expertise of the builder. On average, it may take several weeks to a few months to complete the construction of a wood kiln. This includes the time needed for planning, acquiring materials, and executing the necessary steps involved in building a functional kiln.
Q: Are there any safety precautions I should take when building a kiln for wood?
Yes, there are several safety precautions to consider when building a kiln for wood. These include:
– Ensuring proper ventilation to prevent the buildup of harmful gases or smoke.
– Using heat-resistant materials that are suitable for high temperatures.
– Following local building codes and regulations to ensure safe construction.
– Installing appropriate fire safety measures, such as fire extinguishers and smoke detectors.
– Taking necessary precautions when working with tools and equipment, including wearing protective gear.
– Seeking professional guidance or consulting with experts if needed, especially for complex kiln designs or installations.
It is crucial to prioritize safety throughout the entire process of building and operating a kiln for wood to minimize risks and ensure a safe working environment.
Remember, patience and attention to detail are key when building a kiln for wood. Take the time to thoroughly research and understand the principles involved, and don’t hesitate to seek advice from experienced woodworkers or professionals in the field. With dedication and a passion for woodworking, you can create a kiln that not only meets your needs but also allows you to enhance your craft and achieve the desired results. So, roll up your sleeves, gather your materials, and get ready to embark on a woodworking adventure with your very own homemade kiln. Happy building!
- How to Design Wood Carving - May 7, 2024
- How to Carve Wood - May 7, 2024
- How to Remove Cat Urine From Wood Furniture - May 7, 2024