Have you ever marveled at the intricately carved letters on wooden signs, furniture, or even personal keepsakes? Engraving letters into wood is not only a timeless art form, but it also adds a touch of elegance and personalization to any wooden piece. Whether you are a seasoned woodworker or a beginner looking to explore a new craft, learning how to engrave letters into wood is a skill that will undoubtedly enhance your creative repertoire.
In this comprehensive guide, we will delve into the art of wood engraving, uncovering the essential tools, techniques, and tips needed to master this unique craft. From understanding the different types of wood and choosing the right tools, to mastering the art of lettering and achieving professional-looking results, we will leave no stone unturned. So, whether you aspire to create custom wooden signs for your business, personalize a gift for a loved one, or simply want to add a touch of artistic flair to your woodworking projects, join us on this journey as we unravel the secrets of engraving letters into wood.
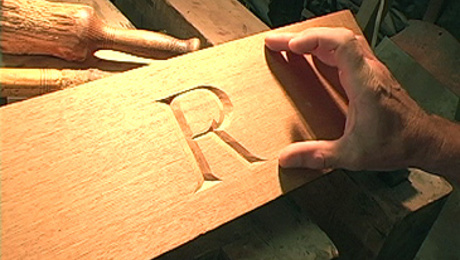
How to Engrave Letters into Wood:
- Choose the wood and lettering style you want for your project.
- Prepare the wood surface by sanding it smooth.
- Create a template for your letters using stencils or a computer program.
- Transfer the template onto the wood using carbon paper.
- Use a wood engraving tool or a wood burning pen to carefully trace the letters.
- Once finished, clean any residue and apply a finish or sealant to protect the wood.

How to Engrave Letters into Wood
In this informative article, we will guide you step by step on how to engrave letters into wood. Whether you want to add a personal touch to a wooden gift or create custom signs, engraving letters into wood can be a rewarding skill to learn. Follow these instructions carefully, and with practice, you’ll be able to achieve professional-looking results.
Step 1: Gather the necessary materials
Before you begin, make sure you have all the materials you need. This includes:
- A piece of wood
- Engraving tools (such as a woodburning pen or a chisel)
- Masking tape
- Pencil and ruler
- Sandpaper
- Protective gear (such as safety goggles and gloves)
Once you have gathered these materials, you are ready to start engraving.
Step 2: Prepare the wood surface
Begin by preparing the wood surface. If necessary, sand down the wood to create a smooth and even surface. This will help ensure clean and precise engraving.

Next, use a pencil and ruler to mark the area where you want to engrave the letters. You can lightly sketch the letters or use stencils for more precise designs. Once you are satisfied with the positioning, secure the wood with masking tape to prevent any movement during the engraving process.
Step 3: Engrave the letters
Now comes the actual engraving process. Depending on the tools you have chosen, follow these guidelines:
If you are using a woodburning pen, plug it in and let it heat up according to the manufacturer’s instructions. Once heated, carefully trace over the pencil markings with the pen, applying gentle and consistent pressure. Take your time and work slowly to ensure clean lines.
If you are using a chisel, select a chisel tip that matches the width of the letters you want to engrave. Hold the chisel at a slight angle and use a mallet to tap it gently into the wood along the pencil lines. Again, take your time and work carefully to avoid any mistakes.
Step 4: Finishing touches
After you have engraved all the letters, remove the masking tape and inspect your work. If there are any rough edges or imperfections, use sandpaper to smooth them out. You can also apply a wood finish or a coat of varnish to protect the engraved letters and enhance the overall appearance.
Remember, practice makes perfect. Don’t be discouraged if your first attempts are not flawless. With time and patience, you will improve your engraving skills and create stunning woodwork.
Step 5: Maintenance and safety tips
Proper maintenance of your engraving tools is essential for longevity and optimal performance. Clean the tools after each use and store them in a safe and dry place. Additionally, always wear protective gear, such as safety goggles and gloves, to prevent any accidents or injuries while engraving.
Now that you have learned the step-by-step process of engraving letters into wood, you can explore various projects and create personalized wooden items. Enjoy the process and let your creativity shine!
Frequently Asked Questions
Here are some commonly asked questions about how to engrave letters into wood:
Question 1: What tools do I need to engrave letters into wood?
To engrave letters into wood, you will need a few essential tools. Firstly, you’ll need a wood engraving tool or a woodburning pen, which is used to carve or burn the letters into the wood surface. Additionally, you may need a stencil or transfer paper to ensure accurate letter placement. It’s also recommended to have sandpaper or a sanding block to smooth the wood surface before and after engraving. Lastly, protective gear such as safety goggles and a dust mask are important to keep you safe while working.
Keep in mind that the specific tools required may vary depending on the complexity of the project and personal preference. It’s always a good idea to research and consult with experienced wood engravers for specific tool recommendations.
Question 2: How do I prepare the wood surface for engraving letters?
Preparing the wood surface is an important step before engraving letters. Start by selecting a smooth and clean piece of wood. If necessary, sand the wood surface using sandpaper or a sanding block to ensure it’s free of any roughness or imperfections. This will allow for better letter engraving and a more professional finish.
Once the wood surface is smooth, you can use a pencil or a stencil to lightly mark the desired placement of the letters. This will serve as a guide when engraving. If you’re using a stencil, make sure it’s securely attached to the wood surface to prevent any movement during the engraving process. Taking the time to properly prepare the wood surface will result in more accurate and visually appealing letter engraving.
Question 3: What techniques can I use to engrave letters into wood?
There are several techniques you can use to engrave letters into wood. One common technique is hand engraving, where you use a wood engraving tool or a woodburning pen to manually carve or burn the letters into the wood surface. This technique allows for more precision and control, but it requires some practice to master.
Another technique is using a laser engraver, which is a machine that uses a laser beam to etch the letters onto the wood surface. This technique is faster and more precise, but it may require access to specialized equipment.
Question 4: How can I achieve even and consistent letter depth while engraving?
Achieving even and consistent letter depth is crucial for a professional-looking engraving. To achieve this, it’s recommended to practice your engraving technique on a scrap piece of wood before working on your final project. This will help you get a feel for the pressure and speed required to create consistent letter depth.
When engraving, it’s important to maintain a steady hand and apply consistent pressure. Avoid rushing and take your time to ensure each letter is engraved with the same depth. If needed, you can make multiple passes over each letter to achieve the desired depth.
Question 5: How do I finish and protect the engraved wood surface?
Once you have finished engraving the letters into the wood, it’s important to protect the surface and enhance its appearance. Start by using sandpaper or a sanding block to smooth any rough edges or uneven surfaces created during the engraving process.
After sanding, you can apply a wood finish or sealant to protect the engraved wood surface. There are various options available, such as clear varnish, polyurethane, or wood oil. Apply the chosen finish according to the manufacturer’s instructions, ensuring even coverage. This will help protect the wood from moisture, UV rays, and other potential damage while giving it a polished look.
Engraving letters into wood allows for endless creative possibilities, whether it’s adding a custom monogram to a wooden plaque or personalizing a gift for a loved one. The satisfaction of seeing your own handiwork come to life is truly rewarding. So, don’t be afraid to take the plunge and explore the art of wood engraving. With practice and dedication, you’ll soon be able to create stunning pieces that showcase your craftsmanship and attention to detail. So, grab your tools, gather your supplies, and let your imagination run wild as you embark on this exciting journey of wood engraving.
- How to Make Wooden Pyramid Puzzle - May 13, 2024
- How to Solve Wooden Pyramid Puzzle - May 13, 2024
- How to Wooden Puzzle - May 13, 2024