Are you tired of walking on uneven, creaky floors that make your home feel unstable? Do you dream of a smooth, level surface under your feet? If so, you’re in luck! In this guide, we will explore the art of leveling a floor with plywood, a technique that can transform your space and provide a solid foundation for all your activities.
Whether you’re planning to install new flooring, lay down tiles, or simply want a more stable surface, leveling a floor with plywood is a practical and cost-effective solution. This method involves adding layers of plywood to create an even base, effectively eliminating any dips or bumps that may be present. Not only will this improve the aesthetic appeal of your home, but it will also enhance its functionality and durability. So, if you’re ready to say goodbye to the aggravation of uneven floors, join us as we dive into the world of plywood leveling and unlock the secrets to a balanced, harmonious living space.
How to Level a Floor with Plywood:
- Remove any existing flooring and clean the subfloor.
- Measure the thickness needed for leveling and cut plywood sheets accordingly.
- Place the plywood sheets over the subfloor, ensuring they are snugly fitted.
- Secure the plywood sheets to the subfloor using screws or nails.
- Fill any gaps between the plywood sheets with wood filler and sand them smooth.
- Install new flooring over the leveled plywood subfloor.
How to Level a Floor with Plywood
In this informative guide, we will take you through the step-by-step process of leveling a floor using plywood. Whether you are planning to install new flooring or experiencing uneven surfaces, this method can help you achieve a smooth and level base. With the right tools and techniques, you can easily tackle this project and create a sturdy foundation for your floors. Read on to learn more about how to level a floor with plywood.
Gather the Necessary Tools and Materials
Before you begin leveling your floor with plywood, it is essential to gather all the necessary tools and materials. This will ensure that you have everything you need to complete the job efficiently. Here’s a list of items you will need:
- Plywood sheets
- Measuring tape
- Straightedge or level
- Saw (circular saw or jigsaw)
- Nails or screws
- Hammer or drill
- Wood shims
- Adhesive (construction adhesive or flooring adhesive)
- Protective gear (gloves, safety goggles)
Once you have gathered all the necessary tools and materials, you can proceed to the next steps of leveling your floor with plywood.
Measure and Prepare the Floor
Start by measuring the area that needs leveling. Use a measuring tape to determine the dimensions of the uneven surface. This will help you determine the amount of plywood you will need to cover the area adequately.

Next, thoroughly clean the floor, removing any debris or dirt. Make sure the surface is smooth and free from any obstructions that could affect the plywood installation. If there are any loose or damaged floorboards, repair or replace them before proceeding.
Once the floor is clean and prepared, you can move on to the next steps of the leveling process. Remember to wear protective gear, such as gloves and safety goggles, to ensure your safety throughout the project.
Install the Plywood Sheets
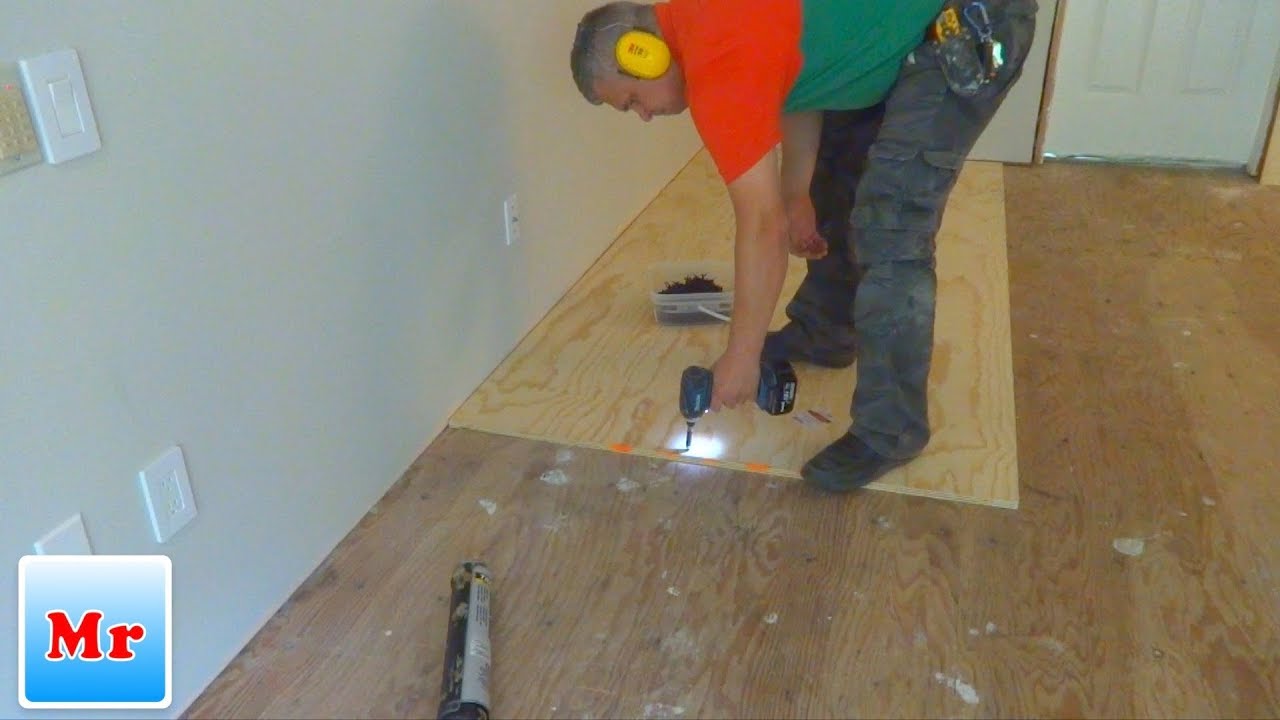
Now it’s time to install the plywood sheets. Start by cutting the sheets to fit the dimensions of the area you measured earlier. Use a straightedge or level as a guide to ensure accurate cuts. If necessary, use a circular saw or jigsaw to trim the plywood to the correct size.
Place the cut plywood sheets on the floor, starting from one corner of the room. Make sure the edges of the plywood are aligned with the walls or existing floorboards. If there are gaps between the plywood sheets, use wood shims to fill them and create a level surface.
Secure the plywood sheets to the subfloor by nailing or screwing them down. Position the nails or screws along the edges and in the center of each sheet. This will help prevent any movement or shifting of the plywood over time.
Finally, apply adhesive to the underside of the plywood sheets before securing them in place. This will provide additional stability and prevent squeaking or creaking sounds when walking on the floor.
Once you have installed all the plywood sheets, allow the adhesive to dry completely before proceeding with any further flooring installation or renovations.
Finishing Touches
After the adhesive has dried, you can proceed with the finishing touches to ensure a smooth and level floor surface. Use a sander or sandpaper to smooth out any rough edges or imperfections on the plywood. This will create a seamless transition between the plywood and the rest of the flooring.
Inspect the floor for any remaining gaps or uneven areas. If necessary, add additional wood shims or plywood pieces to level out any discrepancies. Once you are satisfied with the results, you can proceed with installing your desired flooring material over the leveled plywood surface.
Remember to follow the manufacturer’s instructions for installing the specific type of flooring you have chosen. This will ensure a proper and long-lasting installation.
By following these step-by-step instructions, you can successfully level a floor with plywood. This method provides a cost-effective solution to uneven surfaces and creates a stable foundation for your flooring. Remember to take your time, measure accurately, and use the proper tools for the job. With patience and attention to detail, you can achieve a level and professional-looking floor.
Frequently Asked Questions
Here are some commonly asked questions about how to level a floor with plywood:
Q: What is the purpose of leveling a floor with plywood?
A: Leveling a floor with plywood is done to create a smooth and even surface for the installation of various types of flooring materials. Uneven floors can cause problems such as uneven tile or hardwood installation, squeaking, and premature wear and tear. Plywood is used as a leveling material because it is strong, durable, and can easily be cut and shaped to fit the floor’s contours.
By using plywood to level the floor, you can ensure that your new flooring will be installed properly and will last longer, providing a stable and comfortable surface for your daily activities.
Q: How do I determine if my floor needs leveling with plywood?
A: To determine if your floor needs leveling with plywood, you can perform a simple visual inspection. Look for any noticeable dips, humps, or uneven areas on the floor’s surface. You can also place a level tool on different areas of the floor to check for any significant variations. If you notice any irregularities, it is likely that the floor needs to be leveled with plywood.
It is important to note that in some cases, floor leveling may not be necessary. If the irregularities are minimal and within the acceptable tolerance level for your chosen flooring material, you may be able to proceed with the installation without leveling the floor.
Q: What materials and tools do I need to level a floor with plywood?
A: To level a floor with plywood, you will need the following materials and tools:
– Plywood sheets of appropriate thickness
– Circular saw or jigsaw for cutting the plywood
– Tape measure and pencil for accurate measurements
– Drill and screws for securing the plywood to the subfloor
– Level tool for checking the floor’s levelness
– Construction adhesive for added stability (optional)
Make sure to choose plywood that is suitable for floor leveling, such as underlayment-grade plywood, which is specifically designed for this purpose.
Q: What is the process for leveling a floor with plywood?
A: The process for leveling a floor with plywood involves the following steps:
1. Prepare the subfloor: Remove any existing flooring materials, nails, and debris from the subfloor. Clean the surface thoroughly and make sure it is dry and free of any moisture or mold.
2. Measure and cut the plywood: Measure the dimensions of the floor area that needs leveling. Transfer the measurements to the plywood sheets and cut them to fit using a circular saw or jigsaw.
3. Install the plywood: Lay the plywood sheets on the subfloor, starting from one corner of the room. Use a level tool to ensure that the plywood is level and adjust if necessary. Secure the plywood to the subfloor using screws, spacing them appropriately.
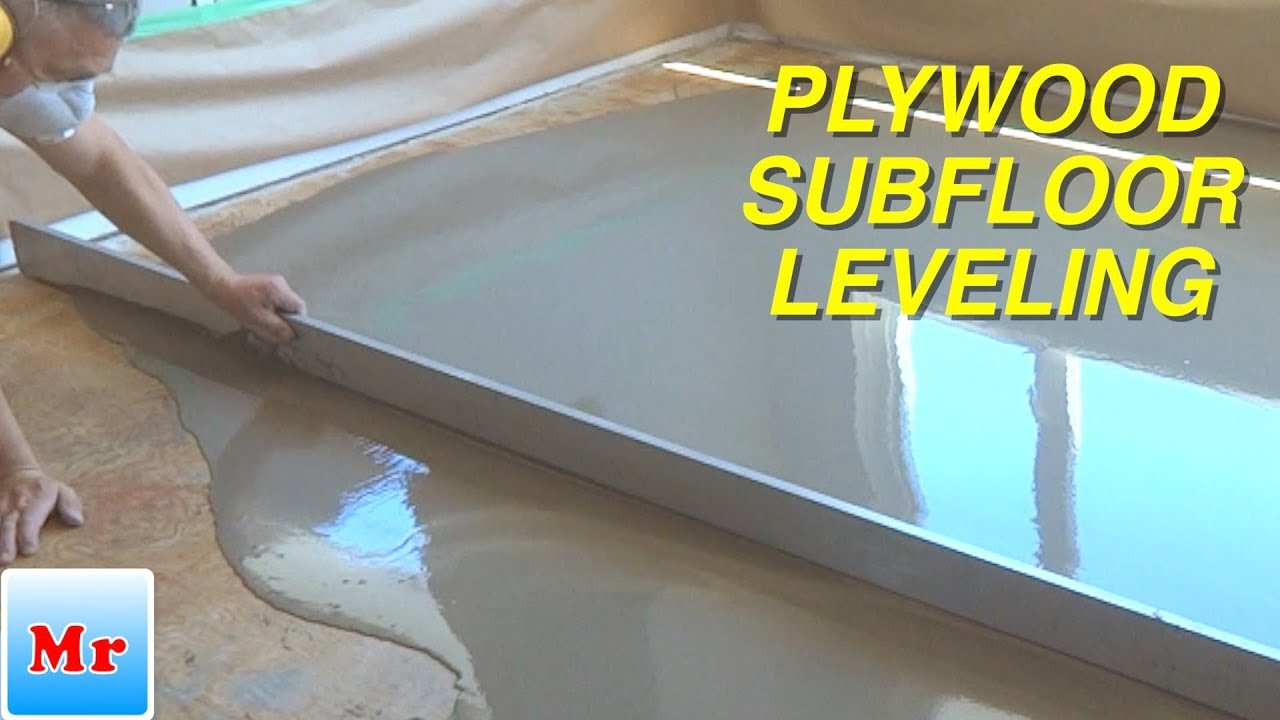
4. Fill gaps and seams: Fill any gaps or seams between the plywood sheets with a suitable floor filler or leveling compound. Smooth the surface with a putty knife and let it dry according to the manufacturer’s instructions.
5. Sand and finish: Once the filler is dry, sand the plywood surface to create a smooth and even finish. Remove any dust or debris and apply a suitable primer or sealer before installing the final flooring material.
Q: Can I level a floor with plywood myself, or should I hire a professional?
A: Leveling a floor with plywood can be a DIY project if you have the necessary skills and tools. However, it does require some level of expertise, especially when it comes to accurately measuring, cutting, and installing the plywood. If you are confident in your abilities and have previous experience with similar projects, you can attempt to level the floor yourself.
On the other hand, if you are unsure or lack the necessary skills, it is advisable to hire a professional flooring contractor. They have the expertise and equipment to ensure that the floor is properly leveled, minimizing the risk of errors and potential issues in the future.
By investing the time and effort into properly leveling your floor, you can ensure a solid foundation for any future renovations or improvements. Not only will this enhance the overall appearance of your space, but it will also provide a more comfortable and durable surface for everyday use. So why wait? Grab your tools, follow the guidelines provided, and get ready to enjoy a level and flawless floor that will stand the test of time.
- How to Know Wood Is Dry - May 4, 2024
- How to Season Wood Uk - May 4, 2024
- How to Make Good Wood - May 4, 2024