Are you planning to install new flooring in your home or office? If so, one crucial step to ensure a smooth and durable result is to level the wood subfloor. A level subfloor not only provides a stable foundation for your flooring but also prevents any future issues such as cracks, squeaks, or uneven surfaces. In this guide, we will explore the step-by-step process of leveling a wood subfloor, equipping you with the knowledge and skills to achieve professional-quality results.
Whether you are a seasoned DIY enthusiast or a novice looking to tackle your first home improvement project, this comprehensive guide will walk you through each stage of the leveling process. From assessing the condition of your subfloor to selecting the appropriate leveling materials and techniques, we will cover it all. With our easy-to-follow instructions and helpful tips, you will have the confidence to transform your uneven and problematic wood subfloor into a smooth, level surface that is ready for the flooring of your choice. So, let’s dive in and discover the secrets of achieving a flawless subfloor for your next flooring installation!
How to Level a Wood Subfloor
- Remove any existing flooring and debris from the subfloor.
- Inspect the subfloor for any loose or damaged boards and replace them.
- Use a long straightedge to check for any low or high spots on the subfloor.
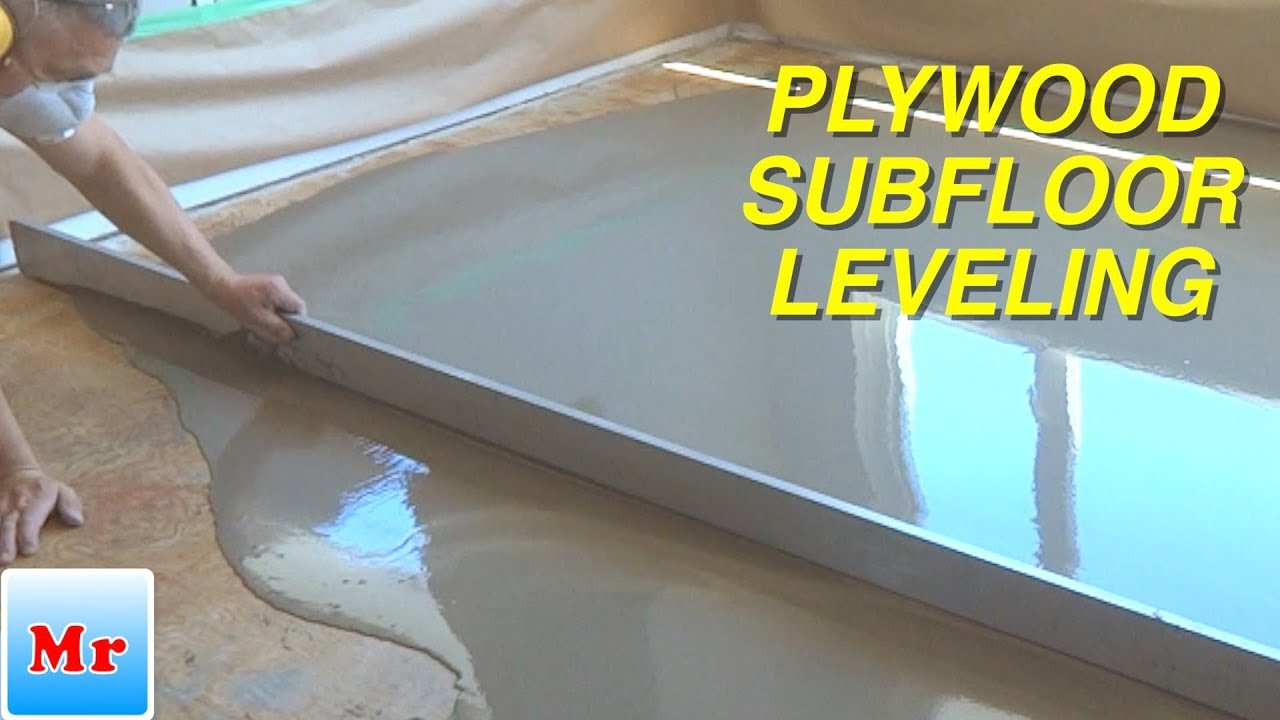
- If there are low spots, fill them with a self-leveling compound according to the manufacturer’s instructions.
- If there are high spots, sand them down until the subfloor is level.
- Once the subfloor is level, sweep or vacuum it to remove any dust or debris.
- You can now proceed with installing your new flooring on the level wood subfloor.
How to Level a Wood Subfloor: A Step-by-Step Guide
In order to ensure a smooth and even surface for your flooring installation, it is essential to properly level your wood subfloor. Uneven subfloors can lead to a variety of problems, such as squeaky floors, gaps in the flooring, and premature wear and tear. By following these step-by-step instructions, you can successfully level your wood subfloor and create a solid foundation for your new flooring.
Step 1: Inspect the Subfloor
Before you begin leveling the subfloor, it is important to thoroughly inspect it for any signs of damage or decay. Check for loose or squeaky boards, water damage, or any other issues that may need to be addressed before proceeding. If you notice any major problems, it may be necessary to consult a professional before attempting to level the subfloor.
Once you have ensured that the subfloor is in good condition, remove any existing flooring, such as carpet or vinyl, and thoroughly clean the surface. This will allow for better adhesion of any leveling compound or adhesive that you will be using.
Step 2: Gather the Necessary Tools and Materials
Before you can begin leveling the subfloor, make sure you have all the tools and materials necessary for the job. This may include a pry bar, hammer, circular saw, measuring tape, level, drill, screws, and a trowel. Additionally, you will need a leveling compound or self-leveling underlayment, which can be purchased at most home improvement stores.
Be sure to read the manufacturer’s instructions for the leveling compound or underlayment you will be using, as different products may have specific requirements or recommendations for application.
Step 3: Start Leveling the Subfloor

With the necessary tools and materials ready, you can now start leveling the subfloor. Begin by identifying any low spots or areas that need to be raised. Use a level to determine the extent of the unevenness.
If the subfloor has minor imperfections, you may be able to use a leveling compound or self-leveling underlayment to fill in the low areas. Follow the manufacturer’s instructions for mixing the compound and apply it to the subfloor using a trowel. Use a level to ensure the compound is spread evenly and to the desired thickness.
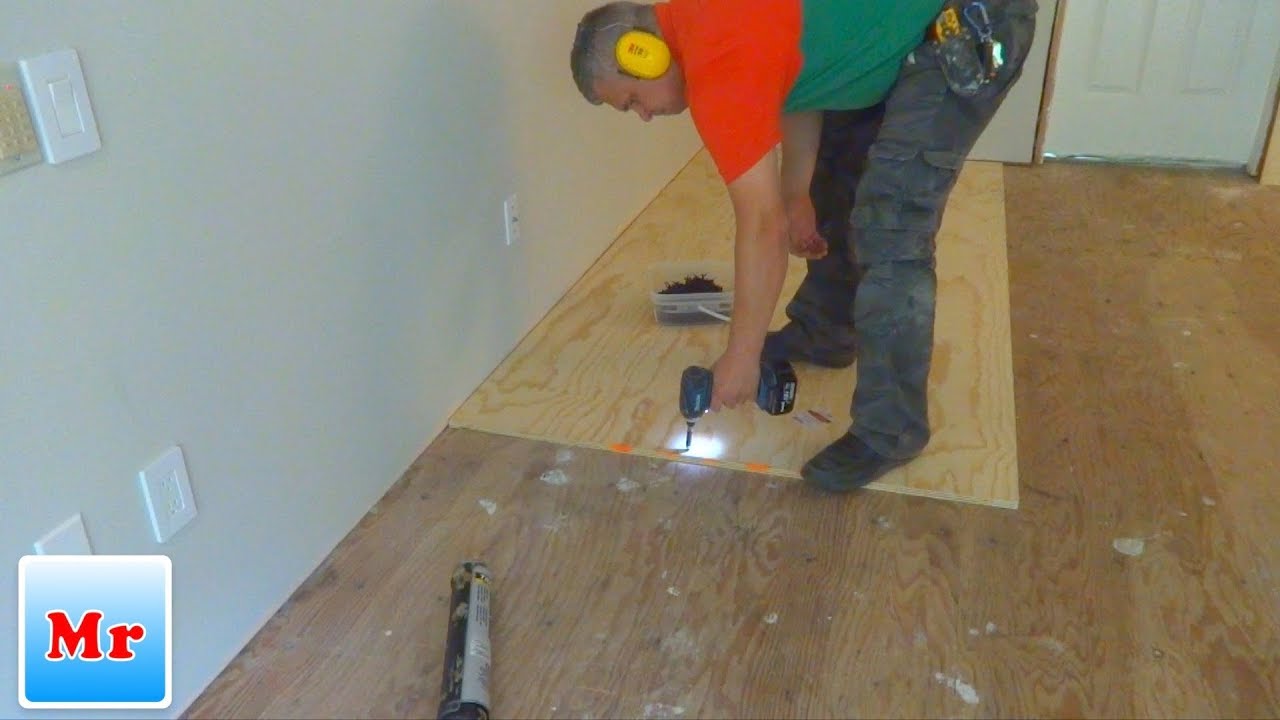
For larger or more significant unevenness, you may need to use shims or additional layers of plywood to level the subfloor. Cut the plywood to fit the area that needs to be raised and secure it to the existing subfloor using screws or nails. Make sure the plywood is level by using a level before moving on to the next section.
Continue this process until the entire subfloor is level and free of any major irregularities. Allow the leveling compound or underlayment to fully cure before proceeding with the installation of your new flooring.
Step 4: Install New Flooring
Once the subfloor is level and completely dry, you can proceed with the installation of your new flooring. Follow the manufacturer’s instructions for your specific type of flooring, whether it be hardwood, laminate, tile, or another material.
Ensure that you have the necessary tools and materials for the flooring installation, and carefully follow the recommended installation procedure. Take your time to ensure that each piece of flooring is properly aligned and securely fastened to the subfloor.
After the installation is complete, inspect the flooring for any gaps or unevenness. If necessary, make any necessary adjustments or repairs to ensure a flawless finish.
Step 5: Maintain the Leveled Subfloor
Once your new flooring is installed, it is important to properly maintain the leveled subfloor to ensure its longevity. Regularly clean the floor using appropriate cleaning products and methods for your specific flooring material. Avoid excessive moisture or water damage, and promptly address any issues or repairs that may arise.
By following these steps and maintaining your leveled subfloor, you can enjoy a sturdy and well-installed flooring for years to come.
Frequently Asked Questions
In this section, you will find answers to common questions about how to level a wood subfloor.
Q: Why is it important to level a wood subfloor?
Leveling a wood subfloor is important for several reasons. First, it provides a stable and even surface for the installation of flooring materials such as hardwood, laminate, or tile. A level subfloor helps prevent the flooring from shifting, cracking, or developing other issues over time. Additionally, leveling the subfloor helps to ensure that doors and cabinets will open and close properly, without any interference caused by an uneven surface.
Moreover, a level subfloor is crucial for the overall aesthetics of the space. A flat and smooth surface creates a more visually appealing and professional-looking finished floor. It also makes it easier to lay down floor coverings evenly, reducing the risk of gaps or visible imperfections.
Q: How can I determine if my wood subfloor needs leveling?
There are a few signs that may indicate the need to level your wood subfloor. One of the most obvious signs is if you notice any noticeable slopes or dips when walking across the floor. You can also use a long level or a straight edge to check for any unevenness. If the level indicates variations of more than 1/8 inch over a 6-foot span, it is likely that your subfloor needs to be leveled.
Another way to check is by observing the behavior of your flooring. If you notice any creaking sounds, bouncing, or movement when you walk on the floor, it could be an indication of an uneven subfloor. Lastly, if you are planning to install a new flooring material and the manufacturer’s instructions recommend a level subfloor, it is important to ensure that your wood subfloor meets those requirements.
Q: What are the common methods for leveling a wood subfloor?
There are a few common methods for leveling a wood subfloor. One method is using self-leveling compound, which is a cement-based material that can be poured over the subfloor to fill in low areas and create a level surface. This method is suitable for minor leveling jobs.
Another method is using shims or leveling strips. This involves placing thin strips of wood or plastic shims under the subfloor to raise it and create a level surface. This method is typically used for localized areas that need to be leveled.
Q: Can I level a wood subfloor myself, or should I hire a professional?
Leveling a wood subfloor can be a DIY project, depending on the extent of the leveling required. Minor leveling jobs can often be done by homeowners with some DIY experience. However, if the subfloor has significant issues or if you are unsure about the process, it is advisable to hire a professional. A professional will have the expertise and tools necessary to ensure a properly leveled subfloor.
Additionally, if you are planning to install certain types of flooring, such as tile, it may be necessary to hire a professional to ensure the subfloor meets the specific requirements of the flooring manufacturer.
Q: Are there any precautions I should take when leveling a wood subfloor?
When leveling a wood subfloor, there are a few precautions you should keep in mind. First, ensure that the subfloor is clean and free of any debris before beginning the leveling process. This will help the leveling materials adhere properly and ensure a smooth finish.
It is also important to follow the manufacturer’s instructions for any leveling products you are using. This includes mixing ratios, application techniques, and drying times. Failure to follow these instructions could result in an uneven or unstable subfloor.
Remember, a level subfloor not only enhances the aesthetics of your space but also prevents future problems such as squeaks, cracks, or uneven wear on your flooring. Whether you’re preparing for a new carpet, hardwood, laminate, or tile, investing the time and effort into leveling your wood subfloor will yield long-lasting results. So, put on your DIY hat, gather your tools, and get ready to transform your space by mastering the art of leveling a wood subfloor. Your feet (and your floors) will thank you for it!
- How to Remove Wood Vinyl - April 15, 2024
- How to Remove Tape From Hardwood Floor - April 15, 2024
- How to Remove Floor Adhesive From Wood Subfloor - April 15, 2024