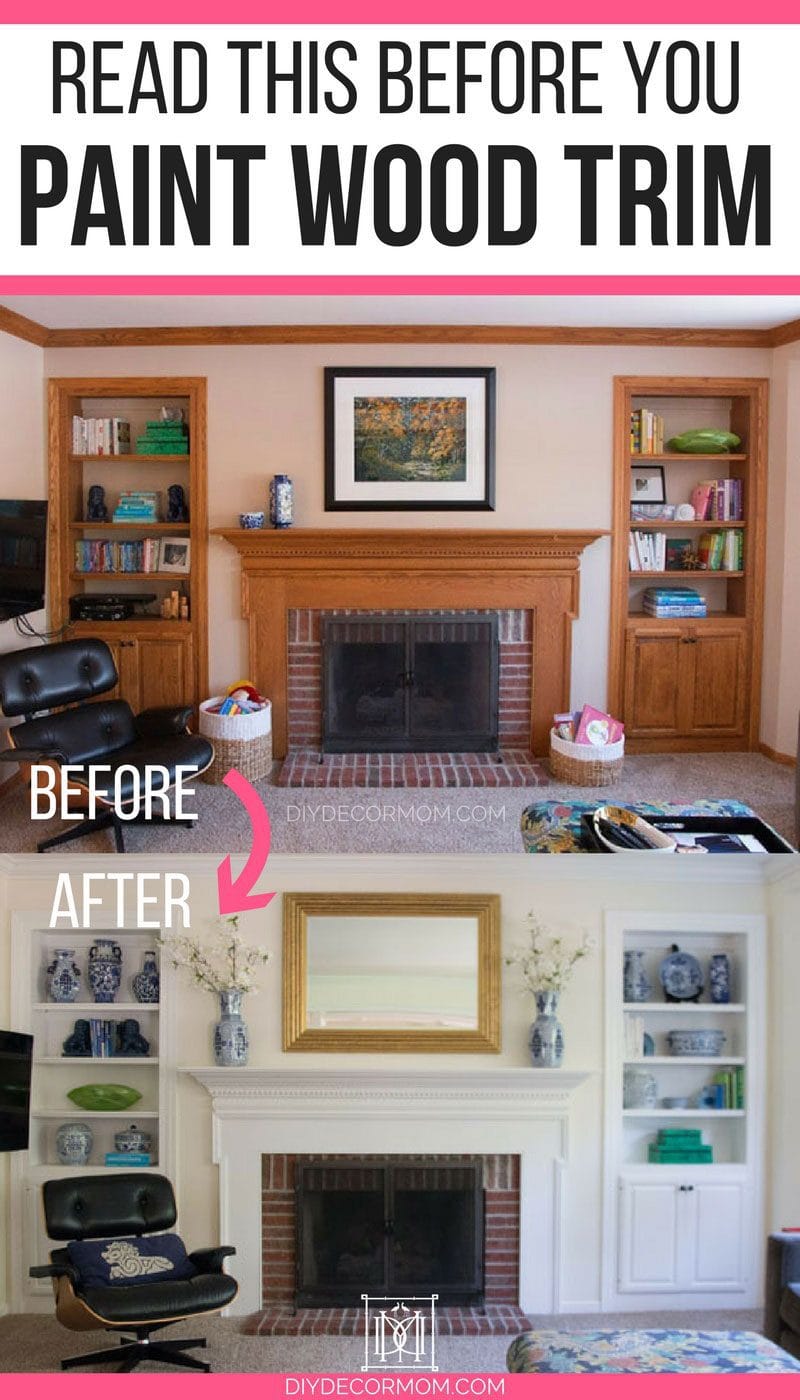
Are you tired of the dull and outdated look of your wood trim? Do you dream of a fresh and modern transformation that will breathe new life into your space? Look no further! In this guide, we will explore the art of painting wood trim white, a simple yet effective technique that can instantly elevate the aesthetic appeal of any room. Whether you’re a novice DIY enthusiast or a seasoned homeowner looking to refresh your interior design, this step-by-step tutorial will equip you with all the knowledge and tools you need to achieve a flawless and professional finish. Get ready to unlock the secrets of transforming your wood trim into a stunning white feature that will leave your guests in awe.
Painting wood trim white is a versatile and timeless choice that can brighten up any space, making it feel more spacious and contemporary. It offers a clean and crisp look that complements a variety of interior styles, from traditional to modern. However, achieving a flawless white finish on wood trim requires careful preparation and execution. In this guide, we will walk you through the entire process, from selecting the right materials and tools to properly prepping the surface, applying primer and paint, and achieving a smooth and durable finish. Whether you’re working with stained or previously painted wood trim, we’ve got you covered with expert tips and techniques to ensure a professional result that will stand the test of time. Get ready to transform your space with the elegance and sophistication of white-painted wood trim.
- Prepare the surface by cleaning it thoroughly and sanding any rough areas.
- Apply a primer to the wood trim to ensure better adhesion of the paint.
- Choose a high-quality white paint suitable for wood surfaces.
- Using a brush or roller, apply the first coat of paint to the wood trim, following the grain.
- Allow the paint to dry completely before applying a second coat.
- Inspect the painted trim for any uneven areas and touch up if necessary.
- Once the paint is fully dry, remove any tape or protective coverings.
Introduction
Painting wood trim white is a great way to freshen up the look of your home. Whether you are looking to update the trim in your living room, bedroom, or any other space, this step-by-step guide will provide you with all the information you need to successfully complete the project. With a few tools and some patience, you can transform your wood trim into a clean and modern feature in your home.
Step 1: Preparation
Before you start painting, it is important to properly prepare the wood trim. Start by cleaning the trim with a mild detergent and water to remove any dirt or grime. Next, use sandpaper to smooth out any rough spots or imperfections on the surface. Wipe away any dust or debris with a clean cloth before moving on to the next step.
After cleaning and sanding, it is crucial to protect the surrounding areas from paint splatters. Cover the floor and furniture with drop cloths or plastic sheets. Use painter’s tape to tape off any areas that you do not want to be painted, such as windows or door frames.
Step 2: Priming
Applying a primer is essential to ensure proper adhesion of the paint to the wood trim. Choose a high-quality primer that is specifically designed for wood surfaces. Using a brush or a roller, apply an even coat of primer to the entire surface of the trim. Make sure to follow the manufacturer’s instructions for drying time.
Priming not only helps the paint adhere better but also helps to prevent any stains or discoloration from bleeding through the paint. It creates a smooth and even base for the paint application, ensuring a professional-looking finish.
Step 3: Painting

Once the primer has dried, you are ready to start painting. Select a high-quality latex paint in the shade of white you desire. Using a brush or a roller, apply the paint in smooth and even strokes, following the direction of the wood grain. Start from one end and work your way to the other, making sure not to leave any drips or brush marks.
Apply multiple thin coats of paint rather than one thick coat to achieve a more even and durable finish. Allow each coat to dry completely before applying the next. This will help prevent any smudging or smearing of the paint.
Step 4: Finishing Touches
After the final coat of paint has dried, inspect the wood trim for any imperfections or touch-ups that may be needed. Use a fine-grit sandpaper to smooth out any rough areas or drips. Wipe away any dust with a clean cloth.
For added protection and durability, consider applying a clear top coat or sealer to the painted wood trim. This will help protect it from scratches and stains, ensuring a longer-lasting finish. Follow the manufacturer’s instructions for application and drying time.
Conclusion
Painting wood trim white can completely transform the look of your home. With the right tools, proper preparation, and a systematic approach, you can achieve professional-looking results. Remember, patience is key during the process, and taking your time will ensure a flawless finish. So go ahead, give your wood trim a fresh new look with a coat of white paint!
Frequently Asked Questions
Below are some commonly asked questions about how to paint wood trim white:
Question 1: What materials do I need to paint wood trim white?
To paint wood trim white, you will need the following materials:
1. Sandpaper or sanding block
2. Primer
3. Paintbrushes
4. Painter’s tape
5. Drop cloths or plastic sheets to protect the surrounding areas
6. White paint specifically formulated for wood surfaces
7. Stir sticks
8. Paint tray or bucket
Question 2: How do I prepare the wood trim for painting?
Before painting the wood trim white, it is important to properly prepare the surface. Follow these steps:
1. Remove any existing paint or finish from the wood trim by sanding it with sandpaper or a sanding block. This will create a rough surface for better paint adhesion.
2. Clean the trim using a damp cloth to remove any dust or debris.
3. Apply painter’s tape to protect the walls or other adjacent surfaces from accidental paint splatters.
4. Lay down drop cloths or plastic sheets to protect the floor or furniture.
Question 3: Should I use a primer before painting wood trim white?
Using a primer before painting wood trim white is highly recommended. A primer helps to create a smooth and even surface for the paint, improves paint adhesion, and enhances the durability of the final finish. It also helps to block any stains or discoloration that may bleed through the paint.
Apply a thin and even coat of primer to the wood trim, following the manufacturer’s instructions. Allow the primer to dry completely before proceeding with the paint.
Question 4: How do I paint wood trim white?
Follow these steps to paint wood trim white:
1. Stir the white paint thoroughly to ensure an even consistency.
2. Dip the paintbrush into the paint tray or bucket and remove any excess paint by gently tapping it against the side of the container.
3. Start painting the wood trim, working in small sections at a time. Use long, smooth strokes in the direction of the wood grain for a professional finish.
4. Apply multiple thin coats of paint, allowing each coat to dry completely before applying the next one. This will ensure a smooth and even finish.
5. Once the final coat is applied and completely dry, carefully remove the painter’s tape.
Question 5: How can I maintain the white paint on wood trim?
To maintain the white paint on wood trim, follow these tips:
1. Clean the trim regularly with a soft cloth or sponge to remove any dust or dirt buildup.
2. Avoid using harsh cleaners or abrasive materials that may damage the paint.
3. Touch up any chips or scratches in the paint as soon as they appear to prevent further damage.
4. Consider applying a clear topcoat or sealant to protect the paint and enhance its durability.
5. Regularly inspect the painted trim for any signs of wear or damage and address them promptly to maintain the overall appearance.

Not only does painting wood trim white provide a clean and bright aesthetic, but it also has the potential to increase the value and appeal of your home. Whether you’re looking to update an older property or simply refresh the look of your space, this DIY project is a cost-effective way to achieve a dramatic transformation. So, grab your paintbrush and get started on transforming your wood trim from drab to fab today!
- How to Make Wooden Pyramid Puzzle - May 13, 2024
- How to Solve Wooden Pyramid Puzzle - May 13, 2024
- How to Wooden Puzzle - May 13, 2024