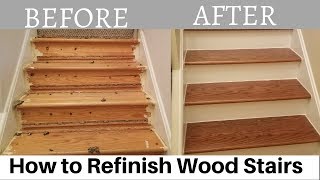
So, you’ve got a set of wood stairs that are looking a little worse for wear. Well, fear not! In this guide, we’re going to show you how to refinish wood stairs and bring back their former glory. Whether the stairs are covered in scratches, worn-out finishes, or just need a fresh coat of paint, we’ve got you covered. Get ready to roll up your sleeves and learn the step-by-step process to transform your stairs into a stunning focal point of your home.
Are you ready to embark on a journey of DIY greatness? Refinishing wood stairs may seem like a daunting task, but with the right knowledge and a bit of elbow grease, you’ll be amazed at what you can achieve. Say goodbye to those scuffs and hello to beautiful, revitalized stairs that will leave your friends and family in awe. So, grab your tools and let’s dive right in!
But wait, before we jump into the nitty-gritty of refinishing, let’s take a moment to understand why it’s important to give your wood stairs a little TLC. Over time, these hardworking structures can start to show signs of wear and tear. By refinishing them, you not only restore their beauty but also protect them from further damage. Plus, by taking matters into your own hands, you’ll save some hard-earned cash in the process.
So, if you’re ready to take your wood stairs from drab to fab, then keep reading. In this guide, we’ll walk you through each step, from preparing the surface to applying the final finish. With our easy-to-follow instructions and some patience, you’ll be amazed at what you can achieve. Get ready to impress everyone with your DIY skills – let’s get started!
Refinishing wood stairs is a simple yet transformative DIY project that can breathe new life into your home. Follow these steps to achieve beautiful results:
- Clean the stairs thoroughly, removing any dirt or debris.
- Sand the surface to smooth out imperfections.
- Wipe the stairs clean and apply wood stain or paint for your desired finish.
- Allow the finish to dry completely.
- Seal the stairs with a polyurethane coating for durability.
With these steps, you’ll have refurbished wood stairs in no time!
How to Refinish Wood Stairs: Transforming Dull to Dazzling
Wood stairs add timeless elegance and warmth to any home, but over time, they can become worn and lackluster. If your wood stairs are in need of a makeover, refinishing them can breathe new life into your space. In this comprehensive guide, we will walk you through the step-by-step process of refinishing wood stairs. From preparing the surface to applying the final coat of finish, we’ve got you covered. Get ready to unleash your DIY skills and give your stairs a stunning transformation.
1. Preparing for the Refinishing Process

Before diving into the refinishing process, it’s crucial to prepare your stairs properly. Start by removing any carpeting, nails, or staples. Sanding the stairs is the next step to remove the existing finish and create a smooth surface. Use a medium-grit sandpaper for the initial sanding and then go over it with fine-grit sandpaper. Don’t forget to clean the stairs thoroughly by vacuuming or using a tack cloth to remove any dust or debris.
Once the stairs are clean and smooth, it’s time to fill any cracks or gaps with wood filler and let it dry. Sand the filled areas gently until they are even with the surrounding wood. Lastly, protect areas that you don’t want to refinish, such as the walls and steps surrounding the stairs, by applying painter’s tape.
Now that your stairs are properly prepped, you can move on to the next steps in the refinishing process.
2. Staining the Wood Stairs
The staining process is where you can really customize the look of your wood stairs. Choose a stain color that complements your home’s aesthetic and apply it evenly to the stairs. Start from the top and work your way down, using long, smooth brush strokes. Allow the stain to penetrate the wood for the recommended time and then wipe off any excess with a clean cloth.
If you desire a deeper color, you can repeat the staining process once the first coat is dry. Remember to let each coat dry completely before applying another one. Once you achieve the desired color and the stain is dry, you’re ready to seal the wood.
Note: Ensure proper ventilation while working with stains and follow the manufacturer’s instructions for the best results.
3. Sealing and Protecting the Wood
After staining, it’s essential to seal and protect the wood to ensure its longevity and durability. The type of sealer you choose depends on your preference and the level of protection you desire. Polyurethane is a popular option as it provides a durable and glossy finish.
Apply the sealer using a high-quality brush, starting from the top and working your way down. Use long, even strokes and avoid overbrushing to minimize brush marks. Allow the sealer to dry according to the manufacturer’s instructions, and then lightly sand the surface with fine-grit sandpaper to remove any imperfections.
Repeat the sealing process by applying multiple coats of sealer, ensuring each coat is completely dry before adding the next. Once the final coat is dried and cured, your wood stairs will be ready to impress.
Additional Tips for a Flawless Wood Stair Refinishing
Refinishing wood stairs is a meticulous process that requires attention to detail. Here are some additional tips to help you achieve a flawless finish:
1. Proper Ventilation
Working with stains and sealers can emit strong odors and fumes. Ensure proper ventilation by opening windows and using fans to circulate air. Consider wearing a mask to protect yourself.
2. Test the Stain
Before applying the stain to the entire staircase, test it on a small, inconspicuous area to ensure it achieves your desired color. Different wood species may produce different results.
3. Use Quality Products
Investing in high-quality stains, sealers, and brushes will enhance the overall outcome of your wood stair refinishing project. Quality products provide better coverage, durability, and a more professional finish.
4. Take Your Time
Refinishing wood stairs is not a task to rush. Allow ample time for each step of the process, including drying and curing times. Patience and attention to detail will yield the best results.
5. Maintain Your Stairs
Once your wood stairs are refinished, it’s important to maintain them properly to prolong their beauty and protect your investment. Regularly clean the stairs with a soft, dry cloth or microfiber mop to remove any dirt or debris. Avoid using harsh chemicals or abrasive cleaners that can damage the finish.
Conclusion
Refinishing your wood stairs is a rewarding project that can revive the overall look of your home and add value to your property. With careful preparation, attention to detail, and the right materials, you can transform worn-out stairs into stunning focal points. Whether you choose a classic stain or a contemporary finish, refinishing wood stairs allows you to unleash your creativity and showcase your personal style. So, roll up your sleeves, gather your supplies, and get ready to embark on a stair-refinishing adventure that will leave you with a smile every time you climb those steps.
**Key Takeaways: How to Refinish Wood Stairs**
Key Takeaways: How to Refinish Wood Stairs
- Prepare the stairs by removing any carpet, sanding down the surface, and filling in any cracks or holes.
- Protect yourself by wearing safety gear, such as goggles and a mask, to prevent exposure to dust and chemicals.
- Apply a wood stain or paint to enhance the appearance of the stairs, making sure to follow the manufacturer’s instructions.
- Allow the finish to dry completely before applying a protective sealant to ensure durability and longevity.
- Maintain the refinished wood stairs by regularly cleaning them with a gentle cleaner and avoiding harsh chemicals that may damage the finish.
Frequently Asked Questions
Are you looking to give your wood stairs a fresh, new look? Refinishing wood stairs can be a rewarding and transformative project. Here are some commonly asked questions to help guide you through the process.
1. How do I prepare my wood stairs for refinishing?
Before refinishing your wood stairs, it’s crucial to properly prepare them. Start by clearing the area and protecting any adjacent surfaces. Next, remove any carpeting, sand down the stairs to remove the old finish, and wipe them clean. Fill in any gaps or cracks with wood putty and allow it to dry. Finally, sand the stairs again to create a smooth surface for the new finish.
Remember to wear protective gear such as goggles, a mask, and gloves to ensure your safety during the process. Proper preparation is key to achieving a successful refinishing outcome.
2. What tools and materials do I need to refinish wood stairs?
Refinishing wood stairs requires a few essential tools and materials. You will need sandpaper or a sanding machine to remove the old finish, a paint scraper or chemical stripper to help loosen any stubborn varnish or paint, and a vacuum or brush to clean the stairs after sanding.
Additionally, you’ll need a stain or paint of your choice to refinish the stairs, as well as brushes or rollers to apply the finish evenly. Don’t forget to protect the surrounding area with drop cloths or plastic sheets. Having the proper tools and materials will make the refinishing process much smoother and more efficient.
3. Should I stain or paint my wood stairs?
The decision to stain or paint your wood stairs depends on your personal preference and the desired look you want to achieve. Staining the stairs allows the natural wood grain to shine through, giving a more rustic and timeless appearance. On the other hand, painting the stairs gives you the flexibility to choose any color and provides a smooth, uniform finish.
Consider the style of your home and the overall aesthetic you wish to create. If you want to preserve the natural beauty of the wood, staining is the way to go. If you prefer a bold and modern look, painting is the better option. Ultimately, it’s up to you and what suits your taste and design vision.
4. How many coats of finish should I apply?
In general, it is recommended to apply at least two coats of finish to ensure long-lasting protection and durability. The first coat acts as a base layer, penetrating the wood and providing a foundation for the subsequent coats. The second coat adds additional protection and enhances the overall appearance of the stairs.
If you desire a deeper or richer color, consider applying an extra coat of stain or paint. However, be sure to follow the manufacturer’s instructions on drying times between coats to ensure proper adhesion and a smooth finish. Applying the appropriate number of coats will help your wood stairs withstand daily wear and tear while maintaining their beauty.
5. How do I maintain and care for refinished wood stairs?
To prolong the life and beauty of your refinished wood stairs, regular maintenance is important. Avoid using harsh chemicals or abrasive cleaners that can damage the finish. Instead, clean the stairs using a soft brush or cloth and a mild cleaner specifically formulated for wood surfaces.
Additionally, place mats or rugs on high-traffic areas to prevent excessive wear. Protect the stairs from direct sunlight, as prolonged exposure can cause fading and discoloration. Lastly, periodically check for any signs of damage or wear and address them promptly to prevent further issues. By following these maintenance practices, you can enjoy your refinished wood stairs for years to come.

Summary
So there you have it, a quick summary of how to refinish your wood stairs. First, you need to gather your materials like sandpaper, stain, and varnish. Then, you’ll need to clean and prep the stairs by removing any old finish and repairing any damage. Once the stairs are prepped, it’s time to sand them down to get a smooth surface. After sanding, apply the stain and let it dry. Finally, add a top coat of varnish to protect and give your stairs a beautiful finish. Remember to take your time and follow each step carefully for the best results.
In conclusion, refinishing wood stairs can be a fun and rewarding DIY project. With a little effort and patience, you can transform your worn-out stairs into a stunning focal point in your home. So why wait? Grab your materials and start revitalizing your wood stairs today!
- How to Design Wood Carving - May 7, 2024
- How to Carve Wood - May 7, 2024
- How to Remove Cat Urine From Wood Furniture - May 7, 2024