I'm here to show you how to varnish wood on YouTube, so you can unleash your creativity and bring new life to your furniture.
With just a few simple steps, you'll learn to transform dull and worn-out wood into a stunning masterpiece.
Whether you're a DIY enthusiast or a beginner, this tutorial will guide you through the process with ease.
Get ready to embark on a journey of liberation as you discover the joy of varnishing wood with your own hands.
Let's get started!
Overview
I really appreciate this overview because it gives me a clear understanding of what to expect when varnishing wood. As someone who desires liberation in the world of woodworking, this knowledge is invaluable. Varnishing wood is a process that involves applying a protective coating to enhance the appearance and durability of the wood. It creates a glossy or satin finish that not only protects the wood from moisture and wear but also adds depth and richness to its natural beauty.
Before diving into the varnishing process, it's important to prepare the wood properly. This includes sanding the surface to ensure it's smooth and free of imperfections. I recommend starting with a coarse-grit sandpaper and gradually working your way up to a finer grit for a flawless finish. Additionally, make sure to clean the surface thoroughly to remove any dust or debris.

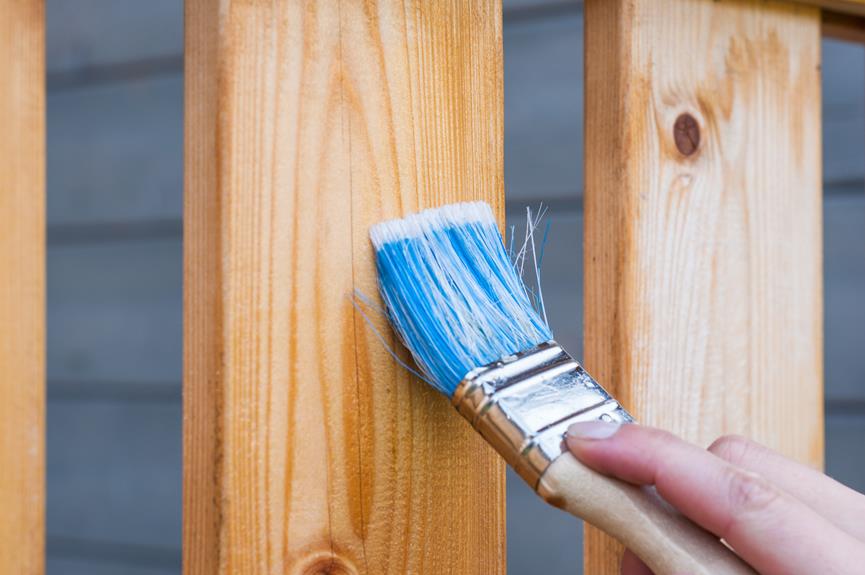
Once the wood is prepped, it's time to apply the varnish. There are different types of varnish available, such as oil-based or water-based, each with its own advantages. It's crucial to choose the right type of varnish for your project. Using a brush or a roller, apply thin and even coats of varnish in the direction of the wood grain. This will help to achieve a smooth and professional-looking finish.
After each coat, allow the varnish to dry completely before applying the next one. Sand lightly between coats to ensure proper adhesion and a smooth finish. Depending on the desired level of protection and sheen, multiple coats may be necessary.
quick answer
Varnishing wood is a great way to enhance its natural beauty and protect it from damage. If you're looking for a quick answer on how to varnish wood, here are two key steps to get you started:
- Preparation:
- Start by sanding the wood to create a smooth surface.
- Clean the wood to remove any dust or debris.
- Varnishing:
- Apply the varnish using a brush or roller, following the grain of the wood.
- Allow the first coat to dry completely before applying additional coats.
- Sand lightly between coats for a smooth finish.
- Finish by applying a final coat for added protection.
By following these steps, you can achieve a professional-looking varnish on your wood. Remember to choose a varnish that suits your desired level of sheen and durability.
Now that you have a quick answer to your question about varnishing wood, let's move on to the key takeaways from this discussion.
Key Takeways
There are several key takeaways from the discussion on varnishing wood that can help enhance its natural beauty and protect it from damage.
Varnishing wood is a process that involves applying a clear protective coating to the surface of the wood. This coating helps to seal the wood, preventing moisture from seeping in and causing warping or rotting. It also adds a layer of protection against scratches, stains, and fading from sunlight.
One important takeaway is the importance of properly preparing the wood before applying varnish. This includes sanding the surface to create a smooth and even texture, as well as removing any dust or debris. Additionally, it's crucial to choose the right type of varnish for the specific wood and desired outcome. There are different types of varnish available, such as oil-based varnish or water-based varnish, each with its own benefits and considerations.
Another key takeaway is the application technique. It's recommended to apply varnish in thin and even coats, allowing each layer to dry completely before applying the next. This helps to achieve a smooth and professional finish. It's also important to consider the drying time and curing process of the varnish, as this can vary depending on the type and brand.
Summary
To summarize, I've learned that properly preparing the wood and applying varnish in thin coats are essential steps in achieving a smooth and durable finish.
When it comes to preparing the wood, it's important to start by sanding it thoroughly. This helps to remove any imperfections and creates a smooth surface for the varnish to adhere to. Additionally, it's crucial to clean the wood before applying the varnish, as any dust or debris can ruin the finish.
Once the wood is properly prepared, applying varnish in thin coats is key. This allows for better control and prevents the varnish from becoming too thick and uneven. I've also discovered that it's best to use a high-quality brush or foam applicator to ensure smooth and even application.
Furthermore, it's important to allow each coat of varnish to dry completely before applying the next one. This helps to prevent any drips or bubbles from forming and ensures a flawless finish. Lastly, sanding lightly between coats can help to achieve an even smoother result.
Detailed Instructions
When it comes to varnishing wood, detailed instructions are essential to achieve a professional-looking finish. To ensure success, there are a few key points to keep in mind.
First, gather the necessary tools such as sandpaper, a paintbrush, and a clean cloth.
Then, follow a step-by-step application process, making sure to choose the right varnish for your project.
Additionally, be aware of common varnishing mistakes and implement tips for achieving a smooth finish.
Tools Needed for Varnishing
I frequently use a paintbrush, sandpaper, and a clean cloth for varnishing. These tools are essential for achieving a smooth and flawless finish on wood surfaces. The paintbrush allows for precise application of the varnish, ensuring even coverage and minimizing brush strokes. Sandpaper is used to prepare the surface by smoothing out any imperfections and creating a smooth base for the varnish. Finally, a clean cloth is necessary for wiping away any dust or debris before applying the varnish.
To further illustrate the importance of these tools, here is a table outlining their specific uses:
| Tool | Use |
|---|---|
| Paintbrush | Precise application of varnish |
| Sandpaper | Smoothing out imperfections |
| Clean cloth | Removing dust and debris |
Now that we have covered the essential tools, let's move on to the step-by-step application process.
Step-By-Step Application Process
After preparing the wood surface and gathering the necessary tools, I first begin by applying a thin coat of varnish using long, even strokes. This step is crucial for achieving a smooth and even finish. By using a brush or a cloth, I carefully spread the varnish over the entire surface, making sure to cover every inch.
It's important to apply the varnish in the direction of the wood grain to enhance its natural beauty. Once the first coat is applied, I allow it to dry completely before proceeding to the next step. This initial coat serves as a foundation for the subsequent layers of varnish, providing a protective barrier and enhancing the wood's durability.
Now that we've the application process underway, let's move on to the next important aspect – choosing the right varnish.
Choosing the Right Varnish
To achieve the best results, I always take into consideration both the durability and appearance of the wood by carefully selecting the varnish for my project and applying it in accordance with the wood's natural grain.
When choosing the right varnish, it's important to consider the type of wood, the desired finish, and the intended use of the piece. For hardwoods, I prefer using oil-based varnishes as they provide excellent protection and enhance the natural beauty of the wood. On the other hand, water-based varnishes are a great choice for softer woods or indoor projects where odor and drying time are a concern.
By selecting the appropriate varnish, I ensure that my woodwork not only looks stunning but also withstands the test of time.
Now, let's move on to discussing some common varnishing mistakes that should be avoided to achieve a flawless finish.
Common Varnishing Mistakes
The article provides detailed instructions on common varnishing mistakes and how to avoid them. When it comes to varnishing wood, there are several mistakes that can easily be made if you're not careful. To help you achieve a smooth and flawless finish, I've compiled a list of the most common varnishing mistakes and how to avoid them. Take a look at the table below to see the mistakes and their corresponding solutions:
| Mistake | Solution | Emotion |
|---|---|---|
| Applying too much varnish | Apply thin, even coats | Frustration |
| Not sanding between coats | Sand lightly with fine-grit sandpaper | Disappointment |
| Rushing the drying process | Allow ample drying time between coats | Impatience |
| Neglecting to clean the surface | Thoroughly clean and remove any dust or debris | Negligence |
| Using a low-quality brush | Invest in a high-quality brush for a smooth application | Regret |
Tips for Achieving a Smooth Finish
I've learned that for achieving a smooth finish, it's essential to apply thin, even coats of varnish. When it comes to varnishing wood, many people make the mistake of applying thick coats, thinking it will provide better protection. However, this often leads to an uneven and streaky finish.
To avoid this, I recommend using a high-quality brush and applying the varnish in long, smooth strokes, following the grain of the wood. It's important to work quickly and avoid overbrushing, as this can cause bubbles or brush marks.
After each coat, lightly sand the surface with fine-grit sandpaper to remove any imperfections. Repeat the process, applying additional thin coats until you achieve the desired smoothness.
Final Thought
I'm really impressed with the final outcome of my varnished wood project. The process of varnishing wood can be quite challenging, but the end result is truly worth it. Varnishing not only enhances the natural beauty of the wood but also provides protection against moisture, stains, and scratches.
To achieve a smooth finish, it's essential to prepare the wood properly. Start by sanding the surface to remove any imperfections and create a smooth, even texture. This will allow the varnish to adhere properly and result in a flawless finish. After sanding, make sure to remove any dust or debris using a tack cloth.
Next, apply the varnish using a high-quality brush or foam applicator. Work in thin, even coats, following the grain of the wood. Avoid overloading the brush to prevent drips and uneven coverage. Allow each coat to dry fully before applying the next one, and lightly sand between coats to ensure a smooth surface.
Once the final coat is dry, gently buff the surface with a fine-grit sandpaper or steel wool to remove any imperfections. Finish off by applying a clear topcoat or wax to protect the varnish and give it a beautiful sheen.
Frequently Asked Questions
What Are the Different Types of Varnish Available for Wood?
There are several types of varnish available for wood, including polyurethane, shellac, and lacquer. Each type offers different benefits and finishes, so it's important to choose the one that best suits your project.
Can Varnish Be Used on All Types of Wood?
Yes, varnish can be used on all types of wood. It provides a protective layer that enhances the beauty and durability of the wood. It's important to choose the right type of varnish for different wood surfaces.
Is It Necessary to Sand the Wood Before Applying Varnish?
It's necessary to sand the wood before applying varnish. Sanding helps to create a smooth surface, removes any imperfections, and allows the varnish to adhere properly. This step ensures a professional and long-lasting finish.
How Long Does It Take for Varnish to Dry Completely?
It typically takes varnish about 24 to 48 hours to dry completely. However, factors such as humidity and temperature can affect drying time. It's important to allow sufficient drying time before using or moving the varnished wood.
Can Varnish Be Applied Over an Existing Finish on Wood?
Yes, varnish can be applied over an existing finish on wood. It's important to properly clean and prepare the surface before applying the varnish to ensure proper adhesion and a smooth, even finish.
- How to Design Wood Carving - May 7, 2024
- How to Carve Wood - May 7, 2024
- How to Remove Cat Urine From Wood Furniture - May 7, 2024