Are you wondering how to build a wheelchair ramp with plywood? Well, you’re in the right place! In this guide, we’ll show you a step-by-step process to construct a sturdy and accessible ramp for individuals using wheelchairs.
Building a wheelchair ramp with plywood can be a great DIY project that not only helps people with mobility challenges but also adds value to your home. Plus, it’s easier than you might think! So, grab your tools, roll up your sleeves, and let’s get started on this rewarding construction adventure!
Whether you’re a beginner or an experienced builder, we’ll provide you with all the necessary instructions and tips to make this project a success. Let’s dive in and learn how to build a wheelchair ramp with plywood together!
- Measure the height and length of the ramp.
- Calculate the slope needed for accessibility.
- Choose the right plywood and gather necessary tools.
- Mark and cut the plywood according to measurements.
- Attach the supports and secure the ramp to the landing.
- Apply a non-slip surface and add handrails for safety.
- Ensure the ramp meets accessibility guidelines.
Creating a wheelchair ramp with plywood is a straightforward process that can enhance accessibility. Follow these steps to build a ramp that meets safety and inclusivity standards.
How to Build a Wheelchair Ramp with Plywood
Building a wheelchair ramp with plywood is a cost-effective and practical solution to provide accessibility for individuals with mobility challenges. Plywood ramps are versatile, easy to construct, and customizable to specific needs. In this article, we will guide you through the process of building a wheelchair ramp using plywood, providing detailed instructions and tips to ensure a sturdy and safe structure.
The Importance of Accessibility
Creating an inclusive environment is crucial to ensure equal opportunities for everyone. Wheelchair ramps play a vital role in promoting accessibility and enabling individuals with disabilities or mobility limitations to move freely and independently. By building a wheelchair ramp with plywood, you can enhance the accessibility of your home or business, providing a barrier-free entrance for wheelchair users and others with mobility challenges.
1. Assessing the Site and Gathering Materials
The first step in building a wheelchair ramp with plywood is to assess the site where the ramp will be installed. Measure the height of the steps or threshold to determine the length of the ramp needed. Take into account any obstacles or uneven terrain that may require additional planning or modifications.

Once the site assessment is complete, gather all the necessary materials. For a basic plywood ramp, you will need pressure-treated plywood, pressure-treated 2×4 boards, galvanized screws or nails, handrails (if required), and concrete footings or post anchors for support.
Ensure you have the appropriate tools, including a circular saw, drill, measuring tape, level, and safety equipment such as goggles and gloves. It is also advisable to consult local building codes or regulations to ensure compliance before starting the project.
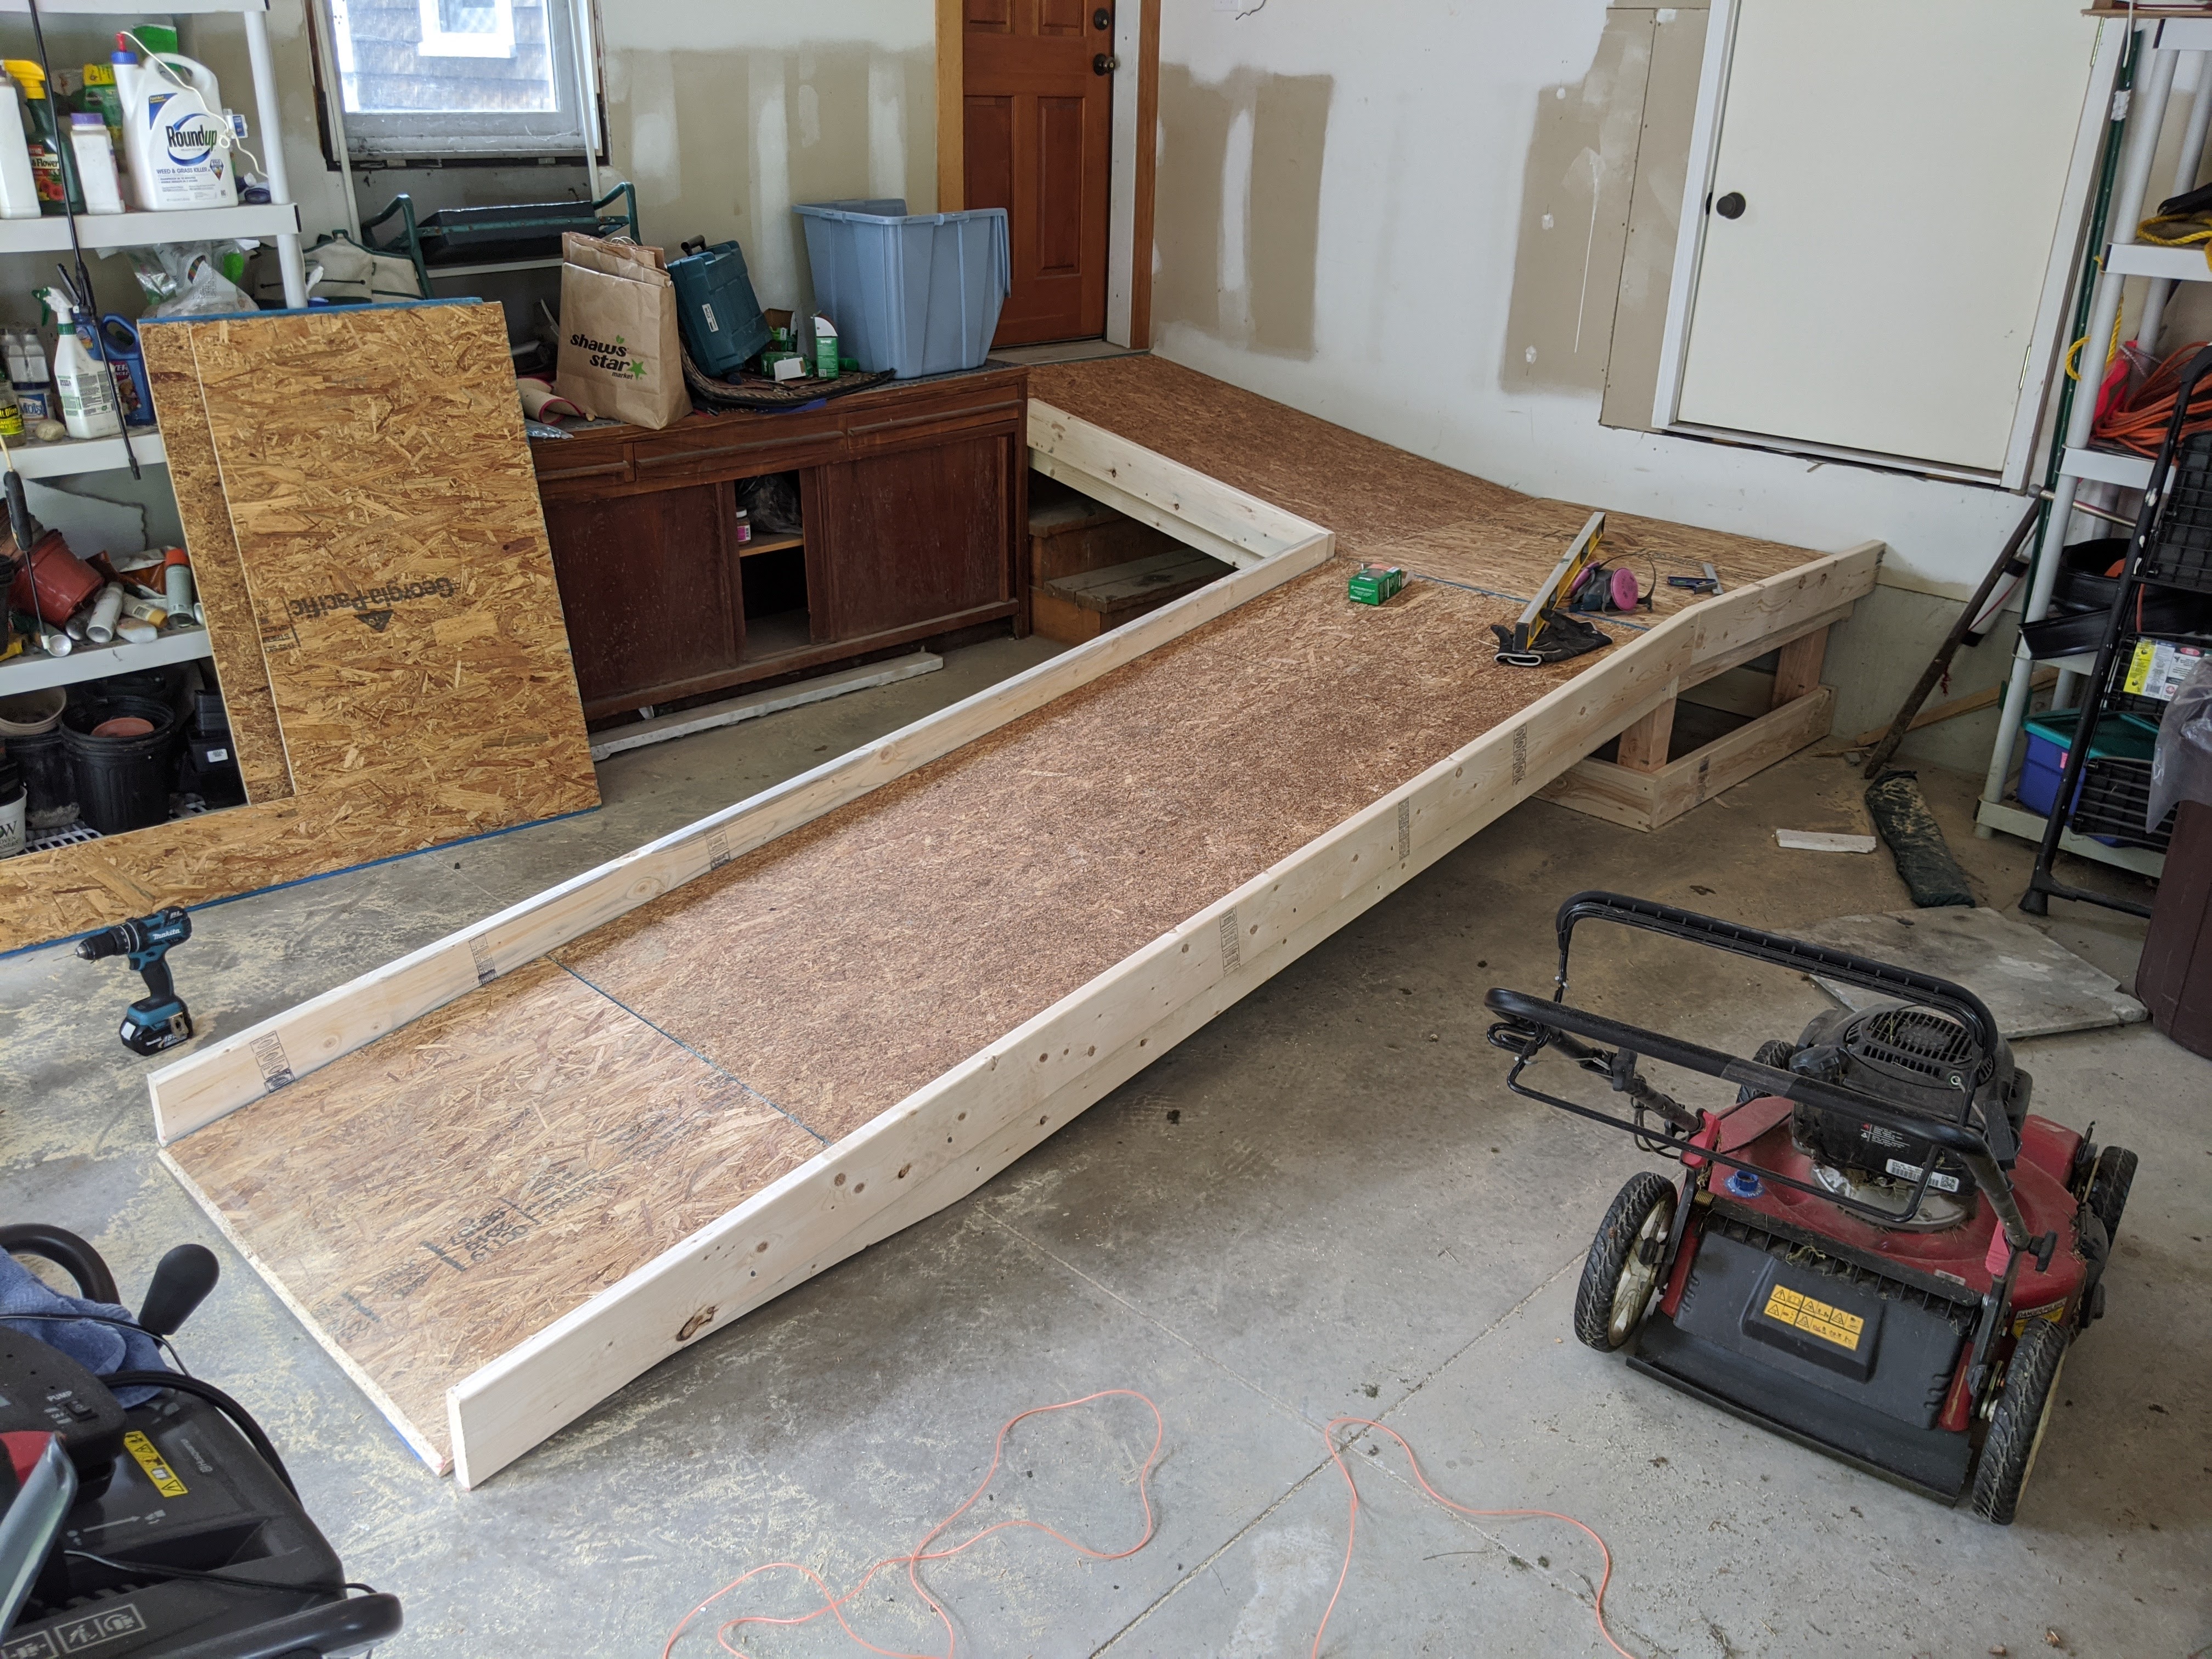
2. Building the Ramp Frame
The ramp frame provides the structure and support for the plywood surface. Begin by constructing the frame using pressure-treated 2×4 boards. Cut the boards to the desired length for the ramp, taking into account the width of the plywood sheets. Space the boards evenly, ensuring sufficient support throughout the ramp’s length.
Attach the frame using galvanized screws or nails, ensuring a secure and stable structure. Use a level to ensure the frame is level and square. If constructing a ramp with multiple sections or turns, incorporate additional support posts or beams for added stability.
Once the frame is complete, place concrete footings or post anchors at regular intervals to provide additional support. These will serve as the base for the ramp’s posts or supports. Check that the frame is level and secure before proceeding to the next step.
3. Installing the Plywood Surface
With the ramp frame in place, it’s time to install the plywood surface. Measure the width and length of the ramp frame and cut the plywood sheets to fit. It may be necessary to trim the plywood to ensure a precise fit around any obstacles or curves in the ramp.
Secure the plywood sheets to the ramp frame using galvanized screws or nails, placing fasteners at regular intervals to ensure a secure attachment. Ensure that the plywood is flush with the edges of the ramp frame to prevent tripping hazards or gaps.
Once the plywood surface is installed, check for any loose or uneven areas and secure or adjust as necessary. Sand any rough edges or splinters to create a smooth surface. If desired, apply a non-slip surface treatment to enhance traction and prevent slips or falls, especially during wet or icy conditions.
4. Adding Handrails and Safety Features
Handrails are an essential component of a wheelchair ramp, providing additional support and stability. Install handrails along both sides of the ramp, ensuring they are at a comfortable height and graspable. Use pressure-treated 2×4 boards or pre-made handrail kits for this purpose.
Consider adding safety features such as edge protection, which can be achieved with pressure-treated 2×4 boards attached to the edges of the ramp. This prevents wheels from sliding off the ramp and provides additional stability. It is also important to ensure the ramp has proper lighting for visibility, particularly during nighttime use.
Regular maintenance is key to ensuring the longevity and safety of your wheelchair ramp. Inspect the ramp periodically for any signs of damage, loose fasteners, or rotted wood. Make any necessary repairs promptly and address any accessibility concerns that may arise over time.
5. Benefits of Plywood Wheelchair Ramps
Plywood wheelchair ramps offer several benefits, making them an attractive option for both temporary and permanent solutions. Here are some advantages:
- Cost-effectiveness: Plywood is an affordable material, making it a budget-friendly option for building wheelchair ramps.
- Customizability: You can easily adapt a plywood ramp to fit specific site requirements and wheelchair user needs.
- Easy Construction: Plywood ramps can be constructed with basic tools and skills, making them accessible for DIY projects.
- Durability: Pressure-treated plywood is resistant to rot, decay, and insect damage, ensuring the longevity of your ramp.
- Versatility: Plywood ramps can be disassembled and moved if needed, making them suitable for temporary installations or rental properties.
Additional Considerations when Building a Wheelchair Ramp with Plywood
While the main steps have been outlined above, there are additional factors to consider when building a wheelchair ramp with plywood:
1. Building Codes and Regulations
Check local building codes and regulations to ensure compliance when constructing a wheelchair ramp. Requirements may vary depending on the location and type of structure. Adhering to these regulations will help ensure the ramp is safe and accessible for all users.
2. Slope and Rise
The slope and rise of the wheelchair ramp are essential factors in providing ease of use for wheelchair users. The maximum slope allowed by most guidelines is 1:12, meaning that for every 1 inch of rise, there should be 12 inches of ramp length. However, it is advisable to consult local codes or accessibility guidelines for specific requirements.
3. Non-Slip Surface
Applying a non-slip surface treatment to the plywood ramp can greatly enhance traction and prevent accidents. Consider using products specifically designed for this purpose, such as non-slip paint, adhesive strips, or rubber mats.
Conclusion
Building a wheelchair ramp with plywood provides a practical and affordable solution to promote accessibility and inclusivity. By following the steps outlined in this article, you can construct a sturdy and safe ramp that enables individuals with mobility challenges to navigate entrances and obstacles with ease. Remember to consider local regulations, maintain the ramp regularly, and prioritize safety features such as handrails and non-slip surfaces. With a plywood wheelchair ramp, you can create an inclusive environment that promotes independence and equal access for all.
Key Takeaways: How to Build a Wheelchair Ramp with Plywood
- Measure and plan the ramp design according to the slope requirements for wheelchair accessibility.
- Prepare the area by removing any obstacles and ensuring a solid foundation for the ramp.
- Cut and assemble the plywood pieces for the ramp structure, making sure to secure them properly.
- Add handrails and non-slip surfaces to enhance safety for wheelchair users.
Frequently Asked Questions
Building a wheelchair ramp with plywood is an accessible and cost-effective solution. Here are some commonly asked questions about this topic:
1. Can I use regular plywood to build a wheelchair ramp?
Regular plywood is not recommended for building a wheelchair ramp as it may not be durable enough to withstand the weight and pressure. To ensure safety, it is important to use exterior-grade plywood that is specifically designed for outdoor use. This type of plywood is more resistant to moisture, warping, and rot, making it a suitable choice for building a ramp that will be exposed to the elements.
Additionally, check with your local building codes and regulations to determine if there are any specific requirements for the materials used in constructing a wheelchair ramp. Using the appropriate type of plywood will help ensure the ramp is sturdy and long-lasting.
2. How do I determine the size and slope of the wheelchair ramp?
The size and slope of a wheelchair ramp are crucial factors in ensuring accessibility and safety. According to the ADA (Americans with Disabilities Act) guidelines, the recommended slope for a wheelchair ramp is no steeper than 1:12, meaning for every 1 inch of rise, there should be 12 inches of ramp length. To determine the minimum ramp length, multiply the total rise in inches by 12.
For example, if the total rise of the ramp is 24 inches, the minimum ramp length would be 288 inches. The width of the ramp should be at least 36 inches to allow enough space for a wheelchair user to navigate comfortably. Remember to consider any landing platforms at the top and bottom of the ramp to ensure proper maneuverability.
3. What tools and materials do I need to build a wheelchair ramp with plywood?
To build a wheelchair ramp with plywood, you will need the following tools:
– Measuring tape
– Circular saw or jigsaw
– Drill
– Screwdriver
– Carpenter’s square
– Level
– Clamps
– Safety goggles
As for the materials, you will need:
– Exterior-grade plywood
– Pressure-treated lumber for framing and support
– Screws or nails
– Ramp surface material (such as non-slip paint, rubber matting, or aluminum plates)
– Handrails (if required by local building codes)
4. How can I make a plywood wheelchair ramp slip-resistant?
To make a plywood wheelchair ramp slip-resistant, there are several options you can consider. One option is to apply a non-slip paint specifically designed for outdoor surfaces. This paint contains textured additives that provide traction, reducing the risk of slipping.
Another option is to install rubber matting on the ramp surface. Rubber matting is durable, easy to install, and offers excellent grip for wheelchair users. Alternatively, you can also use aluminum plates with a textured surface, which provide an anti-slip surface for added safety.
5. Are there any building codes or regulations I need to follow when constructing a wheelchair ramp?
Yes, it is important to comply with local building codes and regulations when building a wheelchair ramp. Building codes may vary depending on your location, so it’s crucial to check with your municipality or local authorities beforehand. These codes typically cover specifications for ramp dimensions, slope, handrail requirements, and other safety measures.
By following the building codes, you can ensure that the wheelchair ramp is constructed to meet safety standards and provide accessibility for wheelchair users. It’s also important to consult with professionals or experts if you’re unsure about certain aspects of the construction process, as they can provide guidance and ensure that the ramp adheres to the necessary regulations.

Summary
Building a wheelchair ramp with plywood is a practical and affordable solution for accessibility. By following a few key steps, you can create a ramp that will provide safe and convenient access for those who use a wheelchair. First, gather the necessary materials, including plywood, screws, and a saw. Then, measure the desired length and slope of the ramp, ensuring it meets local building codes. Cut the plywood to the appropriate size and attach it securely to a frame. Finally, add handrails for additional safety and test the ramp for stability before use.
In conclusion, building a wheelchair ramp with plywood is an accessible DIY project that anyone can tackle. With the right materials and careful measurements, you can create a ramp that will greatly improve accessibility for individuals using wheelchairs. By following these steps, you can make a positive impact in your community and help make the world a more inclusive place.
- How to Circulate Wood Stove Heat - April 27, 2024
- How to Light Wood Burning Stove - April 27, 2024
- How to Install a Wood Burning Fireplace Insert - April 27, 2024