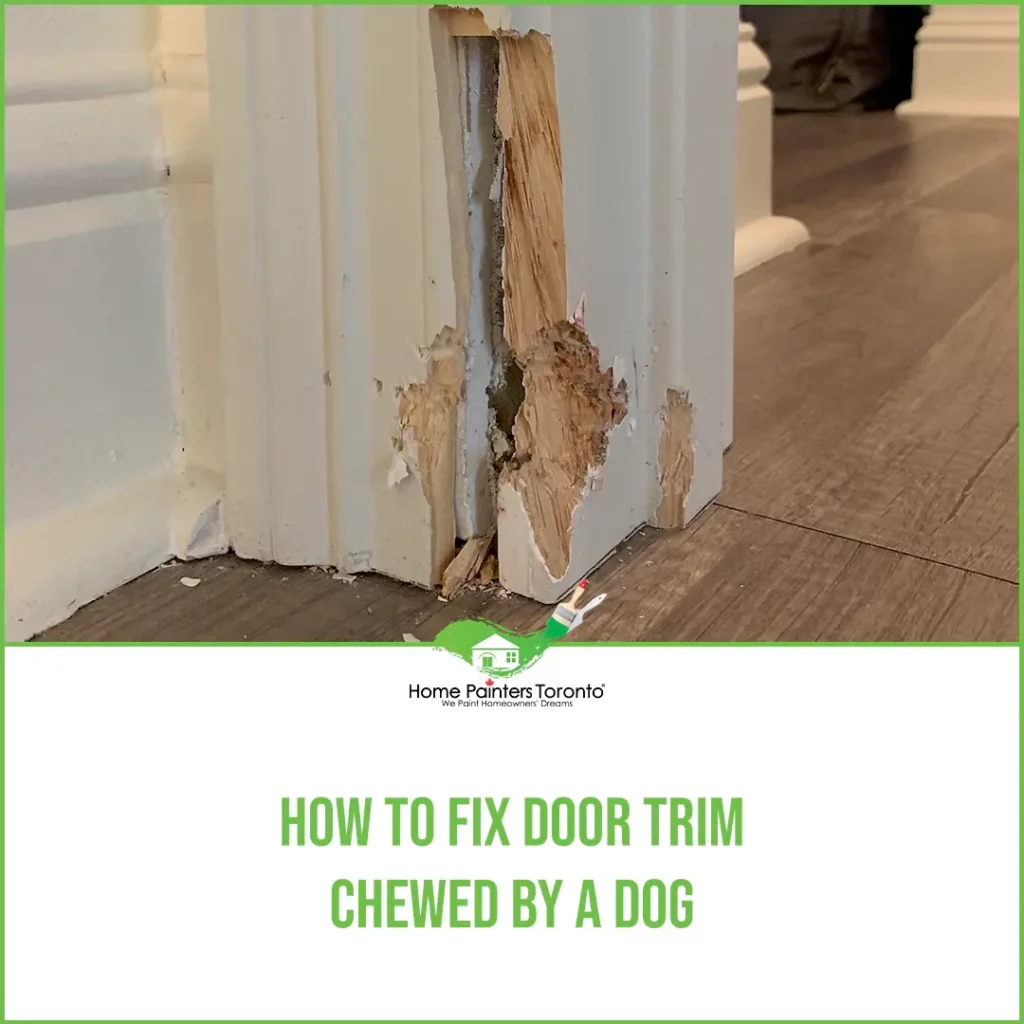
Have you ever walked into a room and noticed that your once pristine wood trim has been chewed up by a mischievous pet or a curious child? It’s frustrating to see your beautiful home marred by these unsightly bite marks, but fear not! In this guide, we will explore the step-by-step process of fixing chewed wood trim, so you can restore your home to its former glory.
Wood trim is a common feature in many homes, adding a touch of elegance and sophistication to any room. However, it is also vulnerable to damage, especially if you have pets or young children. Whether it’s a small nibble or a full-on gnaw, chewed wood trim can be an eyesore that detracts from the overall aesthetic of your space. But don’t despair! With a few simple tools and a little bit of know-how, you can easily repair and restore your chewed wood trim, giving it a fresh and polished look once again. So, roll up your sleeves and let’s dive into the world of wood trim restoration!
How to Fix Chewed Wood Trim:
- Assess the damage: Determine the extent of the chew marks on the wood trim.
- Fill the gaps: Use wood filler to fill in the chewed areas, following the product instructions.
- Sand the surface: Once the wood filler is dry, sand the area until it is smooth and even.
- Apply primer: Apply a coat of primer to the repaired area to ensure proper adhesion of the paint.
- Paint the trim: Use a matching paint color to touch up the repaired wood trim.
- Seal the paint: Apply a clear sealant over the painted area to protect it from future damage.
How to Fix Chewed Wood Trim: A Step-by-Step Guide
In this guide, we will provide you with a detailed step-by-step process to help you fix chewed wood trim. Whether your furry friend has left their mark or you’re dealing with accidental damage, restoring your wood trim to its former glory is easier than you might think. With a few simple tools and some patience, you can have your wood trim looking as good as new.
Step 1: Assess the Damage
The first step in fixing chewed wood trim is to assess the extent of the damage. Carefully examine the affected area to determine the size and depth of the chew marks. This will help you decide the best course of action and the materials you will need for the repair.
If the chew marks are shallow and only affect the surface of the wood, you may be able to fix the trim without having to replace it. However, if the damage is deep and extensive, you may need to consider replacing the entire section of trim.
Step 2: Sand the Damaged Area
Once you have assessed the damage, it’s time to start the repair process. Begin by sanding the chewed area using fine-grit sandpaper. This will help smooth out any rough edges and prepare the surface for the next steps.

Make sure to sand in the direction of the wood grain to avoid creating additional damage. Start with a light touch and gradually increase the pressure as needed. Be careful not to sand too much, as you don’t want to remove more wood than necessary.
Step 3: Fill the Chew Marks
After sanding, it’s time to fill in the chew marks. There are various wood fillers available on the market that are specifically designed for this purpose. Choose a filler that matches the color of your wood trim for a seamless repair.
Apply the wood filler to the chewed area using a putty knife or a spatula. Make sure to fill the marks completely and smooth out the surface. Follow the manufacturer’s instructions regarding drying time, as it may vary depending on the product used.
Step 4: Sand and Blend
Once the wood filler has dried, use fine-grit sandpaper to sand the repaired area. This will help level the surface and blend the filled area with the surrounding wood. Be gentle and take your time to achieve a smooth finish.
Wipe away any dust or debris with a clean cloth before proceeding to the next step.
Step 5: Apply Stain or Paint
Depending on the finish of your wood trim, you may need to apply stain or paint to match the rest of the surface. If your trim is stained, use a matching wood stain and apply it to the repaired area following the manufacturer’s instructions.
If your trim is painted, choose a paint color that matches the existing trim and carefully apply it to the repaired area. Use a small brush and take your time to achieve a seamless blend.
Step 6: Seal and Protect
To ensure the longevity of your repair, it’s essential to seal and protect the wood trim. Apply a clear sealant or varnish to the repaired area, following the product instructions. This will help protect the wood from further damage and give it a polished look.
Allow the sealant to dry completely before touching or using the repaired area.
Step 7: Maintain the Trim
Once you have successfully fixed the chewed wood trim, it’s important to maintain it properly. Regularly clean the trim with a gentle wood cleaner and avoid using harsh chemicals or abrasive materials that could damage the surface.
Inspect the trim periodically to check for any new damage or signs of wear. Promptly address any issues to prevent further damage and keep your wood trim looking its best.
Step 8: Seek Professional Help if Needed
If you feel unsure or uncomfortable with the repair process, don’t hesitate to seek professional help. A skilled carpenter or woodworker can provide expert advice and assistance to ensure a successful repair.
Remember, it’s always better to seek professional help than risk further damage to your wood trim.
Frequently Asked Questions
Here are some common questions about how to fix chewed wood trim:
Q: How can I repair chewed wood trim?
To repair chewed wood trim, you will need to follow a few steps. First, start by cleaning the damaged area using a soft cloth and warm soapy water. Next, use a putty knife to remove any loose or splintered wood. Once the area is clean, apply a wood filler or putty to the damaged section, smoothing it out with the putty knife. Allow the filler to dry completely before sanding it down to match the surrounding trim. Finally, finish the repair by painting or staining the trim to match the rest of the woodwork.
If the damage is too severe or you are unsure of how to proceed, it may be best to consult a professional carpenter or woodworker to ensure the repair is done correctly.
Q: What materials do I need to fix chewed wood trim?
To fix chewed wood trim, you will need the following materials:
– Soft cloth
– Warm soapy water
– Putty knife
– Wood filler or putty
– Sandpaper or sanding block
– Paint or stain
– Paintbrush or stain applicator
Having these materials handy will make the repair process easier and more efficient.
Q: Can I use wood filler to fix deep chew marks in wood trim?
Yes, wood filler can be used to fix deep chew marks in wood trim. When applying the wood filler, make sure to press it firmly into the damaged area to ensure a proper bond. Depending on the depth of the chew marks, you may need to apply multiple layers of filler, allowing each layer to dry before adding the next. Once the filler is dry, sand it down to match the surrounding trim and finish with paint or stain.
Keep in mind that wood filler may not provide a seamless repair for very deep or extensive damage. In such cases, it may be necessary to replace the trim altogether.
Q: How long does it take for wood filler to dry?
The drying time for wood filler can vary depending on the brand and specific product you are using. In general, most wood fillers will dry within 2-6 hours. However, it is recommended to check the instructions provided by the manufacturer for the specific drying time of the product you are using. It is important to allow the filler to dry completely before sanding or painting to ensure a smooth and durable repair.
Q: Can I fix chewed wood trim without professional help?
Yes, it is possible to fix chewed wood trim without professional help. With the right materials and techniques, you can achieve a satisfactory repair. Following the steps mentioned earlier and taking your time to properly clean, fill, sand, and finish the damaged area can result in a successful repair. However, if you are unsure or uncomfortable with the process, it is always a good idea to seek professional assistance to ensure the best possible outcome.
In conclusion, fixing chewed wood trim is a task that may seem daunting at first, but with the right approach and tools, it can be successfully accomplished. By carefully assessing the damage, preparing the surface, and using appropriate materials, you can restore the wood trim to its original beauty. Remember to take your time and follow each step diligently, as rushing through the process may lead to unsatisfactory results.
Furthermore, it is essential to maintain a positive mindset throughout the repair process. Approach it as an opportunity to showcase your craftsmanship and attention to detail. Embrace the challenge and view it as a chance to enhance the overall aesthetics of your space. Remember, with patience and perseverance, you can transform chewed wood trim into a visually appealing feature that adds value to your home or office. So, roll up your sleeves, gather your tools, and embark on this rewarding journey of fixing chewed wood trim.
- How to Design Wood Carving - May 7, 2024
- How to Carve Wood - May 7, 2024
- How to Remove Cat Urine From Wood Furniture - May 7, 2024