Are you considering installing a wood stove in your home? If so, one crucial aspect to consider is how to properly install a wood stove chimney through the roof. While this may seem like a daunting task, with the right knowledge and guidance, you can ensure a safe and efficient installation. In this guide, we will walk you through the steps and provide you with essential tips to make the process as smooth as possible.
When it comes to wood stove installations, the chimney plays a vital role in venting the smoke and gases produced. Installing a chimney through the roof requires careful planning and attention to detail to guarantee proper ventilation and prevent any potential hazards. Whether you are a skilled DIY enthusiast or a homeowner looking to gain a better understanding of the process, this guide will equip you with the necessary information to confidently tackle this project. So, let’s dive in and explore the step-by-step instructions, safety precautions, and expert tips to help you successfully install a wood stove chimney through your roof.
How to Install a Wood Stove Chimney Through the Roof:
- Measure and mark the desired location for the chimney on the roof.
- Drill a hole through the roof at the marked spot, ensuring it is large enough for the chimney to fit through.
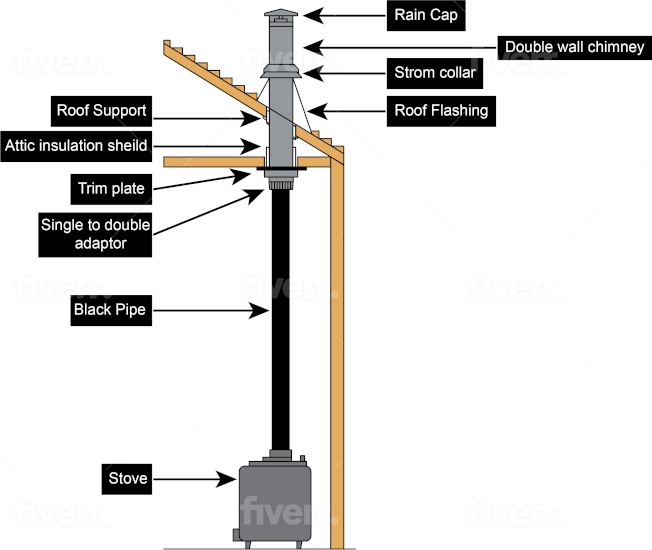
- Install a roof flashing around the hole to create a watertight seal.
- Attach the chimney pipe to the wood stove, ensuring a secure connection.
- Insert the chimney pipe through the roof hole, extending it above the roofline.
- Secure the chimney pipe to the roof using brackets or supports.
- Install a chimney cap on top of the pipe to prevent debris and animals from entering.

How to Install a Wood Stove Chimney Through the Roof
Installing a wood stove chimney through the roof is a crucial step in ensuring proper ventilation and safety for your wood-burning stove. Done correctly, it allows for the efficient removal of smoke and gases produced by the stove. Here is a step-by-step guide on how to install a wood stove chimney through the roof.
Step 1: Gather the Necessary Materials
Before beginning the installation process, it’s important to gather all the required materials. These typically include a wood stove chimney kit, flashing, roof support brackets, storm collar, and silicone sealant. Ensure that you have all the necessary tools on hand as well, such as a drill, tape measure, and ladder.
Start by measuring the distance from the wood stove to the roof to determine the length of the chimney pipe needed. It’s crucial to purchase a chimney kit that is appropriate for your stove and meets local safety regulations.
Step 2: Prepare the Roof for Installation
Prior to installing the wood stove chimney, you need to prepare the roof for the process. Begin by selecting the optimal location for the chimney, ensuring that it is at least two feet higher than any roof surface within a ten-foot radius. This helps prevent any potential fire hazards.

Next, mark the spot on the roof where the chimney will penetrate. Use a drill to create a pilot hole at the center of the marked spot. This will act as a guide for cutting the hole in the next step. Ensure that the hole is appropriately sized to accommodate the chimney pipe.
Step 3: Cut the Hole in the Roof
Now it’s time to cut the hole in the roof. Use a reciprocating saw or a hole saw to carefully cut along the marked lines. Make sure to follow all safety precautions and wear protective gear, such as goggles and gloves, during this step.
Once the hole is cut, inspect the surrounding area for any potential damage. Repair or reinforce the roof if necessary to ensure its structural integrity. This step is crucial in maintaining the stability and safety of the chimney installation.
Step 4: Install the Roof Support Brackets and Flashing
After the hole is prepared, you can proceed with installing the roof support brackets and flashing. The roof support brackets provide stability and help distribute the weight of the chimney. Secure them to the roof rafters or trusses, ensuring proper alignment with the chimney hole.
Next, install the flashing to create a watertight seal around the chimney. Slide the flashing under the shingles, ensuring a snug fit. Apply silicone sealant to prevent any potential leaks. This step is crucial in preventing water damage and maintaining the integrity of your roof.
Step 5: Connect the Chimney Pipe and Install the Storm Collar
Now it’s time to connect the chimney pipe. Follow the manufacturer’s instructions to assemble the sections of the chimney pipe, ensuring a tight fit. Use screws or locking bands to secure the connections and prevent any potential leaks.
Once the pipe is securely connected, install the storm collar around the chimney pipe at the roofline. The storm collar provides an additional layer of protection against water penetration. Ensure a tight fit and use silicone sealant to create a watertight seal.
Step 6: Complete the Installation
After connecting the chimney pipe and installing the storm collar, inspect the entire installation for any potential issues. Ensure that all connections are secure and sealed properly. Check for any gaps or leaks that may need to be addressed.
Finally, test the wood stove and chimney system to ensure proper ventilation. Make any necessary adjustments to ensure optimal performance. Regularly inspect and clean the chimney to prevent the buildup of creosote and maintain its efficiency.
Frequently Asked Questions
In this section, we have compiled some commonly asked questions about how to install a wood stove chimney through the roof. If you’re considering installing a wood stove chimney, this information will help guide you through the process.
Question 1: What materials do I need to install a wood stove chimney through the roof?
To install a wood stove chimney through the roof, you will need the following materials:
1. Chimney pipe sections: These are typically made of stainless steel or galvanized steel and come in various lengths.
2. Roof flashing: This is used to create a watertight seal around the chimney pipe where it exits the roof.
3. Storm collar: This is a metal collar that fits around the chimney pipe and is used to further protect against leaks.
Question 2: How do I determine the correct size of the chimney pipe?
The size of the chimney pipe you need depends on the size of your wood stove. It is recommended to consult the manufacturer’s specifications or guidelines for your wood stove to determine the appropriate size of the chimney pipe. The diameter of the chimney pipe should match the flue collar size of your wood stove.
It’s important to choose the correct size to ensure proper draft and efficient operation of your wood stove. Using an undersized or oversized chimney pipe can lead to poor performance and potential safety hazards.
Question 3: What are the steps for installing a wood stove chimney through the roof?
Installing a wood stove chimney through the roof involves the following steps:
1. Planning and preparation: Measure the distance from the wood stove to the roof and determine the necessary chimney pipe length. Check local building codes and regulations to ensure compliance.
2. Cutting the hole: Create an opening in the roof for the chimney pipe. Take proper precautions to avoid damaging any structural components or electrical wiring.
3. Installing the chimney pipe: Assemble the chimney pipe sections and attach them securely. Ensure that the pipe is straight and level, following the manufacturer’s instructions.
Question 4: How do I seal the chimney pipe to prevent leaks?
To create a watertight seal around the chimney pipe where it exits the roof, you will need to install roof flashing and a storm collar.
Roof flashing is typically made of metal and is placed over the hole in the roof. It should be installed in layers, starting with a base layer under the shingles, followed by the top layer that overlaps the shingles.
A storm collar is then placed around the chimney pipe above the roof flashing. It should be tightened securely to prevent water from entering the gap between the pipe and the flashing.
Question 5: Do I need professional help to install a wood stove chimney through the roof?
While it is possible for a skilled DIYer to install a wood stove chimney through the roof, it is recommended to seek professional help, especially if you are not experienced with roofing or chimney installations.
A professional chimney installer or a licensed contractor will have the expertise and knowledge to ensure that the installation is done correctly and safely. They can also help you navigate any local building codes and regulations that may apply.
Remember, it is crucial to prioritize safety throughout the entire process. Hiring a professional if you are unsure of any aspect or if you encounter any difficulties is always a smart decision. With the right tools, materials, and expertise, installing a wood stove chimney through the roof can be a rewarding project that adds both functionality and aesthetic appeal to your home. So, go ahead, embrace the warmth, and enjoy the cozy ambiance that a wood stove chimney can bring to your living space.
- How to Design Wood Carving - May 7, 2024
- How to Carve Wood - May 7, 2024
- How to Remove Cat Urine From Wood Furniture - May 7, 2024