Are you tired of looking at your old, worn-out wood door? Do you dream of giving it a fresh, new look that will make your entire space feel more inviting? Look no further! In this guide, we will take you through the step-by-step process of refinishing a wood door, bringing it back to life and making it the stunning centerpiece it deserves to be.
Refinishing a wood door may seem like a daunting task, but with the right tools, materials, and techniques, it can be a rewarding and satisfying project. Whether you’re a seasoned DIY enthusiast or a beginner looking to take on your first home improvement project, this guide will provide you with all the information you need to successfully refinish your wood door. From preparing the surface to applying the final coat of finish, we will walk you through each stage, offering helpful tips and tricks along the way. So, let’s roll up our sleeves and transform that tired wood door into a masterpiece that will leave your guests in awe.
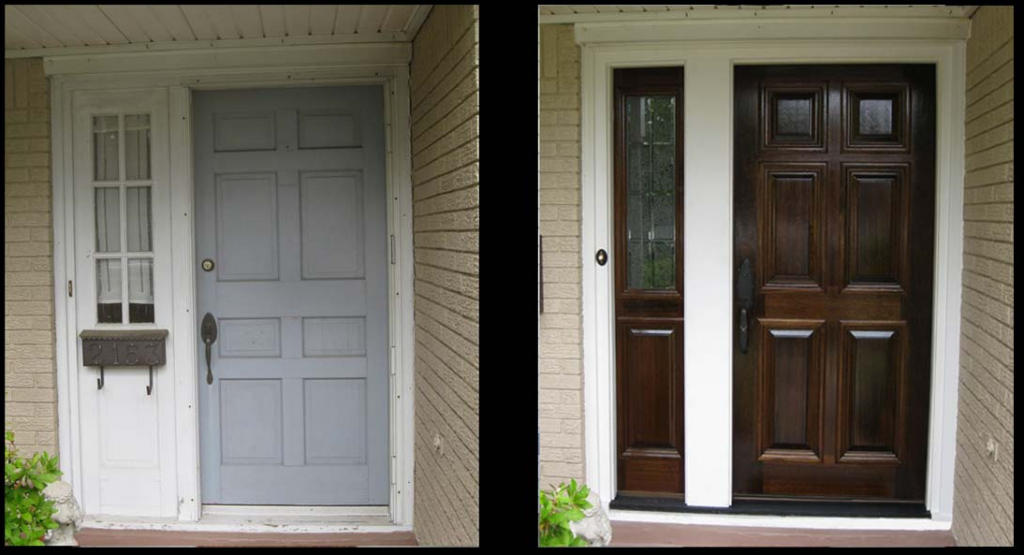
How to Refinish a Wood Door:
- Remove the door from its hinges.
- Strip off the old finish using sandpaper or a chemical stripper.
- Repair any damage or cracks in the wood using wood filler.
- Sand the entire door to smooth out the surface.
- Apply a wood stain or paint to the door, following the manufacturer’s instructions.
- Allow the finish to dry completely.
- Reattach the door to its hinges.

How to Refinish a Wood Door: Step-by-Step Guide
Refinishing a wood door can breathe new life into your home’s entrance and enhance its overall aesthetic appeal. Whether your wood door has become worn, faded, or you simply want to change its color, this step-by-step guide will provide you with the information you need to successfully refinish your wood door. With proper preparation and attention to detail, you can transform your door into a stunning focal point. Read on to learn how to refinish a wood door like a professional.
Step 1: Remove the Door from Its Hinges
The first step in refinishing a wood door is to remove it from its hinges. This will allow you to work on the door more easily and ensure that you achieve an even finish. Use a screwdriver or a drill to remove the screws from the hinges, taking care to support the weight of the door as you do so. Once the door is detached, lay it on a flat, stable surface.
Before proceeding with any refinishing steps, it’s important to ensure that the door is clean and free from any existing finish or paint. Use a paint stripper or sandpaper to remove the old finish, taking care to follow the manufacturer’s instructions and wearing appropriate protective gear. Once the door is stripped and smooth, wipe it down with a damp cloth to remove any dust or debris.
Step 2: Repair and Fill Any Imperfections
Inspect the wood door for any imperfections such as cracks, dents, or holes. Use wood filler or putty to repair these areas, following the product instructions for application and drying time. Once the filler is dry, use sandpaper to smooth the repaired spots until they are flush with the rest of the door’s surface. This step is crucial for achieving a flawless finish and ensuring that the door looks as good as new.

After repairing any imperfections, sand the entire door with fine-grit sandpaper to create a smooth and even surface. This will help the new finish adhere properly and result in a professional-looking outcome. Use a tack cloth or a damp cloth to remove any dust or residue left by the sanding process. It’s important to ensure that the door is completely clean before applying the new finish.
Step 3: Apply the New Finish
Choose the type of finish you want for your wood door, whether it’s paint, stain, or varnish. Follow the manufacturer’s instructions for application, including the recommended number of coats and drying time between each coat. Use a brush or a roller to apply the finish evenly, working in the direction of the wood grain. Take care to avoid drips or pooling, as these can result in an uneven or unattractive finish.
Allow the finish to dry completely before applying additional coats or reattaching the door to its hinges. This will ensure that the finish cures properly and provides long-lasting protection for your wood door. Once the final coat is applied and dry, inspect the door for any touch-ups or areas that may need additional attention. Sand and reapply the finish as necessary to achieve the desired result.
Step 4: Reinstall the Door
Once the finish is fully dry and you are satisfied with the result, it’s time to rehang the door. Carefully align the hinges with the corresponding screw holes in the door frame and secure them in place using a screwdriver or a drill. Test the door to ensure that it opens and closes smoothly. Make any necessary adjustments to ensure a proper fit.
Finally, admire your beautifully refinished wood door and enjoy the enhanced look it brings to your home. Regular maintenance, such as periodically cleaning and applying a protective coating, will help prolong the lifespan of your newly refinished door and keep it looking its best for years to come.
Frequently Asked Questions
Here are some commonly asked questions about how to refinish a wood door:
Question 1: What materials do I need to refinish a wood door?
To refinish a wood door, you will need the following materials:
– Sandpaper (medium and fine grit)
– Paint or stain stripper
– Paint or stain of your choice
– Paintbrush or foam roller
– Clean cloth or sponge
– Drop cloth or plastic sheeting
– Gloves and safety goggles
– Paint scraper or putty knife
– Wood filler (if necessary)
Question 2: How do I prepare the wood door for refinishing?
To prepare the wood door for refinishing, follow these steps:
1. Remove the door from its hinges and lay it flat on a work surface.
2. Use a paint scraper or putty knife to remove any existing paint or stain.
3. Apply paint or stain stripper according to the manufacturer’s instructions and allow it to sit for the recommended amount of time.
4. Use a paintbrush or sponge to scrub away the old finish, working in the direction of the wood grain.
5. Rinse the door with clean water and allow it to dry completely.
6. Sand the door with medium grit sandpaper to smooth out any rough spots or imperfections.
7. Finish sanding with fine grit sandpaper for a smooth surface.
Question 3: Should I remove the hardware before refinishing the wood door?
It is recommended to remove the hardware before refinishing the wood door. This includes doorknobs, hinges, and any other metal or decorative pieces attached to the door. Removing the hardware allows for easier and more thorough refinishing of the wood surface. It also protects the hardware from accidentally getting damaged or covered in paint or stain during the refinishing process.
If removing the hardware is not possible, you can cover it with painter’s tape or plastic wrap to protect it from paint or stain. However, keep in mind that this may make refinishing the door more challenging, as you will need to work around the hardware and take extra care not to damage it.
Question 4: How do I apply paint or stain to the wood door?
To apply paint or stain to the wood door, follow these steps:
1. Stir the paint or stain thoroughly before applying.
2. Start with the recessed or detailed areas of the door, using a smaller brush to reach into corners and crevices.
3. Use a foam roller or larger brush for the larger, flat surfaces of the door.
4. Apply the paint or stain in thin, even coats, working in the direction of the wood grain.
5. Allow each coat to dry completely before applying the next coat.
6. If desired, sand lightly between coats for a smoother finish.
7. Repeat the process until you achieve the desired color and coverage.
Question 5: How do I maintain the refinished wood door?
To maintain the refinished wood door, follow these tips:
– Avoid using harsh cleaning agents or abrasive materials that can damage the finish. Instead, use a mild soap and water solution to clean the door.
– Regularly dust the door with a soft cloth or feather duster to prevent a buildup of dirt and debris.
– Avoid placing objects on the door that may scratch or damage the finish. Use protective pads or coasters when necessary.
– If the finish becomes worn or damaged over time, you can touch up the door with additional paint or stain.
– Consider applying a clear protective sealant to the refinished door to enhance its durability and longevity.
Not only does refinishing a wood door improve its appearance, but it also extends its lifespan and protects it from the elements. By properly stripping, sanding, staining, and sealing your wood door, you can ensure that it will continue to withstand the test of time and remain a beautiful asset to your home for years to come. So, don’t be afraid to tackle this DIY project and unleash your creativity. With the right techniques and a little bit of effort, you can achieve professional-looking results and take pride in your newly refinished wood door.
- How to Remove Glue From Wood Floor - April 14, 2024
- How to Dissolve Wood Glue - April 14, 2024
- How to Remove Wood Glue - April 14, 2024