Are you an aspiring artist looking to explore new mediums and techniques to enhance your creativity? Look no further than the captivating world of painting on wood with acrylic. Acrylic paint is a versatile and vibrant medium that allows you to create stunning artworks on various surfaces, and wood is no exception. In this guide, we will delve into the fascinating art form of painting on wood with acrylic, discussing the materials you’ll need, the techniques you can employ, and the endless possibilities that await you.
When it comes to painting on wood with acrylic, the possibilities are truly endless. Whether you’re a seasoned artist or a beginner, this art form provides a unique and exciting way to express your creativity. The natural texture and grain of the wood add an extra dimension to your artwork, creating a visually striking and organic feel. With acrylics, you have the freedom to experiment with bold colors, subtle shades, and intricate details, allowing you to bring your artistic vision to life in a way that is truly one-of-a-kind.
So, if you’re ready to embark on a creative journey that combines the beauty of wood with the versatility of acrylic paint, grab your brushes and let’s dive into the world of painting on wood with acrylic. Get ready to unleash your imagination and discover the endless possibilities that await you on this artistic endeavor.
Acrylic paint is a versatile medium for painting on wood. To get started, prepare the wood surface by sanding it lightly. Apply a coat of acrylic gesso to prime the wood and create a smooth surface. Once dry, you can begin painting with acrylics using brushes or other tools. Layer the colors and allow each layer to dry before adding more. Finish with a varnish or sealer to protect the painting. Enjoy your artistic creation!

How to Paint on Wood with Acrylic
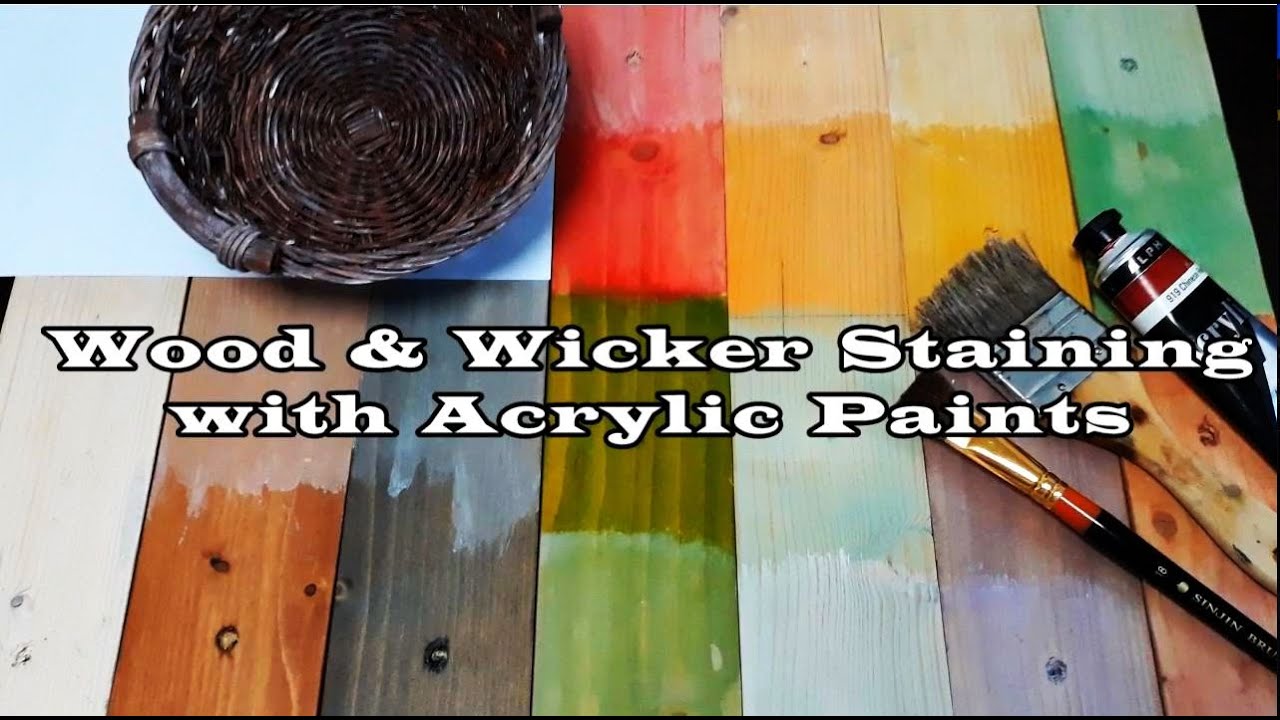
Painting on wood with acrylics can be a fun and creative way to add color and design to your wooden surfaces. Whether you’re a beginner or an experienced artist, this step-by-step guide will walk you through the process of painting on wood with acrylics. With the right materials and techniques, you can create beautiful and long-lasting artwork that will enhance the look of your wooden objects. So, let’s get started!
Step 1: Prepare Your Surface
Before you begin painting on wood, it’s important to properly prepare your surface. Start by sanding the wood to create a smooth and even surface for the paint to adhere to. Use a medium-grit sandpaper and sand in the direction of the wood grain. Once you’ve sanded the surface, wipe away any dust with a clean cloth.
Next, apply a primer to the wood. A primer will help the paint adhere better and prevent it from soaking into the wood. Choose a primer that is suitable for both wood and acrylic paint. Apply the primer using a paintbrush or a foam roller, making sure to cover the entire surface evenly. Allow the primer to dry completely before moving on to the next step.
Step 2: Gather Your Materials
Now that your surface is prepared, it’s time to gather your materials. Here’s what you’ll need:
- Acrylic paint in your desired colors
- Paintbrushes in various sizes
- A palette or a plastic plate for mixing colors
- Water for rinsing your brushes
- A palette knife (optional, for mixing paint)
- A container for water and a cloth for cleaning up spills

Make sure you have all these materials within reach before you start painting on wood. Having everything prepared will make the process smoother and more enjoyable.
Step 3: Start Painting
Now that you have all your materials ready, it’s time to start painting! Begin by selecting your colors and squeezing a small amount of each onto your palette or plastic plate. Use a palette knife or a brush to mix and blend the colors as desired.
Dip your paintbrush into the water and then blot it on a clean cloth to remove any excess moisture. This will help the paint flow smoothly and prevent it from becoming too diluted. Load your brush with paint and start applying it to the wood surface, using gentle strokes. Work in small sections and layer the paint as needed to achieve the desired color intensity.
Continue painting until you’ve covered the entire surface. If you’re working on a detailed design, use smaller brushes for precision. Allow the paint to dry completely between layers if you’re applying multiple coats. Once you’re satisfied with your artwork, let it dry completely before handling or displaying.
Step 4: Clean Up
After you’ve finished painting, it’s important to clean up your materials properly. Rinse your brushes thoroughly with water, making sure to remove all the paint. You can use mild soap if needed. Dry the brushes with a clean cloth and reshape the bristles. Store them in a cool and dry place to prolong their lifespan.
Clean any spills or splatters on your working surface and dispose of any leftover paint or palette mixtures according to your local regulations. Properly cleaning up after painting will help you maintain a neat and organized workspace.
Step 5: Protect and Preserve
Once your painted wood surface is completely dry, consider protecting it with a clear varnish or sealant. This will help preserve the colors and protect the wood from moisture and UV damage. Choose a varnish or sealant that is compatible with acrylic paint and follow the manufacturer’s instructions for application.
Regularly clean and dust your painted wood surfaces to keep them looking their best. Avoid placing them in direct sunlight or in areas with high humidity to prevent fading and warping. With proper care, your painted wood artwork will last for years to come.
Step 6: Experiment and Have Fun!
Now that you know the basics of painting on wood with acrylics, don’t be afraid to experiment and try different techniques. Mix colors, create textures, and let your creativity flow. Painting on wood can be a rewarding and enjoyable artistic endeavor, so embrace the process and have fun!
Frequently Asked Questions
Here are some commonly asked questions about painting on wood with acrylic:
Question 1: Can I use acrylic paint on wood?
Yes, acrylic paint can be used on wood surfaces. It adheres well to wood and provides a durable and long-lasting finish. Acrylic paint also allows for easy blending and layering, making it a versatile choice for wood painting projects.
Before applying acrylic paint on wood, it is recommended to prepare the surface by sanding it lightly to create a smooth and even base. This will help the paint adhere better and result in a more professional-looking finish.
Question 2: Do I need to prime the wood before painting with acrylic?
While priming the wood is not always necessary when using acrylic paint, it is generally recommended, especially if you want to achieve the best results. Priming helps to create a smooth and even surface, enhances paint adhesion, and prevents the wood from absorbing too much paint.
You can use a variety of primers for wood, such as gesso or acrylic-based primers. Apply the primer evenly using a brush or roller, and allow it to dry completely before starting to paint with acrylics.
Question 3: How do I prepare the wood for acrylic painting?
Preparing the wood surface before painting with acrylics is essential for achieving a professional-looking result. Start by cleaning the wood to remove any dust, dirt, or grease using a mild detergent and water. Rinse it thoroughly and allow it to dry completely.
Next, lightly sand the wood using fine-grit sandpaper to create a smooth surface. This will help the paint adhere better and prevent any unevenness. Wipe away any sanding residue and ensure the surface is clean before applying any primer or acrylic paint.
Question 4: Can I use multiple layers of acrylic paint on wood?
Absolutely! Acrylic paint is perfect for layering. You can apply multiple layers of acrylic paint on wood to achieve depth, texture, and dimension in your artwork. Allow each layer to dry completely before adding another one to avoid smudging or blending the colors unintentionally.
Layering with acrylics also allows for corrections and adjustments. If you’re not happy with a particular layer, you can easily paint over it once it’s dry and make the necessary changes without damaging the underlying layers.
Question 5: How do I protect acrylic paint on wood?
To protect your acrylic paint on wood, it is essential to apply a clear topcoat or varnish. This will seal the paint and provide a protective layer against moisture, UV rays, and general wear and tear.
You can choose from various types of clear varnishes or sealants suitable for acrylic paints. Apply the topcoat evenly using a brush or roller, following the manufacturer’s instructions. Allow it to dry completely before handling the painted wood.
Furthermore, the combination of acrylic paint and wood provides a harmonious blend of natural and contemporary elements. The texture and grain of the wood add an organic touch to the artwork, enhancing its visual appeal. Acrylic paint, with its vibrant colors and ability to adhere well to wood surfaces, ensures that the artwork remains vibrant and durable over time.
In conclusion, painting on wood with acrylic is an exciting venture for artists to explore. It allows for the fusion of traditional and modern artistic techniques, resulting in visually captivating and long-lasting artworks. So, grab your brushes, select your favorite wood surface, and let your creativity flow as you delve into the world of painting on wood with acrylic.
- How to Design Wood Carving - May 7, 2024
- How to Carve Wood - May 7, 2024
- How to Remove Cat Urine From Wood Furniture - May 7, 2024