Are you tired of looking at your worn-out wood table, longing for a fresh and polished look? If so, you’ve come to the right place. In this guide, we will take you through the step-by-step process of refinishing your wood table, allowing you to transform it into a stunning piece that will bring new life to your space. Whether you’re a seasoned DIY enthusiast or a beginner looking to take on a new project, this comprehensive guide will provide you with all the information and techniques you need to achieve professional-looking results.
Refinishing a wood table may seem like a daunting task, but with the right tools, materials, and guidance, you’ll be amazed at what you can accomplish. From assessing the condition of your table to preparing the surface, applying the perfect finish, and adding those final touches, we will walk you through each stage of the refinishing process. Along the way, we will share expert tips and tricks to ensure that you achieve a flawless and long-lasting result. So, roll up your sleeves, grab your sandpaper and paintbrush, and let’s get started on transforming your wood table into a true masterpiece.
How to Refinish a Wood Table:
- Prepare the table by removing any existing finish using sandpaper or a chemical stripper.
- Repair any damages, such as scratches or dents, with wood filler.
- Sand the entire surface of the table to smooth out imperfections.
- Apply a wood stain of your choice, following the manufacturer’s instructions.
- Once the stain is dry, apply a clear coat of polyurethane to protect the wood.
- Allow the table to dry completely before using.
How to Refinish a Wood Table: Step-by-Step Guide
Refinishing a wood table can rejuvenate its appearance and extend its lifespan. Whether your table has scratches, stains, or an outdated finish, this step-by-step guide will walk you through the process of refinishing it to restore its natural beauty. With the right tools, materials, and techniques, you can transform your wood table into a stunning centerpiece that will complement any decor.
Gather the Necessary Tools and Materials
Before you begin refinishing your wood table, gather all the necessary tools and materials. This will ensure that you have everything you need at hand, saving you time and effort during the process. Here’s a list of items you will need:
- Safety goggles and gloves
- Respirator mask
- Sandpaper (various grits)
- Paint stripper
- Paintbrushes
- Scraper
- Wood stain
- Clear polyurethane finish
- Clean cloths
- Mineral spirits
Having these tools and materials ready will ensure a smooth and efficient refinishing process.
Prepare the Table for Refinishing
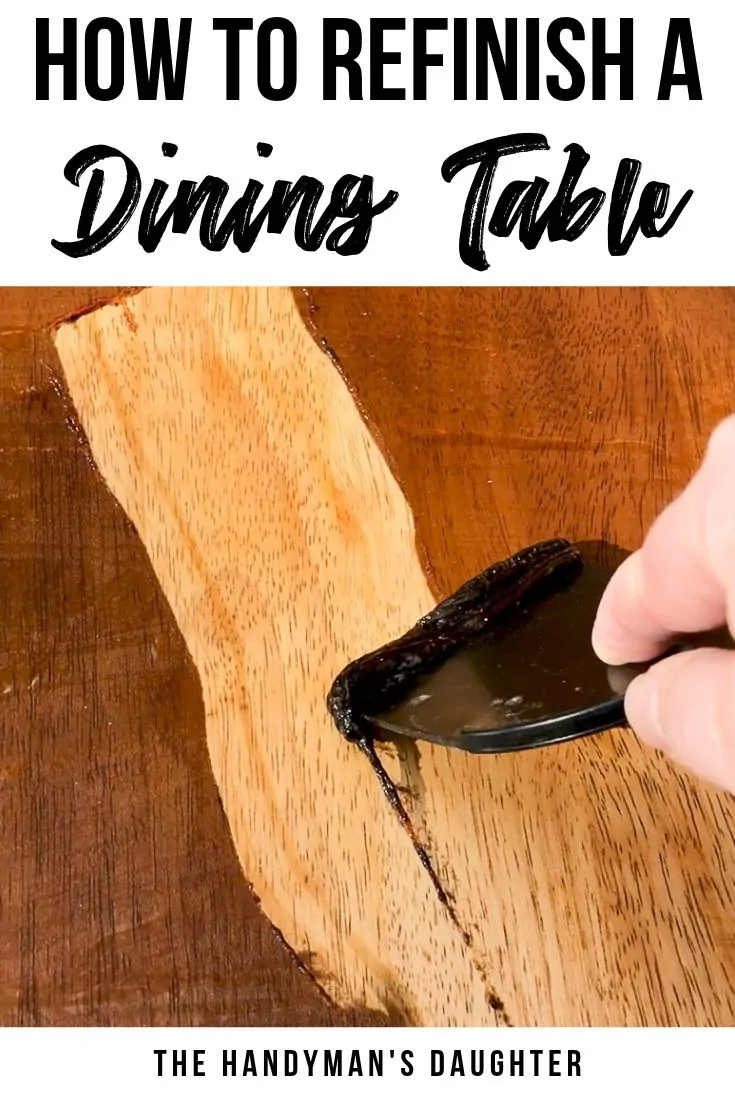
Before you can begin refinishing your wood table, you need to prepare it by removing the existing finish. Start by protecting yourself with safety goggles, gloves, and a respirator mask to prevent any injuries or inhalation of harmful chemicals. Apply a paint stripper to the table’s surface, following the manufacturer’s instructions. Allow the stripper to sit for the recommended amount of time to loosen the old finish.

Once the stripper has done its job, use a scraper to gently scrape off the old finish. Be careful not to gouge or damage the wood surface. After removing the majority of the old finish, use sandpaper with various grits to smooth out any remaining residue and to prepare the wood for staining. Begin with a coarse grit sandpaper and gradually work your way up to a finer grit to achieve a smooth and even surface.
In the next section, we will cover the staining and finishing process, as well as the final steps to complete the refinishing of your wood table.
Stain and Finish the Wood
After preparing the wood table, it’s time to apply the desired stain. Choose a stain color that matches your aesthetic preferences and the overall decor of the room. Before applying the stain, make sure the wood surface is clean and free of dust or debris. Apply the stain evenly with a paintbrush, following the wood grain. Allow the stain to penetrate the wood for the recommended time, and then wipe off any excess stain with a clean cloth.
Once the stain has dried, apply a clear polyurethane finish to protect the wood and enhance its appearance. Use a clean paintbrush to evenly apply the finish, following the manufacturer’s instructions. Allow the finish to dry thoroughly between coats, and lightly sand the surface between each coat for a smooth finish. Apply multiple coats of polyurethane until you achieve the desired level of sheen and protection. Finally, let the table dry completely before placing any objects on it.
By following these step-by-step instructions and taking the necessary precautions, you can successfully refinish your wood table and give it a fresh new look. Remember to work in a well-ventilated area and take breaks as needed. With patience and attention to detail, your wood table will be transformed into a beautiful piece of furniture that you can enjoy for years to come.
Frequently Asked Questions
Here are some commonly asked questions about how to refinish a wood table:
1. How do I prepare the wood table for refinishing?
Before refinishing the wood table, it is essential to prepare it properly. Start by removing any existing finish or paint from the surface using sandpaper or a paint stripper. Make sure to wear protective goggles and gloves during this process. Once the old finish is removed, clean the table thoroughly with a mild detergent and water. Allow it to dry completely before moving on to the next step.
After cleaning, inspect the table for any cracks, scratches, or dents. If necessary, fill these imperfections with wood filler and sand them smooth. Finally, ensure that the surface is free from dust and debris by wiping it down with a tack cloth.
2. What tools and materials do I need for refinishing a wood table?
Refinishing a wood table requires certain tools and materials to achieve the best results. Here are some essential items you will need:
– Sandpaper in various grits (coarse, medium, and fine)
– Paint stripper or chemical finish remover
– Protective goggles and gloves
– Wood filler and putty knife
– Stain or paint of your choice
– Brushes for applying stain or paint
– Clear protective finish (varnish, polyurethane, or lacquer)
– Tack cloth for cleaning the surface
3. Should I stain or paint my wood table?
Deciding whether to stain or paint your wood table depends on your personal preference and the desired look you want to achieve. Staining the wood allows you to enhance the natural beauty of the wood grain and create a rich, warm finish. On the other hand, painting the table gives you more versatility in terms of color options and allows you to completely transform its appearance.
Consider the style of your space, the existing décor, and your desired outcome when choosing between staining and painting. You can also opt for a combination of both techniques by staining the table’s top surface and painting the base or vice versa.
4. How do I apply the stain or paint to the wood table?
When applying stain or paint to a wood table, it is important to follow the correct technique to ensure an even and professional-looking finish. Here’s a step-by-step guide:
– Start by applying a thin and even coat of stain or paint using a brush or a clean cloth. Work in the direction of the wood grain for a smoother finish.
– Allow the first coat to dry completely before applying subsequent coats. This will depend on the specific product you are using, so refer to the manufacturer’s instructions for the recommended drying time.
– For a deeper color or more coverage, apply additional coats as needed, allowing each coat to dry before applying the next one.
– Once you achieve the desired color and coverage, finish the table with a clear protective coat such as varnish or polyurethane to seal and protect the surface.
5. How do I maintain the refinished wood table?
To maintain the refinished wood table and keep it looking its best, follow these tips:
– Clean the table regularly with a soft cloth or sponge and a gentle cleaner specifically designed for wood surfaces. Avoid using abrasive cleaners or harsh chemicals that can damage the finish.
– Use coasters or placemats to protect the table from hot plates, spills, and scratches caused by sharp objects.
– Avoid placing the table in direct sunlight or near heat sources, as prolonged exposure to heat and UV rays can fade and damage the finish over time.
– Periodically inspect the table for any signs of wear or damage. If necessary, touch up the finish by lightly sanding the affected area and applying a fresh coat of stain or paint.

Remember, the key to a successful refinishing project lies in careful preparation, patience, and attention to detail. Take the time to strip away the old finish, repair any damages, and choose the right stain and protective coating for your desired look. With the proper tools and techniques, you can create a beautifully refinished wood table that will be admired and enjoyed for years to come. So, don’t hesitate to embark on this creative journey and unleash your inner craftsman to bring out the natural beauty of your wood table. Happy refinishing!
- How to Make Wooden Pyramid Puzzle - May 13, 2024
- How to Solve Wooden Pyramid Puzzle - May 13, 2024
- How to Wooden Puzzle - May 13, 2024