Are you a DIY enthusiast who loves taking on home improvement projects? Picture this: you’re in the middle of renovating your space, and you encounter a frustrating setback – a broken screw stuck in a piece of wood. Suddenly, your excitement turns into a sense of defeat. But fear not! Removing broken screws from wood may seem like a daunting task, but with the right techniques and tools, you can conquer this challenge and get back on track with your project. In this guide, we’ll explore step-by-step methods to help you remove broken screws from wood, allowing you to save time, money, and your sanity.
Imagine the satisfaction of successfully salvaging that piece of wood and continuing with your project without the hassle of finding a replacement. Whether you’re a seasoned DIYer or just starting out, this guide will equip you with the knowledge and skills needed to tackle this common household problem. From simple everyday tools to specialized screw extractors, we’ll discuss a variety of methods for removing broken screws. So, let’s dive in and discover the secrets to unlocking those stubborn screws, empowering you to confidently handle any future mishaps that may come your way.
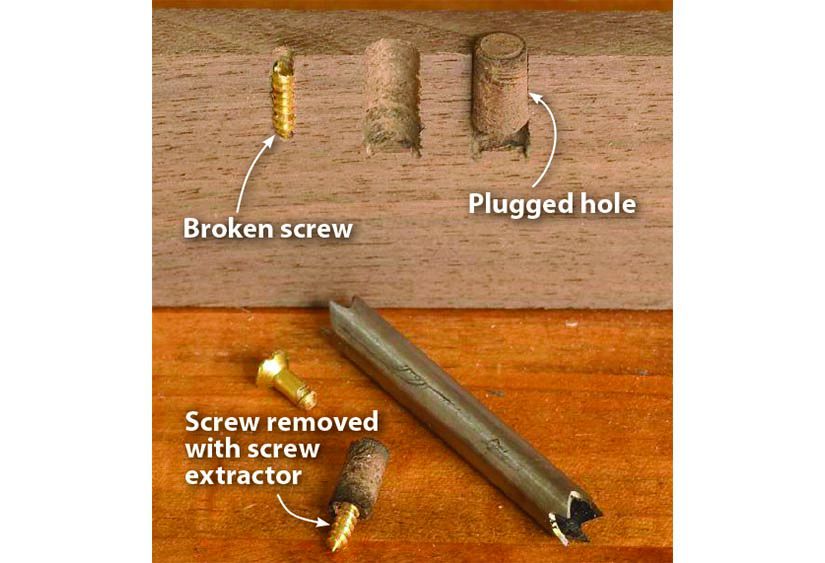
How to Remove Broken Screws from Wood:
- Use a screwdriver or drill to create a small indentation in the center of the broken screw.
- If the screw is protruding, grip it with pliers and turn it counterclockwise to remove it.
- If the screw is not protruding, use a screw extractor tool by inserting it into the indentation and turning it counterclockwise.
- If the extractor doesn’t work, drill a small hole into the center of the screw and use a screw extractor tool again.
- Once the screw is removed, fill the hole with wood filler and sand it down for a smooth finish.
How to Remove Broken Screws from Wood
Removing broken screws from wood can be a frustrating task, but with the right tools and techniques, it can be done efficiently. Whether you are a DIY enthusiast or a professional carpenter, knowing how to remove broken screws is an essential skill to have. In this article, we will guide you through the step-by-step process of removing broken screws from wood, ensuring minimal damage to the surrounding material.
Step 1: Assess the Situation
The first step in removing broken screws from wood is to assess the situation. Take a moment to determine the size of the screw, the depth it is embedded in the wood, and the condition of the surrounding area. This will help you choose the most appropriate method for removal.
If the screw head is visible and protruding from the wood, you may be able to grasp it with pliers or a wrench and unscrew it. However, if the screw is broken below the surface, you will need to use different techniques to extract it.
Step 2: Gather the Necessary Tools
Before proceeding with the removal process, gather the necessary tools. You will need:
- A drill with a drill bit slightly smaller than the diameter of the broken screw
- A screw extractor or a set of left-handed drill bits
- A hammer
- A pair of pliers or a wrench
- Safety goggles

Having these tools ready will save you time and ensure a smoother removal process.
Step 3: Drill a Pilot Hole
If the broken screw is flush with the wood surface, start by drilling a pilot hole in the center of the screw using a drill bit slightly smaller than the screw diameter. This will create a guide for the screw extractor or left-handed drill bit.
Ensure that the drill is set to rotate in reverse or counterclockwise direction before drilling the pilot hole. This will help loosen the broken screw as you drill.
Step 4: Use a Screw Extractor or Left-Handed Drill Bit
Once the pilot hole is drilled, insert the screw extractor or left-handed drill bit into the hole. Apply steady pressure and turn it counterclockwise to catch the broken screw’s threads and begin extraction. Keep the drill in reverse mode throughout this process.
If the screw extractor or left-handed drill bit does not catch onto the broken screw, try tapping it lightly with a hammer to create a better grip. Be cautious not to damage the surrounding wood.
Step 5: Apply Gradual Pressure
As you turn the screw extractor or left-handed drill bit counterclockwise, apply gradual pressure to extract the broken screw. If you encounter resistance, stop and apply penetrating oil to lubricate the area. This will help loosen the screw and make extraction easier.
Continue turning until the broken screw is completely removed from the wood. Be patient and avoid rushing this step, as excessive force can cause further damage.
Step 6: Clean the Hole
After successfully removing the broken screw, clean the hole with a brush or compressed air to remove any debris. This will ensure a clean surface for reinserting a new screw or filling the hole if necessary.
If the hole is too damaged to hold a screw, consider using wood filler or a dowel to repair it before proceeding with your project.
Step 7: Prevent Future Breakage
To prevent future screw breakage, there are a few precautions you can take. Firstly, ensure that you are using the correct size and type of screw for your project. Using a screw that is too long or too short can increase the risk of breakage.
Additionally, always pre-drill pilot holes before inserting screws, especially in hardwood or dense materials. This will reduce the stress on the screw and minimize the chances of it breaking.
Step 8: Practice Patience
Removing broken screws can be a time-consuming process, especially if they are firmly embedded in the wood. Practice patience and take breaks if needed to avoid frustration. Remember, rushing the process can lead to further damage, so proceed with caution and take your time.
By following these step-by-step instructions and using the proper tools, you can successfully remove broken screws from wood, allowing you to continue your project with minimal delays.
Frequently Asked Questions
Here are some commonly asked questions about how to remove broken screws from wood:
Q: What tools do I need to remove broken screws from wood?
To remove broken screws from wood, you will need a few essential tools:
1. Screw extractor: This tool is specifically designed to remove broken screws. It has a tapered end that digs into the screw, allowing you to twist it out.
2. Drill: A drill with a bit slightly smaller than the screw is necessary to create a pilot hole in the center of the broken screw.
Q: How do I use a screw extractor to remove a broken screw?
Using a screw extractor involves the following steps:
1. Drill a pilot hole: Use a drill to create a small pilot hole in the center of the broken screw.
2. Insert the extractor: Insert the screw extractor into the pilot hole, making sure it is securely seated.
3. Rotate counterclockwise: Using a wrench or pliers, slowly rotate the extractor counterclockwise. The extractor’s threads will grip the broken screw and gradually back it out of the wood.
Q: What should I do if the broken screw is stuck and won’t come out?
If the broken screw is stubborn and won’t come out, you can try the following solutions:
1. Apply heat: Use a heat gun or a soldering iron to heat the area around the screw. Heat can help loosen the screw’s grip on the wood.
2. Use penetrating oil: Apply penetrating oil, such as WD-40, to the broken screw. Let it sit for a few minutes to penetrate the threads, then try removing the screw again.
Q: Can I use pliers to remove a broken screw from wood?
Yes, pliers can sometimes be used to remove a broken screw from wood. However, this method may not be as effective as using a screw extractor. To use pliers, grip the exposed part of the broken screw firmly and rotate it counterclockwise. Be careful not to damage the surrounding wood in the process.
If the screw is too small or the head is completely broken off, pliers may not provide enough grip to remove it.
Q: What are some preventative measures to avoid breaking screws in wood?
To prevent breaking screws in wood, consider the following tips:
1. Use the right size and type of screw for the job.
2. Pre-drill pilot holes to make it easier for the screw to go in smoothly.
3. Apply some lubrication, such as wax or soap, to the screw before driving it in.
4. Avoid overtightening the screw, as excessive force can cause it to break.
5. If a screw begins to feel resistant, stop and assess the situation before applying more force.

Furthermore, it is important to always use the appropriate tools for the job. Investing in a quality screw extractor set and having a variety of drill bits on hand can make all the difference in successfully removing broken screws. Additionally, don’t be afraid to seek assistance or advice from professionals if you encounter any difficulties during the process.
By mastering the art of removing broken screws from wood, you can save yourself the expense and hassle of replacing entire pieces of furniture or compromising the integrity of your woodworking projects. With practice and perseverance, you will become more proficient and confident in your ability to tackle this challenge. So next time you encounter a broken screw, remember these tips and techniques to make the task easier and more efficient.
- How to Waterproof the Inside of a Wood Planter Box - May 11, 2024
- How to Build a Raised Garden Bed With Wood - May 11, 2024
- How to Transfer Photos to Wood With Nail Polish Remover - May 11, 2024