Are you tired of staring at that old, worn-out wood table in your home? If so, it’s time to give it a fresh new look with a fresh coat of paint! Repainting a wood table not only revitalizes its appearance but also adds a touch of your personal style to your living space. Whether you’re a seasoned DIY enthusiast or a beginner looking to embark on your first furniture painting project, this guide will walk you through the step-by-step process of repainting a wood table. So, grab your paintbrushes and let’s transform that tired table into a stunning centerpiece that will breathe new life into your home.
Repainting a wood table may seem like a daunting task, but with the right tools, materials, and techniques, it can be a rewarding and enjoyable project. In this comprehensive guide, we will cover everything you need to know to successfully repaint your wood table. From selecting the right paint and prepping the surface to applying the paint and adding finishing touches, we will guide you through each stage of the process. Whether you want to achieve a sleek, modern look or a rustic, distressed finish, we will provide tips and tricks to help you achieve your desired result. So, get ready to unleash your creativity and transform your wood table into a stunning piece of furniture that will be the envy of all your guests.
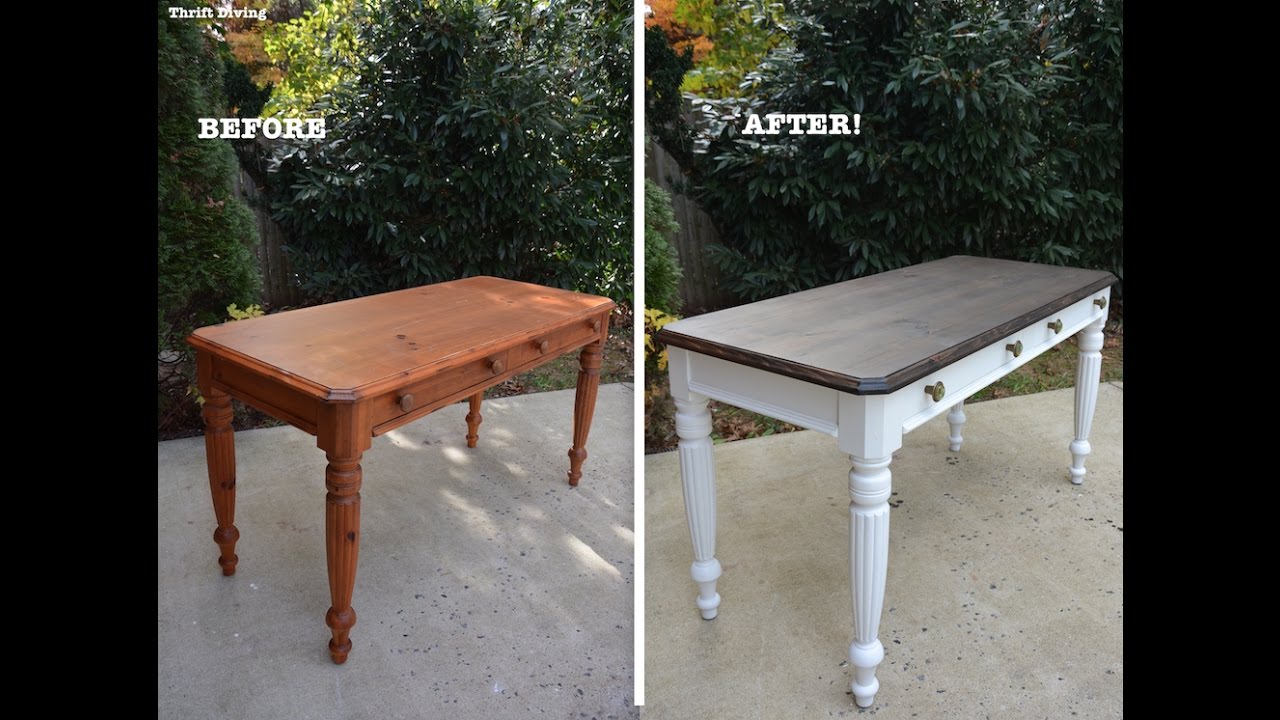
- Prepare the table by sanding it down to remove any existing paint or varnish.
- Clean the surface thoroughly with a mild detergent to remove any dirt or grime.
- Apply a coat of primer to ensure better adhesion of the new paint.
- Choose your desired paint color and apply it evenly using a brush or roller.
- Allow the paint to dry completely, then apply a second coat if necessary.
- Once the final coat is dry, you can optionally apply a clear protective finish for added durability.
How to Repaint a Wood Table
Repainting a wood table can be a great way to breathe new life into an old piece of furniture. Whether you want to refresh the table’s current color or completely change its look, repainting can give your table a fresh and updated appearance. In this step-by-step guide, we will walk you through the process of repainting a wood table, from preparing the surface to applying the final coat of paint.
Step 1: Prepare the Surface
The first step in repainting a wood table is to properly prepare the surface. Start by removing any existing paint or varnish using a paint stripper or sandpaper. This will ensure that the new paint adheres well to the wood. Next, clean the table thoroughly to remove any dust or debris. You can use a mild detergent and water for this step. Once the table is clean, allow it to dry completely before moving on to the next step.
After the table has dried, inspect it for any dents, scratches, or other imperfections. Fill these with wood filler and sand them down until the surface is smooth and even. This will create a perfect canvas for the new paint.
Step 2: Prime the Table
Before applying the paint, it is important to prime the table. Primer helps the paint adhere better to the surface and provides a smoother and more durable finish. Choose a primer that is suitable for wood surfaces and apply it evenly using a brush or roller. Allow the primer to dry completely according to the manufacturer’s instructions.
Once the primer is dry, lightly sand the surface to remove any rough spots or brush marks. This will ensure a smoother finish and better paint adhesion. Clean the table again to remove any dust from sanding.
Step 3: Apply the Paint

Now it’s time to apply the paint to the wood table. Choose a high-quality paint that is specifically formulated for wood surfaces. Using a brush or roller, apply the paint evenly in long, smooth strokes. Start from one end of the table and work your way towards the other, ensuring that the paint is applied evenly and without drips or brush marks.
Allow the first coat of paint to dry completely before applying a second coat. This will ensure a more even and durable finish. If necessary, lightly sand the surface between coats to achieve a smooth finish. Apply as many coats as needed until you are satisfied with the color and coverage.
Step 4: Finishing Touches
Once the final coat of paint is dry, you can add any desired finishing touches to your wood table. This could include applying a clear protective topcoat to enhance durability and provide a glossy finish. Alternatively, you can choose to distress the table for a more vintage or rustic look.
Finally, allow the table to dry completely before using it. This will ensure that the paint cures properly and prevents any unwanted marks or damage. Once dry, you can enjoy your newly repainted wood table and admire the transformation it has undergone.
Frequently Asked Questions
Here are some common questions about how to repaint a wood table:
Question 1: What materials do I need to repaint a wood table?
Answer: To repaint a wood table, you will need the following materials:
– Sandpaper or an electric sander
– Primer paint
– Paintbrushes or a paint sprayer
– Latex or oil-based paint
– Clear sealer or varnish
– Drop cloths or newspaper to protect the surrounding area
Question 2: How do I prepare the wood table for repainting?
Answer: Before repainting a wood table, it is important to properly prepare the surface. The following steps should be taken:
– Start by removing any existing paint or varnish using sandpaper or an electric sander. This will help the new paint adhere better.
– Clean the table thoroughly to remove any dirt, grease, or dust. You can use a mild detergent and water for this step.
– Fill any cracks, dents, or imperfections in the wood with wood filler, and sand the surface smooth once it is dry.
– Apply a coat of primer paint to ensure better adhesion and durability of the final paint color.
Question 3: What is the best type of paint to use for repainting a wood table?
Answer: The best type of paint to use for repainting a wood table depends on personal preference and the desired finish. Latex paint is a popular choice as it is easy to clean up and has low odor. Oil-based paint, on the other hand, provides a more durable and glossy finish. Consider the usage of the table and the look you want to achieve when choosing the paint type.
– If the table will be used frequently and is prone to spills or stains, an oil-based paint might be a better option.
– If you prefer a quick-drying and easy cleanup process, latex paint is a suitable choice.
Question 4: How many coats of paint should I apply?
Answer: The number of coats of paint needed for a wood table depends on the desired color and coverage. In most cases, two coats of paint are sufficient. However, if you are painting a dark table a lighter color or vice versa, you may need to apply additional coats to achieve the desired result. Allow each coat to dry completely before applying the next one.
Question 5: How do I protect the repainted wood table?
Answer: To protect the repainted wood table and ensure its longevity, it is recommended to apply a clear sealer or varnish. This will provide a protective layer and enhance the durability of the paint. Follow the manufacturer’s instructions for the specific product you choose. Additionally, avoid placing hot or sharp objects directly on the painted surface to prevent any damage.
– Regularly clean the table using a soft cloth and mild cleaning solution to keep it looking its best.
In conclusion, learning how to repaint a wood table can be a rewarding and fulfilling project that breathes new life into a tired piece of furniture. By following the steps outlined in this guide, you can confidently transform your table into a stunning centerpiece that reflects your personal style and taste. Remember to take the time to properly prepare the surface, choose the right paint and finish, and apply even coats for a smooth and professional-looking result. With patience and attention to detail, you’ll be able to enjoy your beautifully repainted wood table for years to come.
Don’t be afraid to get creative with your repainting project. Experiment with different colors, finishes, and techniques to truly make your table one-of-a-kind. Whether you prefer a classic, vintage look or a bold, modern statement piece, repainting a wood table allows you the opportunity to express your individuality and create a furniture piece that perfectly complements your home decor. So, roll up your sleeves, gather your supplies, and embark on this exciting journey of transforming your wood table into a stunning masterpiece that will surely be the envy of all who see it. Happy painting!
- How to Remove Mold From Plywood - April 18, 2024
- How to Get Rid of Green Mold on Wood - April 18, 2024
- How to Prevent Mold on Wood - April 18, 2024