Wood is a timeless and elegant material that adds warmth and charm to any space. From antique furniture to cherished heirlooms, wood holds a special place in our hearts and homes. But what happens when cracks appear, threatening the beauty and integrity of our beloved wooden treasures? Fear not, for in this guide, we will explore the art of repairing cracked wood, equipping you with the knowledge and techniques to restore its splendor.
Cracks in wood can occur for various reasons, such as changes in humidity, age, or even accidents. Regardless of the cause, these cracks can be distressing, leaving us wondering if there is a way to salvage our cherished wooden belongings. The good news is that with the right tools and techniques, repairing cracked wood is not only possible but also an opportunity to showcase our craftsmanship and revive the natural beauty of this versatile material. So, whether you’re a seasoned woodworker or a novice DIY enthusiast, join us on this journey as we delve into the art of repairing cracked wood, one crack at a time.
How to Repair Cracked Wood:
- Identify the crack and assess its depth.
- Clean the cracked area using a brush or vacuum.
- Fill the crack with wood filler using a putty knife.
- Smooth the filled area with sandpaper once the filler dries.
- Apply wood glue along the crack and clamp the wood together.
- Allow the glue to dry completely before removing the clamp.
- Sand the repaired area to ensure a smooth finish.
- Apply a wood stain or paint to match the surrounding wood.
How to Repair Cracked Wood: Step-by-Step Guide
Wood is a popular material used in various applications, from furniture to flooring. However, over time, wood can develop cracks due to various factors like changes in temperature and moisture levels. If you have cracked wood that needs repair, don’t worry! With the right tools and techniques, you can restore the integrity and beauty of the wood. In this article, we will guide you through the process of repairing cracked wood, step by step.
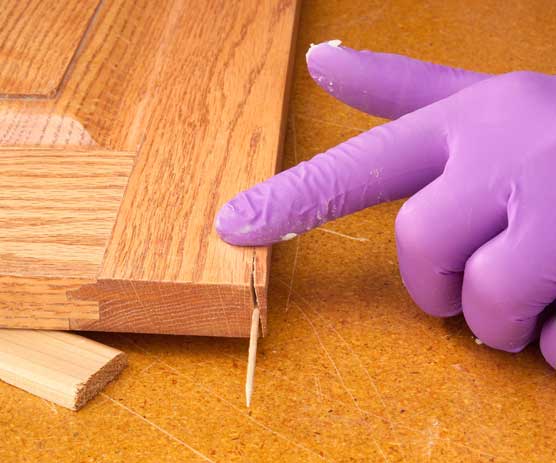
Step 1: Assess the Damage
The first step in repairing cracked wood is to assess the extent of the damage. Take a close look at the crack and determine its length, width, and depth. Is the crack superficial, or does it extend through the entire thickness of the wood? This information will help you determine the best approach for repair.
If the crack is small and shallow, you may be able to fix it with a simple wood filler or epoxy. However, if the crack is deep and significant, you may need to consider more extensive repairs, such as using wood splines or replacing the damaged section altogether.
Step 2: Prepare the Wood
Before you can start repairing the crack, you need to prepare the wood surface. Begin by cleaning the area around the crack to remove any dirt, dust, or debris. You can use a soft brush or a damp cloth to gently clean the surface.

Next, use sandpaper to smooth the edges of the crack. This will help create a clean and even surface for the filler or epoxy to adhere to. Start with a coarse-grit sandpaper to remove any rough edges, and then switch to a finer-grit sandpaper to achieve a smooth finish.
Step 3: Apply Wood Filler or Epoxy
Once the wood surface is prepared, you can apply the wood filler or epoxy to repair the crack. Wood filler is suitable for smaller cracks, while epoxy is better for larger or deeper cracks.
If you are using wood filler, follow the manufacturer’s instructions to mix and apply the filler. Use a putty knife to fill the crack, ensuring that the filler is slightly overfilled to compensate for shrinkage during drying. Once the filler is dry, sand it down to match the surrounding wood surface.
If you are using epoxy, mix the two components according to the instructions. Apply the epoxy to the crack, making sure to fill it completely. Use a putty knife or a plastic scraper to smooth the epoxy and remove any excess. Allow the epoxy to cure according to the manufacturer’s instructions.
Step 4: Sand and Finish
After the filler or epoxy has dried and cured, it’s time to sand and finish the repaired area. Start with a coarse-grit sandpaper to level the repaired surface with the surrounding wood. Gradually switch to finer-grit sandpaper to achieve a smooth finish.
Once the surface is smooth, you can apply a suitable wood finish to match the rest of the wood. This can be a varnish, stain, or paint, depending on your preference and the desired outcome. Apply the finish according to the manufacturer’s instructions, and allow it to dry completely before using or handling the repaired wood.
By following these steps, you can effectively repair cracked wood and restore its strength and appearance. Remember to always prioritize safety by wearing protective gear and working in a well-ventilated area. With patience and care, you can extend the lifespan of your wood and enjoy its beauty for years to come.
Frequently Asked Questions
Here are some commonly asked questions about how to repair cracked wood:
Question 1: How do I identify the type of wood crack I need to repair?
Identifying the type of wood crack is crucial for determining the right repair method. There are three main types of cracks: surface cracks, through cracks, and structural cracks. Surface cracks only affect the top layer of the wood and can be easily repaired. Through cracks go all the way through the wood but do not affect its structural integrity. Structural cracks, on the other hand, impact the strength of the wood and require more extensive repairs.
To identify the type of crack, carefully examine the wood and look for any visible signs of damage. If you are unsure, it is best to consult a professional to assess the severity of the crack and provide appropriate repair solutions.
Question 2: Can I repair a cracked wooden piece myself?
Yes, you can repair a cracked wooden piece yourself, depending on the severity of the crack. Surface cracks and minor through cracks can often be fixed with DIY methods. However, for structural cracks or if you are unsure about the repair process, it is recommended to seek professional help.
Repairing cracked wood requires precision and knowledge of appropriate techniques and materials. Improper repairs can further damage the wood or compromise its structural integrity. If you have any doubts or lack experience in woodworking, it is best to consult an expert to ensure a successful and long-lasting repair.
Question 3: What tools and materials do I need for repairing cracked wood?
The tools and materials you need for repairing cracked wood depend on the type and severity of the crack. Generally, you will need the following:
– Wood glue or epoxy resin for bonding the cracked parts together.
– Clamps or vice grips to hold the wood in place during the repair.
– Sandpaper or a file to smooth the repaired area.
– Wood filler or putty to fill any gaps or voids left after the repair.
– Paint or varnish to match the repaired wood with the rest of the piece.
These are basic tools and materials, and depending on the specific repair, you may need additional items. It is always a good idea to consult a professional or research specific repair methods to ensure you have all the necessary tools and materials.
Question 4: How do I repair a surface crack in wood?
Repairing a surface crack in wood is relatively simple and can be done using wood glue. Here’s a step-by-step process:
1. Clean the cracked area with a soft brush or cloth to remove any dirt or debris.
2. Apply a small amount of wood glue along the length of the crack, making sure it penetrates into the crack.
3. Gently press the cracked parts together and use clamps or vice grips to hold them in place.
4. Allow the glue to dry completely, following the manufacturer’s instructions.
5. Once the glue is dry, remove the clamps and sand the repaired area to make it smooth and even with the rest of the wood.
6. Finally, apply paint or varnish to match the repaired wood with the surrounding surface, if necessary.
Question 5: How do I repair a structural crack in wood?
Repairing a structural crack in wood requires more extensive measures. It is recommended to seek professional help for such repairs, as they may involve complex techniques and specialized equipment. A professional will assess the severity of the crack and determine the most appropriate repair method.
In some cases, reinforcing the cracked wood with metal brackets or splints may be necessary. This helps restore the structural integrity of the wood and prevents further damage. The repair process may also involve removing and replacing the damaged section of the wood if the crack is extensive.
Attempting to repair structural cracks without proper knowledge and expertise can lead to further damage or compromise the stability of the wood. It is best to consult a professional to ensure a safe and effective repair.
Woodworking Tip: Finishing – How to Repair Wood Cracks
In conclusion, repairing cracked wood is a task that requires patience, precision, and the right tools. By following the steps outlined in this guide, you can restore the beauty and functionality of your wooden furniture, flooring, or other items. Remember to start by assessing the severity of the crack and determining the best repair method, whether it’s using wood filler, epoxy, or glue. Take your time to carefully prepare the area, ensuring it is clean and free from debris. Then, apply the chosen repair material and allow it to dry completely before sanding and finishing the wood to create a seamless and polished look.
Furthermore, prevention is key to avoiding future cracks in wood. Regularly inspect and maintain your wooden items, ensuring they are properly sealed and protected from temperature and humidity fluctuations. Additionally, be mindful of how you handle and use wooden objects, taking care to avoid excessive force or pressure that could lead to cracking. By implementing these preventative measures and knowing how to effectively repair cracked wood, you can extend the lifespan of your wooden items and keep them looking their best for years to come. Remember, with the right knowledge and techniques, you can confidently tackle any cracked wood repair project and enjoy the beauty and durability of wood for a lifetime.
- How to Remove Glue From Wood Floor - April 14, 2024
- How to Dissolve Wood Glue - April 14, 2024
- How to Remove Wood Glue - April 14, 2024