Are you an avid woodworker or a DIY enthusiast looking to enhance your skills? One essential tool that every woodworker should have in their arsenal is a sharp wood chisel. A sharp chisel not only allows for precise and clean cuts but also ensures safety and efficiency in your woodworking projects. However, mastering the art of sharpening a wood chisel can be a daunting task for beginners. Fret not, as this guide will take you through the step-by-step process of sharpening your wood chisel to perfection, unlocking its true potential and enhancing your woodworking experience.
Sharpening a wood chisel is not just about restoring its edge; it is an art that requires patience, skill, and knowledge. In this comprehensive guide, we will delve into the various techniques, tools, and tips needed to achieve a razor-sharp edge on your wood chisel. From understanding the different types of chisels and their specific uses to learning the correct sharpening angles and honing methods, we will equip you with all the necessary information to transform your dull chisel into a precision tool. So, whether you’re a seasoned woodworker looking for a refresher or a beginner eager to learn the ropes, join us as we unravel the secrets to sharpening a wood chisel and elevate your woodworking game to new heights.
- Secure the chisel in a vise or hold it firmly with a clamp.
- Use a sharpening stone with a medium grit to remove any nicks or burrs.
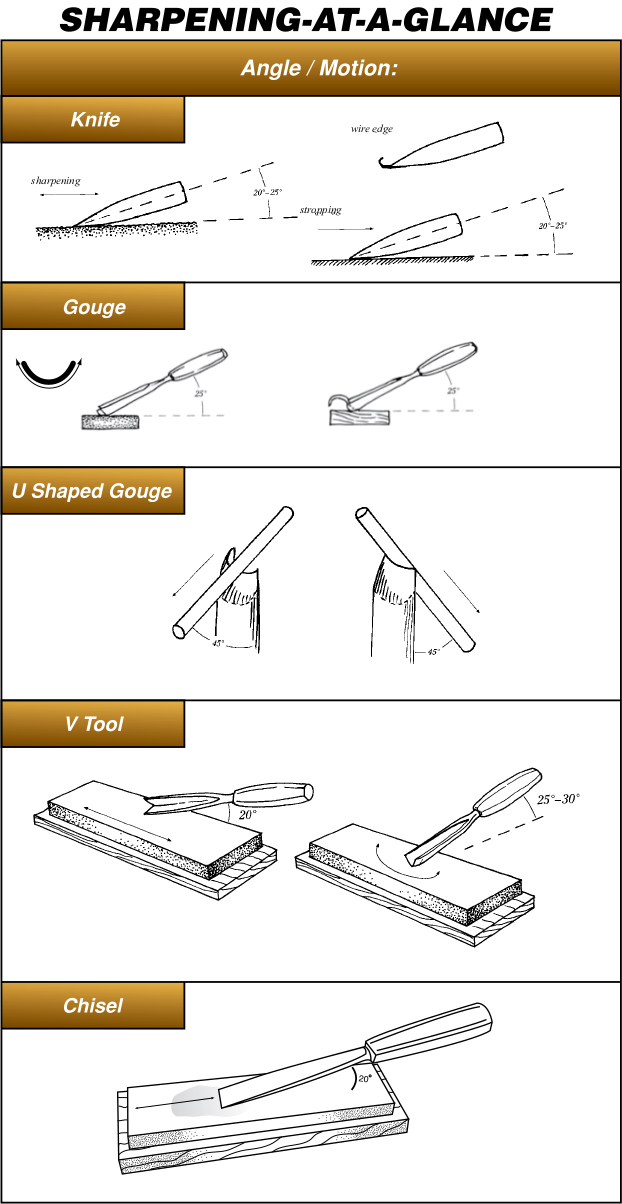
- Hold the beveled edge of the chisel flat against the stone at a 25-degree angle.
- Maintain consistent pressure and move the chisel back and forth across the stone.
- Switch to a fine grit stone and repeat the process to create a sharp edge.
- Finish by honing the edge with a leather strop or honing guide.
How to Sharpen a Wood Chisel
In woodworking, a sharp wood chisel is an essential tool for creating precise cuts and shaping wood. Over time, however, the cutting edge of a chisel can become dull and less effective. In this step-by-step guide, we will walk you through the process of sharpening a wood chisel to restore its sharpness and cutting ability. With a few simple tools and a little practice, you can keep your wood chisels in optimal condition for your woodworking projects.
Step 1: Gather the Necessary Tools
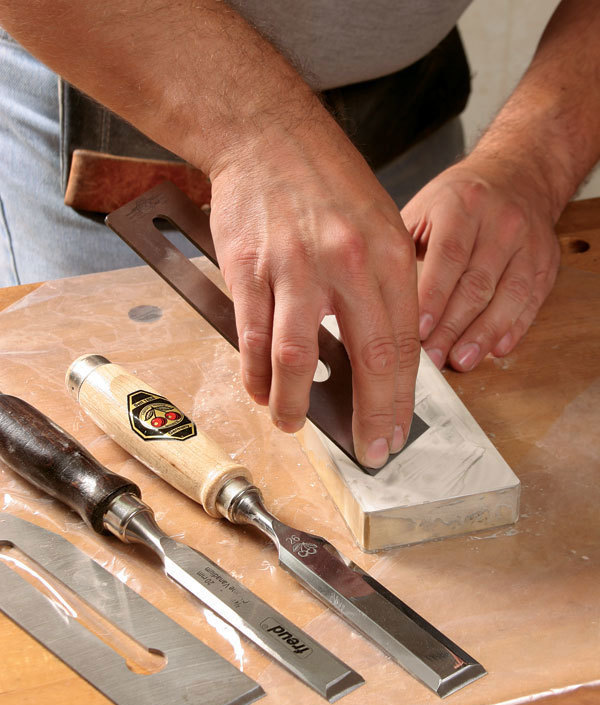
Before you begin sharpening your wood chisel, it is important to gather the necessary tools and materials. You will need a flat sharpening stone or diamond plate, a honing guide, a marker or pencil, and some honing oil. Additionally, have a rag or towel nearby to wipe away any excess oil or debris.
Once you have gathered everything you need, find a flat and stable surface to work on. It is crucial to have a solid and level workspace to ensure accurate sharpening.
Step 2: Prepare the Chisel
Start by preparing the wood chisel for sharpening. Inspect the chisel’s cutting edge for any nicks, chips, or excessive wear. If you notice any major damage, it may be necessary to repair or replace the chisel. Minor imperfections can often be addressed during the sharpening process.
Next, use a marker or pencil to darken the bevel edge of the chisel. This will help you monitor your progress as you sharpen the tool. A clearly marked bevel will allow you to see where the metal is being removed and ensure an even and consistent sharpening.
Step 3: Secure the Chisel in a Honing Guide

A honing guide is a useful tool that helps maintain a consistent angle while sharpening. Place the wood chisel into the honing guide, making sure it sits securely and snugly. The honing guide will prevent any accidental changes in angle, resulting in a more accurate and effective sharpening process.
Adjust the honing guide to achieve the desired bevel angle. The angle will depend on the specific chisel and the intended use. For general woodworking tasks, a bevel angle of around 25 degrees is commonly used. However, consult the manufacturer’s recommendations or your own preferences for the optimal angle.
Step 4: Sharpen the Chisel
Now it’s time to begin sharpening the wood chisel. Place the sharpening stone or diamond plate on your work surface, making sure it is stable and secure. Apply a few drops of honing oil to the stone’s surface, which will help lubricate the process and prevent heat build-up.
Hold the honing guide firmly and position the chisel’s bevel against the stone. With light pressure, move the chisel back and forth along the stone’s surface, following the bevel’s angle. Maintain a consistent and controlled motion, applying even pressure across the entire cutting edge. Continue sharpening until you have removed any dullness and achieved a sharp and polished cutting edge.
Step 5: Test and Fine-Tune
After sharpening, it is important to test the chisel’s cutting ability. Carefully wipe away any oil or debris from the chisel and make a test cut on a scrap piece of wood. Pay attention to the quality of the cut and any signs of improved sharpness.
If necessary, make any adjustments to the bevel angle or repeat the sharpening process to achieve the desired sharpness. Remember, practice makes perfect, and with time, you will develop a sharpening routine that suits your woodworking needs.
Step 6: Maintain and Store Properly
Once you have sharpened your wood chisel, it is essential to maintain its sharpness and protect it from damage. After each use, clean the chisel and remove any debris or residue. Apply a light coat of oil to prevent rust and keep the blade in good condition.
Store your chisels in a clean and dry place, away from excessive moisture or extreme temperatures. Consider using blade protectors or sheaths to prevent accidental nicks or dings when storing or transporting the chisels.
Step 7: Practice and Refine
Sharpening a wood chisel is a skill that improves with practice. Take the time to practice sharpening techniques on different chisels, experiment with different angles, and seek feedback from experienced woodworkers. Continuous learning and refinement will help you master the art of sharpening wood chisels and achieve exceptional results in your woodworking projects.
Step 8: Troubleshooting
If you encounter any difficulties or issues while sharpening your wood chisel, don’t get discouraged. There are various resources available, such as online tutorials and woodworking forums, where you can find solutions to common problems. Remember, every woodworker faces challenges, and seeking advice from others can be invaluable in overcoming them.
Step 9: Safety Precautions
When sharpening a wood chisel, it is crucial to prioritize safety. Always wear protective gear, such as safety glasses and gloves, to shield yourself from potential accidents or injuries. Work in a well-ventilated area to avoid inhaling dust or fumes.
Pay close attention to your movements and maintain a stable and controlled grip on the chisel and honing guide. Keep your fingers and hands away from the cutting edge at all times to prevent accidental cuts. Safety should always be a top priority during any woodworking activity.
Step 10: Seek Professional Help
If you are unsure about sharpening your wood chisel or encounter challenging issues, it is wise to seek professional help. Experienced woodworking professionals or local sharpening services can provide expert guidance and ensure your chisels are sharpened to the highest standard. Don’t hesitate to reach out for assistance when needed.
Frequently Asked Questions
Here are some commonly asked questions about how to sharpen a wood chisel:
1. How often should I sharpen my wood chisel?
It is recommended to sharpen your wood chisel whenever you notice that it is not cutting as efficiently as it used to. The frequency of sharpening will depend on how often you use the chisel and the type of wood you are working with. If you are working with hardwoods, you may need to sharpen your chisel more frequently compared to softer woods.
Regular maintenance is key to keeping your chisel sharp. It is a good practice to inspect the cutting edge before each use and sharpen it if necessary. By keeping your chisel sharp, you will achieve cleaner cuts and reduce the risk of accidents due to a dull blade.
2. What tools do I need to sharpen a wood chisel?
To sharpen a wood chisel, you will need a few basic tools. Here’s a list of the essential tools:
– A sharpening stone or honing guide: This will be used to sharpen the cutting edge of the chisel.
– A flat surface: You will need a stable workbench or table to place the sharpening stone on.
– Honing oil or water: This is used as a lubricant to help achieve a smooth sharpening process.
– Safety equipment: It is important to wear safety goggles and gloves to protect yourself during the sharpening process.
3. What is the correct angle to sharpen a wood chisel?
The correct angle to sharpen a wood chisel is typically between 25 to 30 degrees. This angle provides a good balance between sharpness and durability. Sharpening the chisel at a lower angle will result in a sharper edge but may sacrifice its durability, causing it to dull more quickly. On the other hand, a higher angle will provide more durability but may not be as sharp.
When sharpening the chisel, it is crucial to maintain a consistent angle throughout the process. Using a honing guide can help you achieve this consistency. Start by placing the chisel on the sharpening stone and gradually lift the handle until you reach the desired angle. Gently move the chisel back and forth across the stone in a smooth motion to sharpen the blade evenly.
4. What is the best technique for sharpening a wood chisel?
There are different techniques for sharpening a wood chisel, but one common approach is the “scary sharp” method. Here’s a simple step-by-step process:
– Start by securing the sharpening stone on a flat surface with a non-slip mat or use a honing guide to hold the chisel in place.
– Apply a few drops of honing oil or water to the stone to lubricate the surface.
– Hold the chisel at the desired angle and place the cutting edge against the stone.
– Move the chisel back and forth in a smooth, sweeping motion, applying light pressure.
– Continue sharpening, occasionally checking the progress by inspecting the cutting edge.
– Once the desired sharpness is achieved, remove any burrs by lightly stroking the back of the chisel on the stone.
– Finally, wipe off any excess oil or water from the chisel and inspect the blade before use.
5. Can I sharpen a wood chisel with sandpaper?
Yes, you can sharpen a wood chisel with sandpaper. This method is often referred to as “lapping” or “scraping” and can be a quick and effective way to sharpen a chisel. Here’s how you can do it:
– Start by selecting a flat surface, such as a piece of glass or granite countertop.
– Attach the sandpaper to the flat surface using adhesive or double-sided tape.
– Use a honing guide or your hand to hold the chisel at the desired angle.
– Move the chisel back and forth on the sandpaper in a similar motion to sharpening on a stone.
– Continue sharpening, periodically checking the progress and adjusting the angle if needed.
– Once the chisel is sharp, remove any burrs and wipe off any residue before use.
Sharpening a wood chisel may seem daunting at first, but with the right knowledge and tools, it becomes a straightforward and rewarding process. Not only will you save time and frustration by working with a sharp chisel, but you will also enhance your woodworking skills and produce better results. So, take the time to learn and practice this skill, and soon you will be able to confidently tackle any woodworking project with a sharp and reliable wood chisel. Remember, a sharp chisel is a woodworker’s best friend!
- How to Decorate a Living Room With Wood Paneling - May 8, 2024
- How to Paint Wood Paneling - May 8, 2024
- How to Carve Wooden Gnomes - May 8, 2024