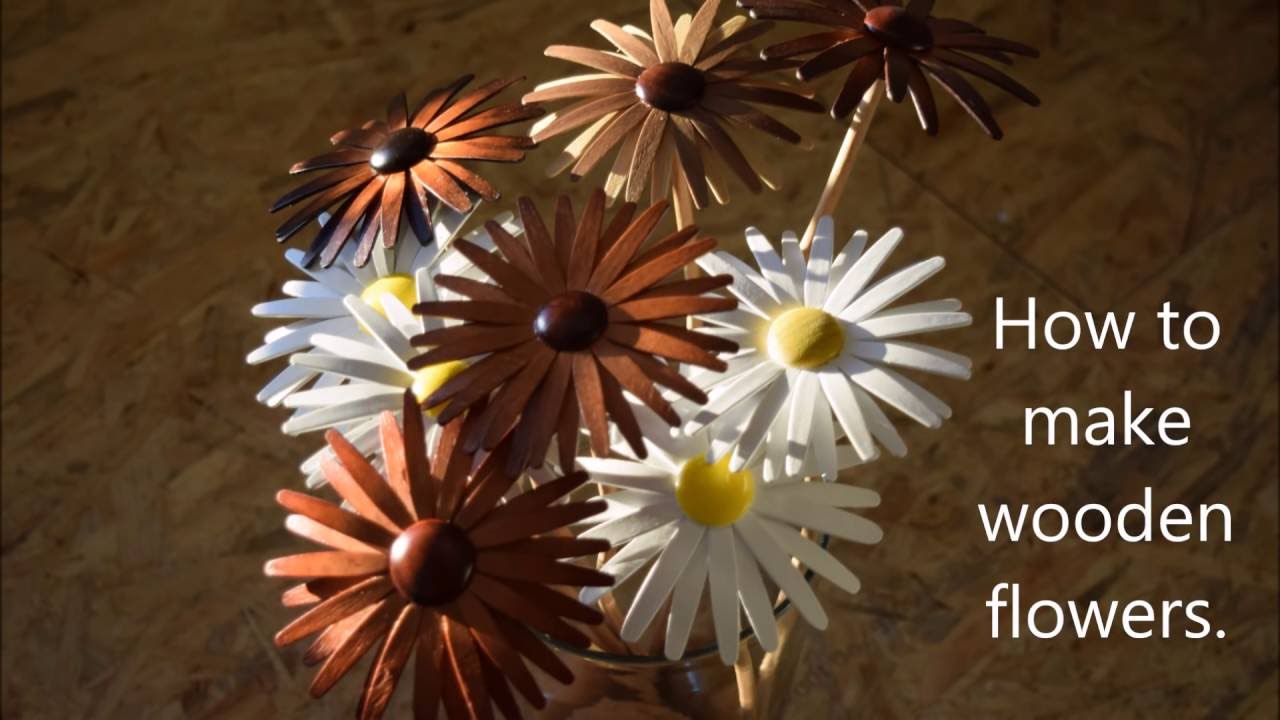
Are you looking to add a touch of natural beauty to your home or garden? Crafting your own wooden flowers can be a rewarding and creative project that allows you to bring the beauty of nature indoors. Whether you’re a seasoned woodworker or a beginner looking to explore a new hobby, this guide will provide you with step-by-step instructions on how to make stunning wooden flowers that will surely impress.
Imagine having a bouquet of flowers that never wilts or fades, showcasing your craftsmanship and creativity. With just a few basic tools and materials, you can create one-of-a-kind wooden flowers that will stand the test of time. From choosing the right type of wood to shaping and painting your creation, we will take you through the entire process, ensuring that you have all the knowledge and skills needed to create beautiful wooden flowers that will be the envy of all who see them. So, let’s dive in and unlock the secrets of transforming simple pieces of wood into exquisite floral masterpieces!
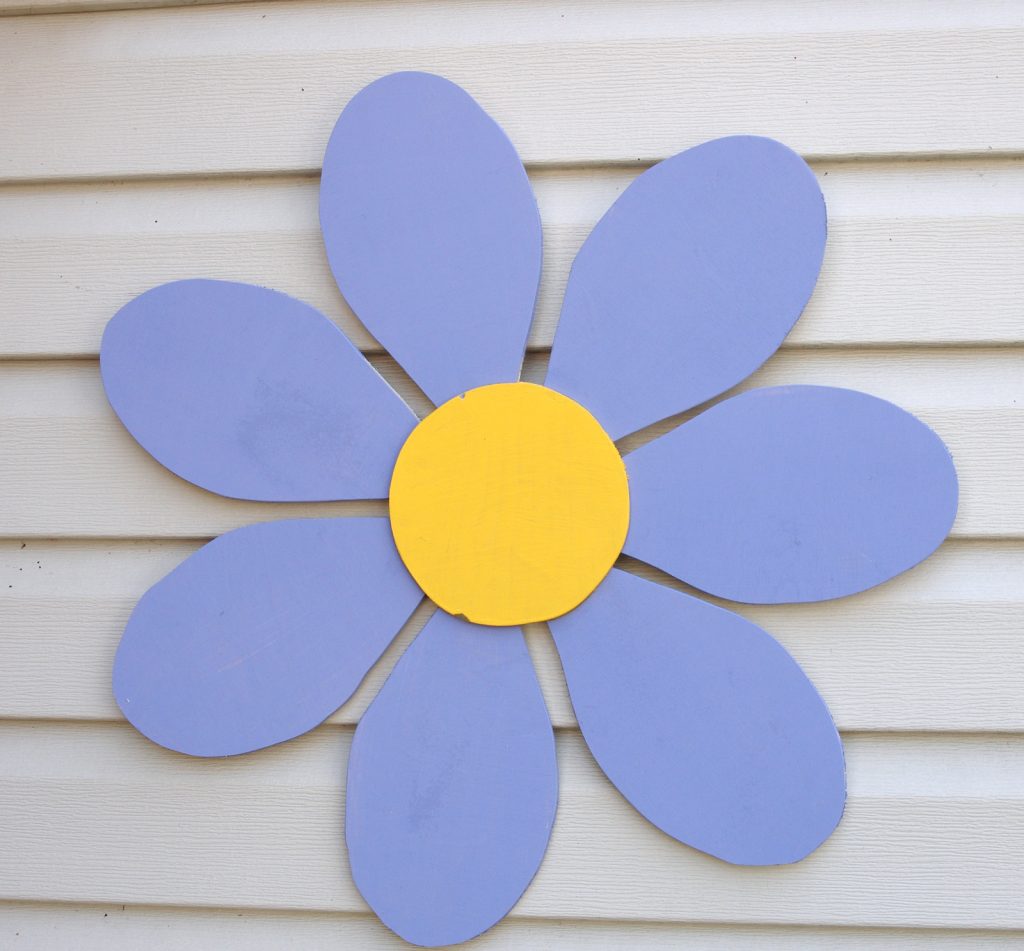
How to Make a Wooden Flower:
- Gather the necessary materials – wood, saw, sandpaper, paint, and glue.
- Measure and cut the wood into desired petal shapes.
- Sand the wooden petals to remove any rough edges.
- Paint the petals in your preferred colors.
- Apply glue to the center of each petal and stack them to form the flower.
- Let the glue dry completely before displaying your wooden flower.
Introduction
Creating a wooden flower can be a rewarding and enjoyable craft project. Whether you want to add a decorative element to your home or give a unique handmade gift, making a wooden flower allows you to showcase your creativity and woodworking skills. In this step-by-step guide, we will walk you through the process of making a wooden flower, from selecting the right wood to adding the finishing touches.
Step 1: Gather Your Materials
Before you begin, gather all the necessary materials to make a wooden flower. You will need:
- A piece of wood (preferably hardwood) for the flower petals
- A smaller piece of wood for the flower center
- A saw for cutting the wood
- Sandpaper or a sander to smooth the edges
- Wood glue for joining the pieces
- Clamps to hold the pieces together while the glue dries
- Paint or stain for adding color (optional)
- Varnish or sealant for protecting the wood (optional)
- A paintbrush or foam brush for applying the paint or stain
- A drill with a small drill bit for creating a hole (optional)
Once you have gathered all the necessary materials, you are ready to move on to the next step.
Step 2: Cut and Shape the Petals
Start by cutting the piece of wood for the flower petals into the desired shape. You can choose a traditional petal shape or experiment with different designs to create a unique look. Use a saw to carefully cut along the outline of the petals.

After cutting the petals, use sandpaper or a sander to smooth the edges and remove any roughness. This will give your wooden flower a polished and professional appearance. Take your time to ensure that each petal is smooth and free from any imperfections.
Step 3: Create the Flower Center
Next, take the smaller piece of wood and shape it into a circular or oval shape to serve as the flower center. You can use a saw or sandpaper to achieve the desired shape. The center should be proportionate to the size of the petals and complement the overall design of the wooden flower.
If you want to add a more intricate touch, you can drill a small hole in the center to create a textured effect. This step is optional but can add an extra element of visual interest to your wooden flower.
Step 4: Assemble and Finish
Now it’s time to assemble your wooden flower. Apply wood glue to the back of each petal and attach them to the flower center in a circular pattern. Use clamps to hold the pieces together firmly while the glue dries. Allow sufficient drying time as per the instructions on the glue packaging.
Once the glue has dried, you can choose to add color to your wooden flower by painting or staining it. Use a paintbrush or foam brush to apply the paint or stain evenly, following your desired color scheme. Let the paint or stain dry completely before moving on to the next step.
If you want to protect the wood and enhance its durability, you can apply a varnish or sealant. This will give your wooden flower a glossy finish and help preserve its beauty for years to come. Apply the varnish or sealant according to the instructions on the product packaging and allow it to dry thoroughly.
And there you have it! You have successfully created a wooden flower. Whether you choose to display it in a vase or use it as a decorative element, your handmade wooden flower will surely impress with its beauty and craftsmanship.
Step 5: Optional Enhancements
If you want to take your wooden flower to the next level, here are a few optional enhancements you can consider:
- Add leaves by cutting out leaf shapes from green wood or painting them onto the petals.
- Create a stem by attaching a wooden dowel or wire to the back of the flower.
- Experiment with different finishes, such as distressing or antiquing techniques, to achieve a vintage look.
- Personalize your wooden flower by carving initials, patterns, or designs into the petals.
Feel free to get creative and make the wooden flower uniquely yours!
Frequently Asked Questions
This section provides answers to some common questions about making a wooden flower.
Question 1: What materials do I need to make a wooden flower?
To make a wooden flower, you will need the following materials:
– A piece of wood (preferably hardwood) for the flower petals
– A wooden dowel or stick for the stem
– Wood glue
– Sandpaper for smoothing the wood
– A saw for cutting the wood to the desired shape and size
– Paint or wood stain for adding color
Question 2: How do I shape the wooden flower petals?
To shape the wooden flower petals, follow these steps:
1. Draw the desired petal shape on the piece of wood.
2. Use a saw to carefully cut out the shape of the petals.
3. Use sandpaper to smooth the edges and surfaces of the petals.
4. Repeat these steps for each petal, ensuring they are all symmetrical.
Question 3: How do I assemble the wooden flower?
To assemble the wooden flower, follow these steps:
1. Apply wood glue to the base of each petal.
2. Attach the petals to the wooden dowel or stick, arranging them in a circular formation.
3. Allow the glue to dry completely before proceeding.
4. Once the glue is dry, you can paint or stain the wooden flower to add color and enhance its appearance.
Question 4: Can I add additional decorations to the wooden flower?
Yes, you can add additional decorations to the wooden flower if desired. Some ideas include:
– Using a small wooden bead or button as the flower’s center
– Attaching small artificial leaves or foliage to the stem
– Adding a ribbon or twine bow to the base of the flower
– Using wood burning techniques to create intricate designs on the petals
Feel free to get creative and personalize your wooden flower!
Question 5: How do I maintain and care for a wooden flower?
To maintain and care for a wooden flower, follow these tips:
– Avoid exposing the wooden flower to excessive moisture or direct sunlight, as it can cause damage or fading.
– Regularly dust the flower with a soft cloth to remove any dirt or debris.
– If the wood appears dry, you can apply a thin coat of wood oil or wax to protect and nourish it.
– Store the wooden flower in a cool, dry place when not in use to prevent warping or other damage.
By following these guidelines, you can ensure your wooden flower remains beautiful and in good condition for years to come.
Woodworking | Easy Wooden Flowers From Hand Plane Shavings – Valentines Project
In conclusion, crafting a wooden flower is a wonderful way to explore your creativity and add a touch of natural beauty to your home or garden. By following the steps outlined in this guide, you can create a stunning wooden flower that will stand the test of time. Remember to choose the right type of wood, use the appropriate tools, and take your time to ensure precision and accuracy in each step of the process.
Whether you are a seasoned woodworker or just starting out, making a wooden flower presents an opportunity to challenge yourself and develop new skills. The satisfaction of seeing your creation come to life, from a simple piece of wood to a vibrant and delicate flower, is truly rewarding. So gather your materials, set aside some time, and enjoy the journey of transforming a humble piece of wood into a stunning wooden flower that will bring joy and beauty to your surroundings for years to come.
- How to Rejuvenate Wood Veneer - April 20, 2024
- How to Fix Water Damage on Wood Coffee Table - April 20, 2024
- How to Fix Water Damaged Swollen Wood Furniture - April 20, 2024