Wood is a timeless material that adds warmth and elegance to any space. Whether it’s a beautiful hardwood floor, a cherished piece of furniture, or a beloved wooden accessory, maintaining the natural beauty of wood is essential. However, occasional mishaps like spills, accidents, or wear and tear can leave unsightly stains on the surface, causing distress to the wood’s appearance. If you find yourself in this situation, fear not! In this guide, we will delve into the art of stain removal from wood, providing you with expert tips and techniques to restore your wood to its former glory.
Removing stains from wood may seem like a daunting task, but with the right knowledge and tools, it can be a relatively straightforward process. From everyday household items to specialized wood cleaners, there are various methods available to tackle different types of stains effectively. Whether you’re dealing with water rings, ink marks, or even deep-set oil stains, this comprehensive guide will equip you with the necessary steps to remove them without causing further damage to your beloved wooden surfaces. So, roll up your sleeves and get ready to learn the secrets of stain removal, as we embark on a journey to revive the natural beauty of your wood.
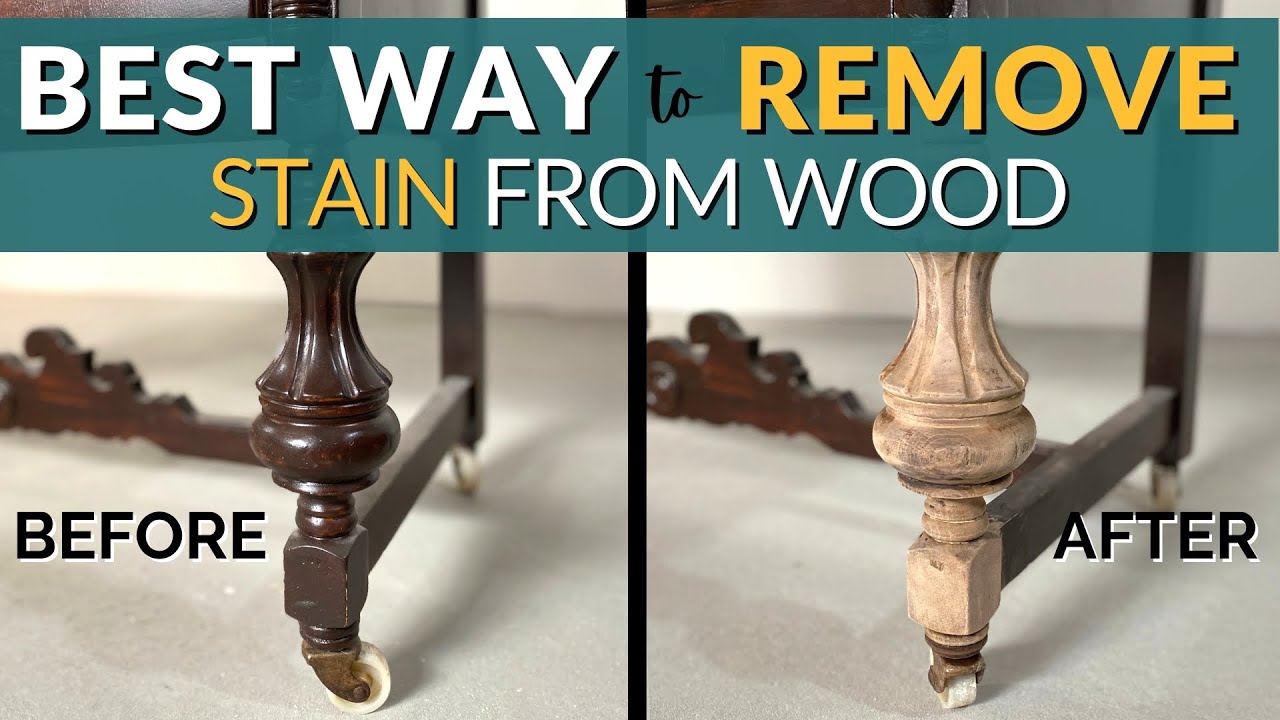
How to Take Stain off Wood:
- Start by sanding the stained wood surface using fine-grit sandpaper to remove the top layer of stain.
- Apply a commercial wood stain remover or a mixture of equal parts vinegar and water onto the stained area.
- Let the stain remover sit on the wood for a few minutes, then scrub the surface with a soft brush or sponge.
- Rinse the wood with clean water and dry it thoroughly.
- If the stain persists, repeat the process or consider using a stronger solvent like mineral spirits or denatured alcohol.
How to Remove Stains from Wood
Welcome to our step-by-step guide on how to effectively remove stains from wood surfaces. Whether you have an old piece of furniture or hardwood floors that have been stained, this guide will provide you with the necessary information to restore the natural beauty of your wood. Follow these simple steps to achieve excellent results.
Step 1: Assess the Stain
Before starting the stain removal process, it’s important to assess the severity of the stain. Determine whether it is a surface stain or if it has penetrated deep into the wood. Surface stains are usually easier to remove compared to deep-seated stains. Additionally, identify the type of stain, such as water stains, ink stains, or oil-based stains. This will help you choose the most appropriate method for removal.
Once you have assessed the stain, gather the necessary tools and materials. You may need items such as sandpaper, wood cleaner, bleach, or specialized stain removers. Ensure you have proper ventilation and protective gear, such as gloves and goggles, before proceeding.
Step 2: Prepare the Wood
Prepare the wood surface by cleaning it thoroughly. Use a mild wood cleaner and a soft cloth to remove any dirt, dust, or grime that may be present. It’s important to have a clean surface before applying any stain removal products. If the stain is on a piece of furniture, consider removing any hardware or accessories that may hinder the stain removal process.

For tougher stains, you may need to sand the wood surface gently. Use fine-grit sandpaper and work in the direction of the wood grain. This will help to smooth out any rough areas and prepare the wood for the stain removal treatment.
Step 3: Apply the Stain Remover
Now it’s time to apply the appropriate stain remover to eliminate the stain. Depending on the type of stain, you may choose to use a commercial stain remover or a homemade solution. Follow the instructions provided with the stain remover carefully, ensuring you apply it evenly over the stained area. Use a brush or a cloth to work the remover into the wood, following the direction of the grain.
Allow the stain remover to sit on the wood for the recommended amount of time. This will give it a chance to penetrate the stain and break it down. Be patient, as some stains may require multiple applications or longer dwell times. If necessary, repeat the process until the stain is completely removed.
Step 4: Rinse and Dry
After the stain has been successfully removed, it’s essential to rinse the wood surface thoroughly. Use a clean damp cloth or sponge to wipe away any residue from the stain remover. Make sure to remove all traces of the product, as leaving it on the wood may cause damage or discoloration over time.
Once the wood has been rinsed, allow it to dry completely. This may take several hours or even overnight, depending on the humidity level. Ensure the area is well-ventilated during the drying process to prevent the growth of mold or mildew.
Step 5: Protect and Restore
Now that the stain has been successfully removed, it’s important to protect and restore the wood surface. Apply a wood sealer or finish to prevent future stains and maintain the wood’s natural beauty. Choose a product that is suitable for the type of wood you are working with, whether it’s hardwood, softwood, or a specific species.
Regularly clean and maintain the wood surface to prevent the accumulation of dirt or stains. Wipe up spills immediately and use coasters or placemats to protect wood furniture from heat or moisture. By following these preventative measures, you can keep your wood looking beautiful for years to come.
Frequently Asked Questions
Here are some commonly asked questions about how to take stain off wood:
1. How can I remove stain from wood?
Removing stain from wood can be done using a few different methods. One option is to use a chemical wood stain remover, which is applied to the stained area and left to sit for a specified amount of time. Afterward, the stain can be scraped or wiped away. Another option is to sand the stained area using sandpaper or a sanding block. This method requires more effort but can be effective in removing the stain. It’s important to note that when using any method, it’s recommended to test it on a small, inconspicuous area first to ensure it doesn’t damage the wood.
If the stain is particularly stubborn or deep, you may need to use a combination of methods or seek professional help to achieve the best results.
2. Can I remove stain from wood without sanding?
Yes, it is possible to remove stain from wood without sanding, although it may require more time and effort. One method is to use a chemical stripper specifically designed for removing stain. This product is applied to the stained area, left to sit for a certain amount of time, and then scraped or wiped away. Another option is to use a mixture of baking soda and water to create a paste, which is then applied to the stain and left to sit. Afterward, the paste can be scrubbed away using a soft brush or cloth.
Keep in mind that the effectiveness of these methods may vary depending on the type and severity of the stain, so it’s important to follow the instructions carefully and test them on a small area before applying them to the entire stained surface.
3. How do I remove water stains from wood?
Water stains on wood can be unsightly, but they can often be removed with a few simple steps. One method is to mix equal parts vinegar and olive oil and apply the mixture to the water stain. Let it sit for a few minutes, then gently rub the area with a soft cloth. Another option is to use a mixture of baking soda and water to create a paste, which can be applied to the stain and gently rubbed in circular motions. Afterward, wipe away the paste with a damp cloth.
If these methods don’t completely remove the water stain, you may need to try a commercial wood cleaner or seek professional help to restore the wood’s appearance.
4. What should I do if the stain has penetrated deep into the wood?
If the stain has penetrated deeply into the wood, it can be more challenging to remove. In such cases, sanding is often the most effective method. Start by using coarse-grit sandpaper to remove the top layer of stained wood, gradually switching to finer-grit sandpaper to smooth out the surface. Be sure to sand in the direction of the wood grain to avoid causing further damage.
After sanding, you can apply a new stain or finish to the wood to restore its appearance. If you’re unsure about the process or want to ensure the best results, it’s recommended to consult a professional or seek guidance from a knowledgeable source.
5. How can I prevent stains on wood surfaces?
Preventing stains on wood surfaces is essential for maintaining their appearance and longevity. One of the best ways to prevent stains is to use protective measures such as coasters, placemats, or tablecloths to shield the wood from spills or excessive moisture. Regularly cleaning and polishing wood surfaces with appropriate products can also help prevent stains from setting in.
If a stain does occur, it’s important to address it promptly to minimize the chances of it becoming permanent. Taking immediate action, such as blotting up spills or using a mild cleanser on fresh stains, can significantly reduce the likelihood of a stain setting into the wood.

In the end, removing stains from wood is not only about aesthetics but also about preserving the value and functionality of your furniture, flooring, or other wood surfaces. Taking the time to understand the nature of the stain and employing the right techniques will save you money and frustration in the long run. Whether it’s a spilled glass of red wine, an ink stain, or a water ring left behind by a careless guest, you now have the knowledge to address these issues effectively. By treating your wood with care and employing the methods discussed in this article, you can ensure that your beloved pieces of woodwork remain beautiful and stand the test of time. So roll up your sleeves, gather your tools, and get ready to restore the natural allure of your wood with confidence.
- How to Remove Mold From Plywood - April 18, 2024
- How to Get Rid of Green Mold on Wood - April 18, 2024
- How to Prevent Mold on Wood - April 18, 2024