In a world where mass-produced decorations and furnishings dominate our homes, there is something undeniably special about adding a touch of personal craftsmanship. And what better way to showcase your patriotic spirit than by creating your very own wooden American flag? This timeless symbol of freedom and unity not only serves as a stunning piece of wall art but also allows you to channel your creativity and woodworking skills. Whether you are a seasoned craftsman or just starting out, this guide will provide you with step-by-step instructions on how to make a wooden American flag that will be the envy of all who lay eyes upon it.
As you embark on this creative journey, you will discover the joy of working with your hands, transforming raw materials into a work of art that exudes the essence of Americana. From selecting the right kind of wood to meticulously painting the stars and stripes, every aspect of this project requires attention to detail and a passion for craftsmanship. So, roll up your sleeves, grab your tools, and let your imagination soar as we delve into the fascinating world of woodworking and explore the process of creating a stunning wooden American flag that will be cherished for generations to come.
- Measure and cut wooden planks to desired flag size
- Sand and smooth the planks
- Paint the planks red and white, leaving space for blue section
- Paint blue section and add stars
- Attach planks together using screws or nails
- Add hanging hardware
How to Make a Wooden American Flag
In this step-by-step guide, we will walk you through the process of creating a beautiful wooden American flag. This project requires some basic woodworking skills and tools, but with patience and attention to detail, you can create a stunning piece of patriotic decor for your home or office. Let’s get started!
Materials and Tools
Before we begin, gather the following materials and tools:
- 3 pieces of wood (1×4 inches) measuring 36 inches in length
- Red, white, and blue paint
- Sanding block or sandpaper
- Paint brushes
- Measuring tape
- Pencil
- Saw
- Nails
- Hammer
- Protective gloves and goggles
Step 1: Cutting the Wood
Start by measuring and marking the wood at regular intervals of 6 inches. Use a saw to cut the wood into six equal pieces. These pieces will form the stripes of the flag. Sand the edges of each piece to ensure a smooth finish.
Next, take one piece of wood and measure and mark the top left corner at 7 inches from the end. From this mark, measure and mark the bottom right corner at 22 inches from the end. Use a saw to cut along the marked lines, creating a triangular shape. This will be the blue canton of the flag.
Step 2: Painting the Flag
Once all the wood pieces are cut and sanded, it’s time to paint. Start by painting the blue canton in the top left corner of the flag. Use blue paint and a brush to cover the entire triangular area. Allow it to dry completely before moving on.

Next, paint every other stripe with red paint, leaving the remaining stripes unpainted for now. Apply multiple coats if needed, allowing each coat to dry before adding the next. Ensure that the paint covers the front, back, and sides of each stripe for a finished look.
Step 3: Adding the Stars
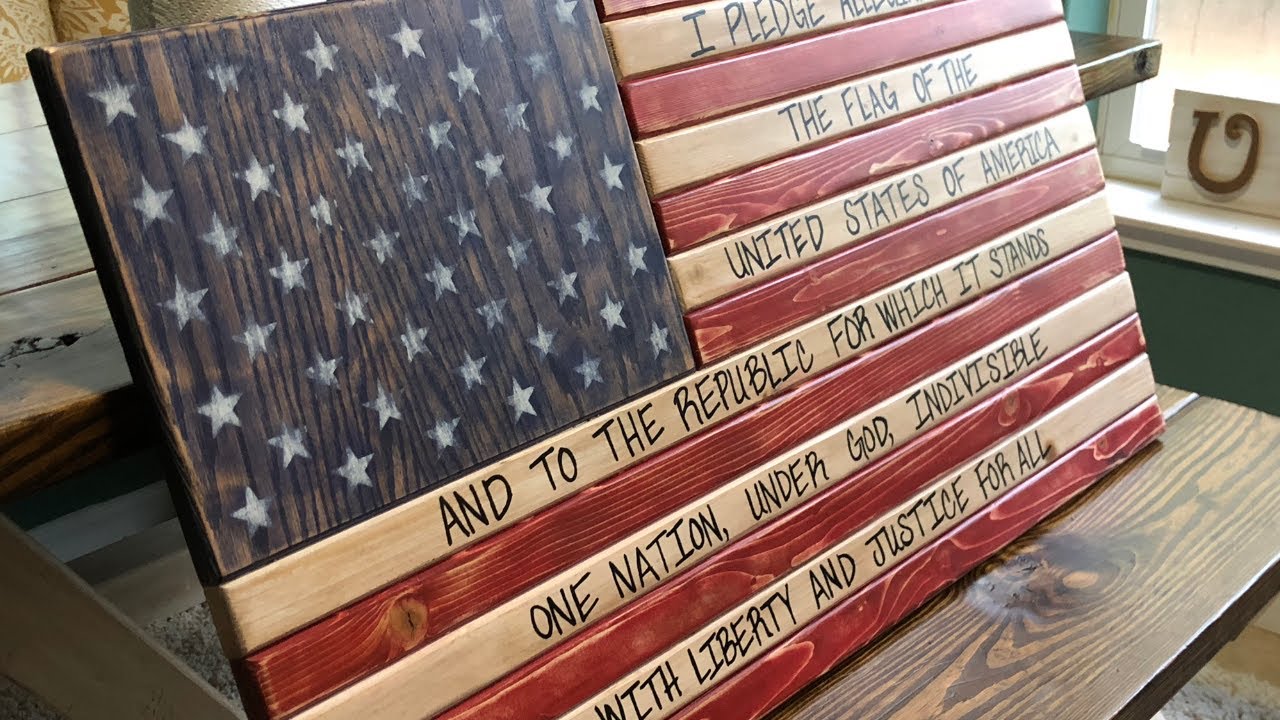
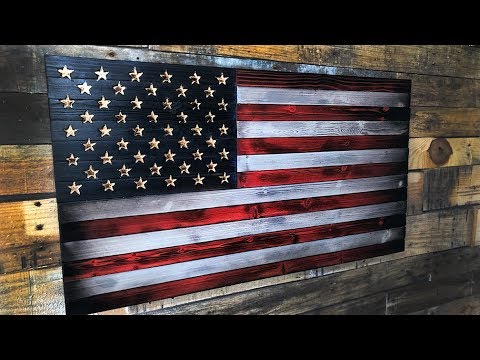
Measure and mark the blue canton to create a grid of stars. The standard American flag has 50 stars arranged in 9 rows staggered horizontally and 11 rows staggered vertically. Use a pencil and a measuring tape to create the grid, ensuring equal spacing between each star.
Once the grid is marked, use white paint and a small brush to carefully paint the stars. Take your time to ensure each star is neat and evenly sized. Allow the paint to dry completely before proceeding.
Step 4: Assembling the Flag
Now that all the pieces are painted and dry, it’s time to assemble the flag. Start by laying out the red and white stripes horizontally, alternating between the two colors. Arrange them in the order you prefer, ensuring they fit snugly together.
Once the stripes are in place, use nails and a hammer to secure them together. Place nails along the top and bottom edges of each stripe, ensuring they go through all the layers of wood. Take care not to split the wood while hammering in the nails.
Step 5: Finishing Touches
Inspect the flag for any rough edges or areas that may need touch-ups. Use sandpaper or a sanding block to smooth out any imperfections. You can also apply a clear coat of varnish or sealant to protect the paint and enhance the overall appearance of the flag.
Once everything is complete, find a prominent spot to display your wooden American flag with pride. Whether it’s indoors or outdoors, this handmade piece will surely add a touch of patriotism to any space.
Frequently Asked Questions
Here are some commonly asked questions about how to make a wooden American flag:
Q: What materials do I need to make a wooden American flag?
To make a wooden American flag, you will need the following materials:
– A piece of plywood or wooden board
– Red, white, and blue paint
– Painter’s tape
– A ruler or measuring tape
– A pencil or marker
– Sandpaper
– Paint brushes
– Clear coat or varnish
Q: How do I prepare the wooden surface before painting?
Before painting, it is important to prepare the wooden surface properly. Follow these steps:
1. Start by sanding the wood to remove any rough areas or splinters. This will ensure a smooth surface for painting.
2. Wipe away any dust or debris with a clean cloth.
3. Apply a primer or base coat to the wood. This will help the paint adhere better and provide a more even finish.
Q: What is the best way to create the flag design on the wooden surface?
There are different methods to create the flag design on the wooden surface. Here is a simple technique:
1. Measure and mark the dimensions of the flag using a ruler or measuring tape. Divide the width into 13 equal sections for the stripes.
2. Use painter’s tape to create straight lines for the stripes. Apply the tape carefully, making sure it is securely attached to the wood.
3. Paint the top and bottom stripes red, leaving the middle section for the white stripes. Let the paint dry before removing the tape.
4. Once the red stripes are dry, apply painter’s tape to the red areas to create the spaces for the stars.
5. Paint the blue section for the stars and let it dry. Remove the tape to reveal the flag design.
Q: How can I make the flag design look more realistic?
To make the flag design look more realistic, you can add some additional details:
1. Use a small brush to paint white stars on the blue section. You can either hand-paint them or use stencils for more precise shapes.
2. After painting the stripes, you can sand them lightly to give a slightly distressed or weathered look.
3. Apply a clear coat or varnish to protect the paint and give the flag a glossy finish.
Q: Are there any safety precautions I should take while working with wood and paint?
Yes, it is important to take some safety precautions while working with wood and paint:
– Wear protective goggles and gloves to prevent any injuries.
– Work in a well-ventilated area to avoid inhaling paint fumes.
– Keep all tools and materials out of reach of children.
– Follow the manufacturer’s instructions for any chemicals or products you use.
– Clean up any spills or messes immediately to prevent accidents.
Furthermore, the process of making a wooden American flag provides an opportunity for individuals to tap into their creativity and express their love for their country. As each stripe is carefully painted, and each star is meticulously carved, a sense of accomplishment and connection to history is fostered. By engaging in this craft, individuals can deepen their understanding and appreciation for the enduring symbol that is the American flag, and the sacrifices made by those who have fought to defend it.
In conclusion, the act of creating a wooden American flag is not only a fulfilling endeavor but also an act of devotion to the principles and values that the flag represents. Through this craft, we can honor our nation’s history, showcase our patriotism, and foster a sense of unity. So, gather your tools, unleash your creativity, and let the stars and stripes come to life in the form of a beautiful wooden flag that will proudly stand as a testament to the American spirit.
- How to Design Wood Carving - May 7, 2024
- How to Carve Wood - May 7, 2024
- How to Remove Cat Urine From Wood Furniture - May 7, 2024