Do you have a collection of cherished photographs that you wish to transform into unique and personalized pieces of art? Look no further than the fascinating technique of transferring photos to wood. This innovative process allows you to preserve your most treasured memories on a natural and rustic canvas, creating stunning home decor pieces or thoughtful gifts for your loved ones. Whether you’re a seasoned DIY enthusiast or a novice looking to explore your creativity, this guide will provide you with all the necessary knowledge and step-by-step instructions to successfully transfer photos to wood.
Imagine the joy of seeing your beloved family portraits, breathtaking landscapes, or nostalgic snapshots beautifully embedded within the grain of a wooden surface. The process of transferring photos to wood is not only a visually captivating endeavor, but it also adds a touch of warmth and character to your photographs, bringing them to life in a whole new way. Unleash your artistic flair as you embark on this captivating journey, learning how to transform ordinary images into extraordinary works of art.
In the following paragraphs, we will delve into the materials you’ll need, the step-by-step process of transferring photos to wood, and provide you with expert tips and tricks to ensure a successful outcome. So, gather your favorite images and let’s embark on this exciting adventure of merging photography and woodworking to create timeless and personalized masterpieces.
- Print your photo on a regular printer using a laser printer or inkjet printer.
- Apply a generous amount of gel medium on the wood surface.
- Place the printed photo face down on the gel medium.
- Smooth out any bubbles or wrinkles using a brayer or credit card.
- Let it dry overnight.
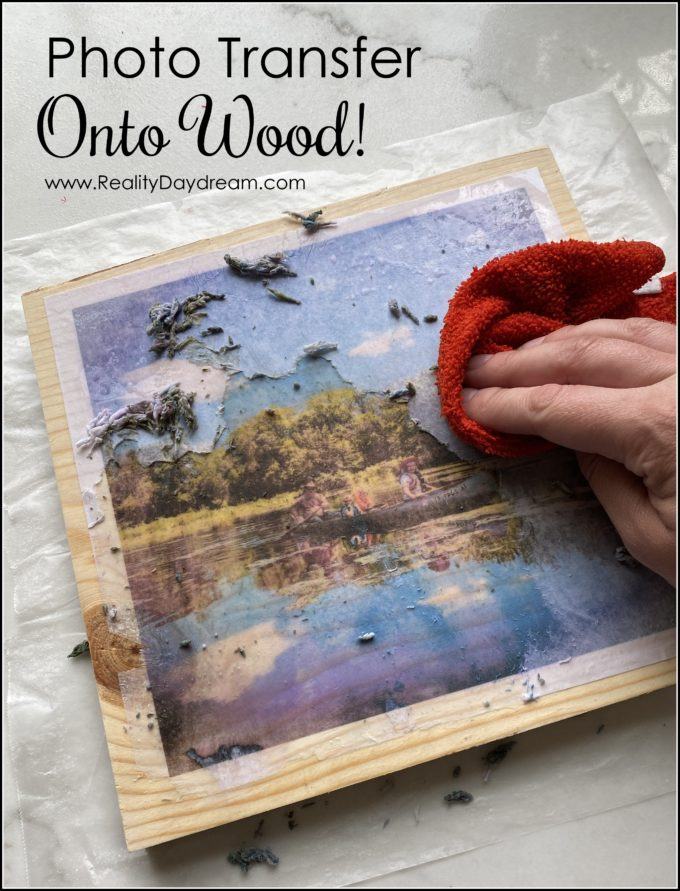
- Gently rub the paper with a damp cloth to remove the paper fibers.
- Apply a thin coat of varnish or sealant for protection.
- Enjoy your personalized photo on wood!
How to Transfer Photos to Wood
Transferring photos onto wood is a creative way to display your favorite memories in a unique and rustic manner. With the right materials and techniques, you can create stunning wooden photo transfers that will impress your friends and family. In this step-by-step guide, we will walk you through the process of transferring photos to wood, from selecting the right wood surface to applying the final protective coat.
Step 1: Gather Your Materials
Before you begin the photo transfer process, make sure you have all the necessary materials at hand. You will need:
- A piece of wood: Choose a smooth and flat wooden surface that is suitable for transferring photos. Avoid using rough or textured wood, as it may affect the quality of the transfer.
- A laser-printed photo: Print your desired photo using a laser printer. Inkjet prints will not work for this technique.
- Gel medium: Purchase a gel medium specifically designed for image transfers. Make sure it is compatible with wood surfaces.
- A foam brush: Use a foam brush to apply the gel medium onto the wood and the photo.
- A plastic scraper: This will be used to smooth out any air bubbles and ensure proper adhesion of the photo to the wood.
- A sealant: Choose a sealant that is suitable for protecting the transferred photo and the wood surface.
Once you have gathered all the materials, you are ready to move on to the next step.
Step 2: Prepare the Wood Surface
Start by preparing the wood surface to ensure optimal adhesion of the photo. Sand the wood lightly to create a smooth and even surface. Remove any dust or debris using a clean, dry cloth. This will help the gel medium to adhere better to the wood.

Next, apply a thin and even layer of gel medium onto the wood using a foam brush. Make sure to cover the entire surface that will come into contact with the photo. The gel medium acts as a transfer agent and helps to bond the photo to the wood.
Now, let the gel medium dry for a few minutes until it becomes tacky to the touch. This is an important step, as applying the photo too early can result in smudging and poor transfer quality.
With the wood surface prepared, you are now ready to proceed with the photo transfer process.
Step 3: Transfer the Photo
Place the printed photo face down onto the tacky surface of the wood. Make sure to position it correctly and avoid any wrinkles or air bubbles. Once the photo is in place, use a plastic scraper to gently press and smooth out the photo, ensuring proper adhesion to the wood surface.
Allow the photo to dry for at least 24 hours. This will give the gel medium enough time to fully bond the photo to the wood. Avoid touching or moving the wood during this time to prevent any accidental smudging.
After the drying period, you can proceed to remove the paper backing. Moisten the surface of the photo with a damp sponge or cloth and gently rub away the paper in circular motions. Be careful not to rub too hard, as this can damage the transferred image.
Continue removing the paper until the entire image is revealed. You may need to rinse the sponge or cloth occasionally to remove any paper residue.
Once the image is fully revealed, let it dry completely. This may take a few hours, depending on the humidity levels in your environment.
With the photo transferred and dried, you are almost done. The final step is to protect the image and the wood surface.
Step 4: Apply a Protective Sealant
To ensure the longevity of your wooden photo transfer, apply a protective sealant over the image and the wood surface. Choose a sealant that is compatible with both the gel medium and the wood. Apply the sealant using a foam brush, making sure to cover the entire surface.
Allow the sealant to dry completely according to the manufacturer’s instructions. This will create a protective barrier, preventing the image from fading and the wood from getting damaged.
Once the sealant is dry, your wooden photo transfer is complete! You can now proudly display your unique creation or give it as a thoughtful gift to someone special.
Frequently Asked Questions
In this section, you will find answers to commonly asked questions about transferring photos to wood.
How do I transfer photos to wood?
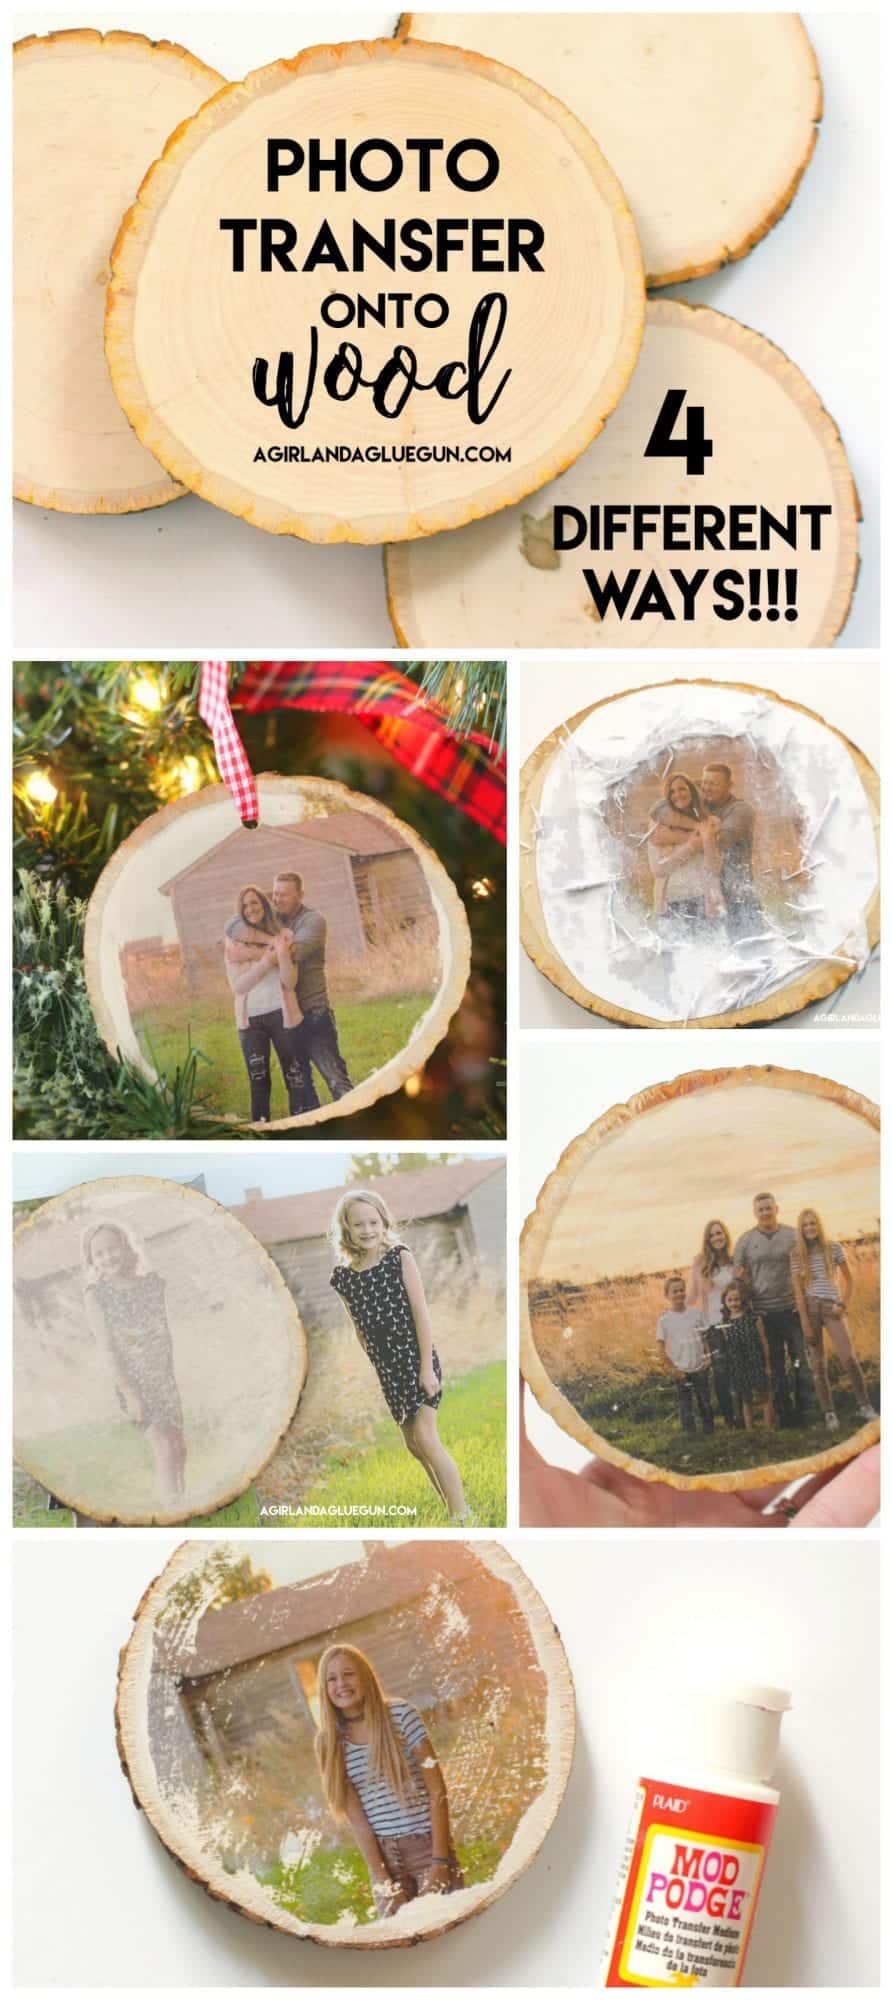
To transfer photos to wood, you can use various methods such as the gel medium transfer or the Mod Podge transfer. Both methods involve printing your photo in reverse on a regular printer paper. Apply a generous amount of gel medium or Mod Podge to the wood surface and place the printed photo face down onto the wood. Smooth out any bubbles or wrinkles and let it dry completely. Once dry, wet the paper with water and gently rub it away, revealing the transferred image on the wood. Seal the wood with a clear varnish for protection.
Another method is the heat transfer method using a heat transfer machine. Print your photo on a special transfer paper, place it face down on the wood, and apply heat using the machine. The heat will transfer the ink onto the wood surface, resulting in a permanent and vibrant image. Follow the manufacturer’s instructions for best results.
What kind of wood is best for transferring photos?
When transferring photos to wood, it is best to use a smooth, light-colored wood with minimal grain. Popular choices include birch plywood, maple, or basswood. These types of wood provide a smooth surface for the photo transfer and allow the colors to show more vibrantly. Avoid using rough or heavily grained wood as it may interfere with the clarity of the transferred image.
It is also important to ensure that the wood is properly sanded and free of any dirt or debris. This will help the photo adhere better to the surface and result in a cleaner transfer.
Can I transfer color photos to wood?
Yes, you can transfer color photos to wood. The color transfer process is similar to transferring black and white photos. Make sure to print your color photo using a high-quality printer and choose the appropriate transfer method. Keep in mind that the colors may appear slightly different on wood compared to paper, so it’s a good idea to test a small portion of the photo before transferring the entire image.
For vibrant color transfers, consider using a white base coat on the wood before applying the photo transfer. This will help the colors pop and enhance the overall appearance of the transferred image.
How do I protect the transferred photo on wood?
To protect the transferred photo on wood, it is recommended to apply a clear varnish or sealant. This will not only protect the image from scratches and fading but also give your project a professional and finished look. Choose a varnish specifically designed for wood, and apply it with a foam brush or a soft cloth, following the manufacturer’s instructions. Allow the varnish to dry completely before handling or displaying the wood piece.
Additionally, avoid exposing the transferred photo to direct sunlight for prolonged periods as it may cause fading. Display your wood photo in an area where it is protected from excessive heat, humidity, and moisture to ensure its longevity.
Can I transfer photos to other surfaces besides wood?
Yes, you can transfer photos to various surfaces besides wood. The photo transfer techniques can be applied to materials such as canvas, fabric, glass, metal, and even ceramic. Each surface may require a slightly different approach, so it’s important to follow specific instructions for the material you are working with. Experiment with different surfaces to create unique and personalized pieces of art or home decor.
Keep in mind that the texture and characteristics of each surface may impact the final result of the transferred photo. Some surfaces may require additional preparation or sealing after the transfer process to ensure the longevity of the image. Always test a small area before transferring the entire photo to a new surface.
By following the step-by-step instructions outlined in this guide, you can confidently embark on your photo transfer journey. Remember to choose high-quality images, use the right transfer medium, and take your time to ensure a smooth and successful transfer. With patience and practice, you’ll be able to create stunning wood photo transfers that are sure to impress friends and family alike. So, gather your materials, unleash your inner artist, and start transferring those cherished memories onto wood today!
- How to Clean Pottery Barn Wood Furniture - April 25, 2024
- How to Clean Amish Wood Furniture - April 25, 2024
- How to Treat Eucalyptus Wood - April 25, 2024