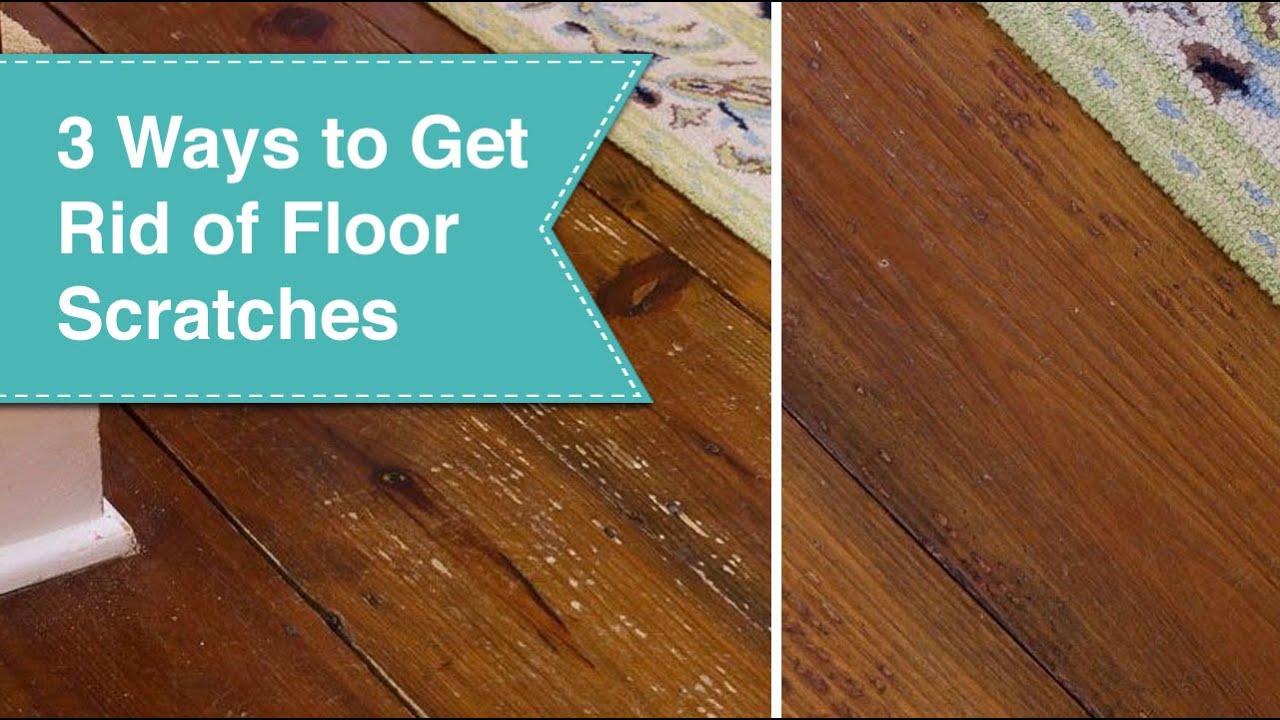
Are you tired of staring at those unsightly scratches on your beautiful wood floors? Don’t worry, you’re not alone. Many homeowners face the challenge of trying to cover up scratches and restore the natural beauty of their wood flooring. But fear not, because I’m here to guide you through the process of how to effectively cover scratches on wood floors.
Wood floors are a timeless choice for any home, adding warmth and elegance to any space. However, they are not immune to wear and tear, and scratches can easily mar their flawless appearance. Whether it’s from moving furniture, pet claws, or just everyday foot traffic, these scratches can be frustrating to deal with. But before you consider replacing your entire flooring, let me show you some simple and affordable techniques to cover up those scratches and bring your wood floors back to their former glory. From homemade remedies to professional products, we’ll explore all the options so you can choose the one that best suits your needs. So, let’s dive in and discover the secrets to restoring your wood floors to their original splendor.
How to Cover Scratches on Wood Floor:
- Clean the scratched area with a gentle wood cleaner.
- Apply a matching colored wood stain to the scratch using a small brush.
- Allow the stain to dry completely.
- Apply a thin layer of clear wood finish over the stained area.
- Let the finish dry and repeat if necessary.

How to Cover Scratches on Wood Floor
If you have a beautiful wood floor that has been marred by unsightly scratches, don’t worry – there are ways to cover up those imperfections and restore the floor’s natural beauty. In this step-by-step guide, we will walk you through the process of effectively covering scratches on a wood floor, so you can enjoy a flawless and polished surface once again.
Gather the necessary materials
Before you begin the process of covering scratches on your wood floor, it’s important to gather all the necessary materials. You will need a microfiber cloth, fine-grit sandpaper, wood filler, a putty knife, a clean cloth, a matching wood stain, a small paintbrush, and a polyurethane sealant. Make sure to choose a wood filler and stain that match the color and finish of your wood floor as closely as possible for the best results.
Start by thoroughly cleaning the scratched area and its surroundings. Use a microfiber cloth to remove any dirt, dust, or debris that may be present. This step is crucial as it ensures that the wood filler adheres properly to the surface and provides a seamless finish.
Fill the scratches with wood filler
Once the area is clean, use a fine-grit sandpaper to gently sand the scratched surface. This helps to create a smooth and even base for the wood filler. After sanding, take a small amount of wood filler and apply it directly into the scratches using a putty knife. Make sure to press the filler firmly into the scratches and smooth out any excess filler with the putty knife. Allow the wood filler to dry completely according to the manufacturer’s instructions.

After the wood filler has dried, use a clean cloth to wipe away any remaining residue. The filled scratches should now be level with the surrounding wood floor, providing a seamless appearance. However, the color of the wood filler may not perfectly match the rest of the floor.
Apply matching wood stain
To ensure a uniform finish, apply a matching wood stain to the filled scratches. Using a small paintbrush, carefully apply the stain to the filled areas, following the direction of the wood grain. Allow the stain to dry completely, and assess if the color matches the rest of the floor. If necessary, apply additional coats of stain until you achieve a close match.
Once the stain is dry and the color is satisfactory, protect the repaired area by applying a thin layer of polyurethane sealant. Use a clean paintbrush to evenly coat the entire repaired section. Allow the sealant to dry completely before allowing any foot traffic on the floor.
By following these simple steps, you can effectively cover scratches on your wood floor and restore its original beauty. Remember to always test any products or techniques in an inconspicuous area first and consult a professional if you are unsure or dealing with extensive damage.
Frequently Asked Questions
Here are some commonly asked questions about how to cover scratches on wood floors, along with detailed answers to help you address this issue effectively:
Question 1: How do I determine the severity of scratches on my wood floor?
To assess the severity of scratches on your wood floor, you can follow these steps:
1. Clean the floor: Start by thoroughly cleaning the scratched area using a soft cloth and a mild wood floor cleaner.
2. Examine the scratches: After cleaning, inspect the scratches closely. If the scratches are shallow and do not penetrate the wood’s surface, they are considered minor. However, if the scratches are deep and expose the bare wood, they are more severe.
Question 2: What are some temporary solutions to cover minor scratches on wood floors?
If you have minor scratches on your wood floor, you can try the following temporary solutions:
1. Use a walnut: Rubbing a raw walnut over the scratches can help fill in the gaps and mask the imperfections. Be sure to rub the walnut in the direction of the grain.
2. Apply a wax stick: Wax sticks designed specifically for wood floors can be used to fill in minor scratches. Simply rub the wax stick over the scratches, then buff the area with a soft cloth to blend it in.
Question 3: How can I cover deep scratches on my wood floor?
To cover deep scratches on your wood floor, you can follow these steps:
1. Clean the area: Begin by cleaning the scratched area using a soft cloth and a mild wood floor cleaner to remove any dirt or debris.
2. Sand the scratches: Gently sand the scratched area using fine-grit sandpaper. Sand in the direction of the wood grain until the scratches become less noticeable.
3. Apply a wood filler: Fill the deep scratches with a wood filler that matches the color of your floor. Use a putty knife to smooth the filler and remove any excess.
4. Finish the repaired area: Allow the wood filler to dry completely, then lightly sand the repaired area. Apply a matching wood stain or finish to blend the repaired section with the rest of the floor.
Question 4: Can I use a wood stain to cover scratches on my wood floor?
Yes, you can use a wood stain to cover scratches on your wood floor. However, it is important to note that stain alone will not fill in the scratches. Before applying the stain, you should follow the necessary steps to prepare the scratched area, such as cleaning, sanding, and filling the scratches with a suitable wood filler. Once the scratches are properly prepared, you can apply the wood stain following the manufacturer’s instructions. After staining, be sure to finish the repaired area with a protective sealant to ensure its longevity.
Question 5: How can I prevent future scratches on my wood floor?
To prevent future scratches on your wood floor, you can take the following preventive measures:
1. Use furniture pads: Place felt or rubber furniture pads on the bottom of chairs, tables, and other furniture to prevent them from scratching the floor when moved.
2. Remove shoes: Encourage family members and guests to remove their shoes before walking on the wood floor to prevent dirt, debris, and potential scratches.
3. Use rugs or mats: Place rugs or mats in high-traffic areas and near entryways to catch any dirt or debris that could scratch the floor.
4. Trim pet nails: Regularly trim your pets’ nails to minimize the risk of scratches when they walk or play on the wood floor.
5. Clean regularly: Keep your wood floor clean by sweeping or vacuuming regularly to remove any abrasive particles that could cause scratches over time.
Ultimately, preserving the natural beauty of a wood floor requires regular maintenance and care. By understanding the causes of scratches and having the right tools and techniques at your disposal, you can confidently restore your wood floor to its former glory. Remember, patience and attention to detail are key when it comes to covering scratches on a wood floor. With the knowledge gained from this guide, you can say goodbye to unsightly scratches and enjoy the elegance and warmth that a well-maintained wood floor brings to your home. So, don’t let scratches dull your floor’s shine – take action today and give your wood floor the treatment it deserves.
- Will Air Conditioner Kill Fleas? - May 18, 2024
- What Kills Mold in Air Conditioner? - May 18, 2024
- Does Air Conditioning Kill Bacteria - May 18, 2024