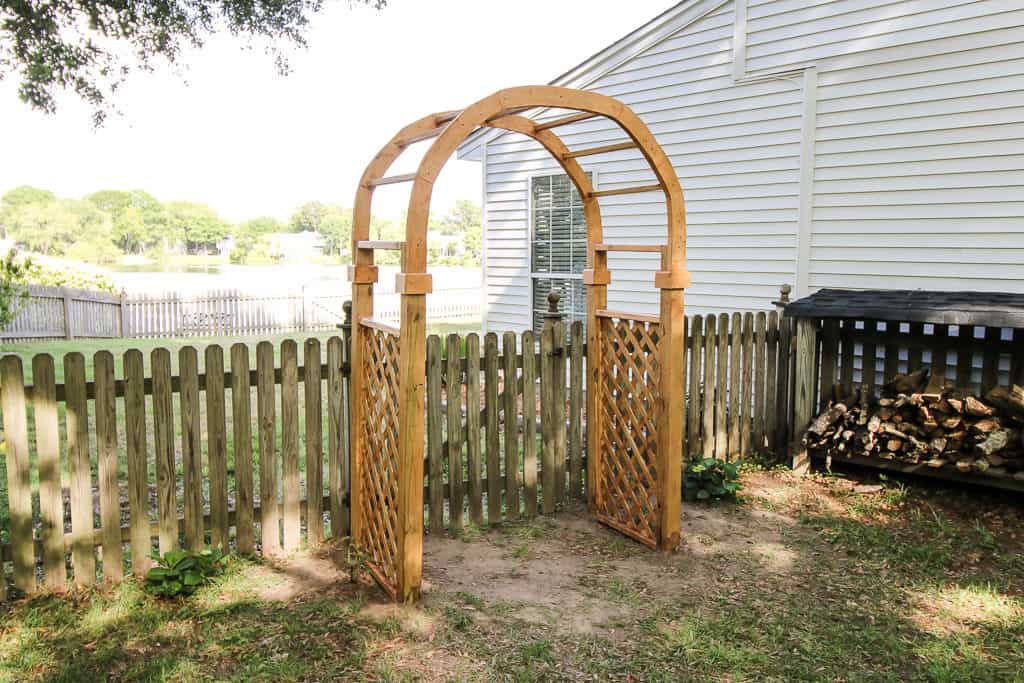
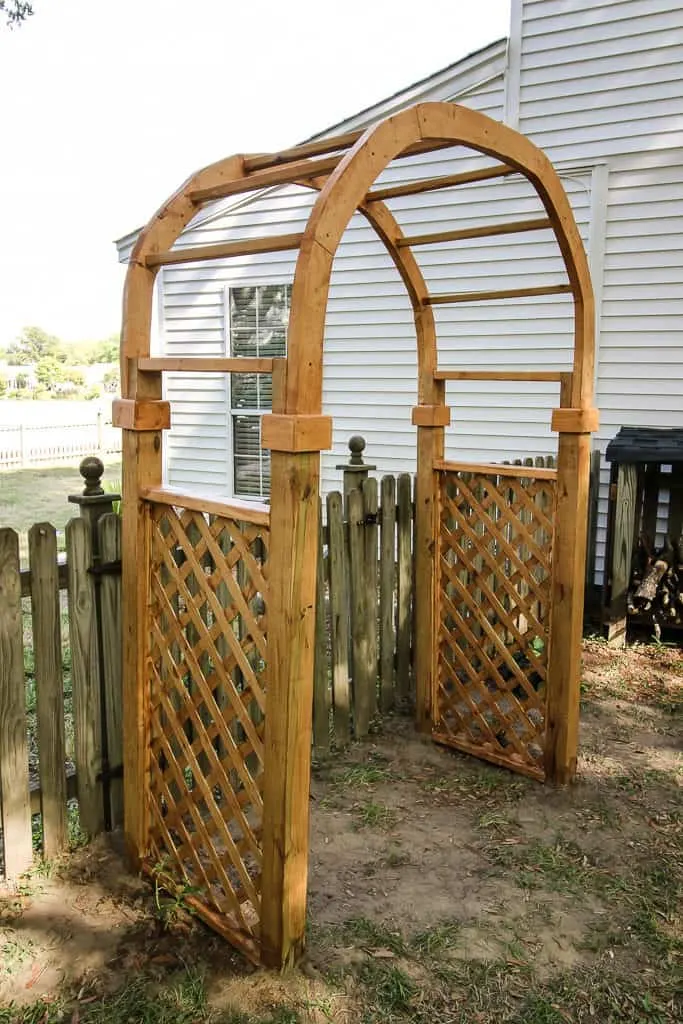
Have you ever been mesmerized by the elegance and beauty of wooden arches? Whether it’s a grand entrance to a garden or a stunning architectural feature in a home, wooden arches have a way of capturing our attention and leaving us in awe. If you’ve ever wondered how these magnificent structures are created, you’re in the right place. In this guide, we will explore the art of crafting wooden arches, providing you with the knowledge and skills to bring these captivating structures to life.
Creating wooden arches may seem like a complex task, but with the right guidance and a bit of patience, you’ll be amazed at what you can achieve. From selecting the right type of wood to understanding the principles of arch design, we will cover all the essential steps in this comprehensive guide. Whether you’re a seasoned woodworker looking to expand your skills or a beginner eager to embark on a new woodworking project, this guide will equip you with the techniques and insights needed to create stunning wooden arches that will stand the test of time. So, let’s dive in and unlock the secrets behind the art of making wooden arches!
How to Make Wooden Arches:
- Measure and cut the wooden boards to the desired length and width.
- Shape the boards into the desired arch shape using a jigsaw.
- Sand the boards to smooth out any rough edges.
- Attach the boards together using wood glue and clamps.
- Allow the glue to dry completely.
- Apply a coat of wood stain or paint to protect the arches and enhance their appearance.
How to Make Wooden Arches
Wooden arches can add a beautiful and elegant touch to any landscape or garden. Whether you’re looking to create a focal point or simply add some architectural interest, making wooden arches is a project that can be accomplished with a few basic tools and materials. In this step-by-step guide, we will walk you through the process of creating your own wooden arches, from selecting the right wood to assembling and finishing the final product. Let’s get started!
Step 1: Gather Materials and Tools
The first step in making wooden arches is to gather all the necessary materials and tools. Here’s what you’ll need:
- Pressure-treated or weather-resistant wood
- Measuring tape
- Pencil
- Saw
- Drill
- Screws
- Sandpaper
- Wood glue
- Paint or stain (optional)
- Paintbrush or roller (optional)
Once you have everything you need, you can move on to the next step.
Step 2: Measure and Cut the Wood
Start by measuring the height and width you want for your wooden arches. Use a measuring tape to accurately determine the dimensions. Once you have the measurements, mark them on the wood using a pencil. Make sure to double-check your measurements before cutting the wood.

Next, use a saw to carefully cut the wood according to your measurements. It’s important to make precise cuts to ensure that the arches fit together correctly. Take your time and use a steady hand to achieve clean and accurate cuts.
Step 3: Create the Arch Shape
Now it’s time to create the arch shape for your wooden arches. Start by laying out the cut pieces of wood on a flat surface. Arrange them in the desired arch shape, ensuring that the ends of each piece align properly.
Once you’re satisfied with the arrangement, use a drill to make pilot holes where the pieces of wood overlap. This will help prevent splitting when you attach them together. Apply wood glue to the overlapping areas and then secure the pieces together using screws.
Step 4: Sand and Finish
After the wooden arches are assembled, use sandpaper to smooth out any rough edges or surfaces. This will give your arches a polished and professional look. Take your time to ensure that all surfaces are smooth and free from splinters.
If desired, you can also apply a coat of paint or stain to your wooden arches. This will not only enhance their appearance but also provide added protection against the elements. Use a paintbrush or roller to apply the paint or stain evenly, following the manufacturer’s instructions.
Step 5: Install the Wooden Arches
Finally, it’s time to install your wooden arches in the desired location. Choose a spot that complements your landscape or garden design. Dig holes in the ground where the arches will be placed, ensuring that they are deep enough to provide stability.
Once the holes are ready, carefully position the wooden arches in place. Use a level to ensure that they are straight and adjust as necessary. Fill the holes with soil and pack it firmly to secure the arches in place.
And there you have it! You have successfully made and installed your own wooden arches. Enjoy the beauty and charm they bring to your outdoor space!
Frequently Asked Questions
Here are some commonly asked questions about how to make wooden arches:
1. How do I choose the right wood for making wooden arches?
When choosing wood for making wooden arches, it’s important to consider both the strength and appearance of the wood. Hardwoods like oak, maple, and cherry are durable and can withstand the weight and stress of an arch. Softwoods like pine and cedar are lighter and easier to work with, but may not be as strong. Additionally, it’s important to select wood that is free from knots, cracks, and other defects that can weaken the arch.
Another factor to consider is the wood’s moisture content. Green or wet wood can warp or twist as it dries, so it’s best to use kiln-dried or seasoned wood. This will ensure that the arch maintains its shape and stability over time.
2. What tools do I need to make wooden arches?
To make wooden arches, you will need a few essential tools. These include a saw for cutting the wood to size, a chisel for shaping the curves of the arch, a drill for creating holes for screws or dowels, and sandpaper for smoothing the wood surfaces. Additionally, clamps or straps can be helpful for holding the wood in place during assembly.
Depending on the complexity of the design, you may also need a router for creating decorative details, a miter saw for precise angles, and a compass or template for tracing the desired curve of the arch. It’s important to have the right tools for the job to ensure accurate and efficient construction of the wooden arch.
3. What techniques can I use to bend wood for making wooden arches?
There are several techniques for bending wood to create wooden arches. One common method is steam bending, which involves heating the wood with steam to make it more pliable. The heated wood is then slowly bent into the desired shape and clamped or strapped until it dries and retains its curve.
Another technique is laminating, where thin strips of wood are glued together to form a strong and flexible arch. This method is particularly useful for creating complex or large-scale arches. Additionally, kerf bending involves making multiple cuts or kerfs on the inside of the wood to allow for easier bending. The wood is then soaked in water or steam to further soften it before shaping.
4. How do I ensure proper stability and structural integrity in wooden arches?
To ensure proper stability and structural integrity in wooden arches, it’s important to consider the design and construction of the arch. The arch should have a proper curvature that distributes the weight evenly along its length. Reinforcing the arch with additional supports, such as braces or dowels, can further enhance its stability.
Proper joinery techniques, such as using mortise and tenon or dovetail joints, can also provide strength and durability to the arch. It’s important to follow best practices for woodworking and ensure that all joints are securely fastened. Additionally, applying a suitable finish or protective coating to the wood can help prevent moisture damage and maintain the arch’s structural integrity over time.
5. Are there any safety precautions I should take when making wooden arches?
Yes, there are a few safety precautions to keep in mind when making wooden arches. Always wear appropriate personal protective equipment, such as safety glasses, gloves, and a dust mask, to protect yourself from flying debris and harmful fumes. Use tools and equipment properly, following the manufacturer’s instructions and guidelines.
When working with power tools, ensure that the work area is well-lit and free from distractions. Keep your fingers and hands away from cutting edges and moving parts. It’s also important to work in a well-ventilated area to minimize exposure to sawdust and other airborne particles. Finally, take your time and work at a pace that allows you to maintain control and accuracy throughout the woodworking process.
How to Build Arches
In conclusion, learning how to make wooden arches is a valuable skill that allows individuals to unleash their creativity and add a touch of elegance to any space. By following the step-by-step instructions outlined in this guide, one can confidently embark on this woodworking journey and create stunning arches that will impress friends, family, and even clients.
Wooden arches not only serve a practical purpose but also elevate the aesthetic appeal of any architectural or design project. Whether it’s for a garden, a doorway, or even a piece of furniture, the possibilities are endless when it comes to incorporating wooden arches into your designs. With the right tools, materials, and a dash of patience, anyone can master the art of creating these beautiful structures. So, why not give it a try and unleash your inner artisan? You’ll be amazed at the transformative power of wooden arches and the joy that comes from crafting something truly unique and remarkable.
- How to Design Wood Carving - May 7, 2024
- How to Carve Wood - May 7, 2024
- How to Remove Cat Urine From Wood Furniture - May 7, 2024