Are you fascinated by the timeless beauty of engraved woodwork? Do you find yourself captivated by the intricate designs and personal touches that can transform a simple piece of wood into a work of art? If so, you’ve come to the right place. In this guide, we will explore the art of wood engraving and delve into the techniques and tools you need to create your own stunning masterpieces. Whether you’re a seasoned woodworker or a beginner looking to embark on a new creative journey, this comprehensive guide will equip you with the knowledge and skills to engrave into wood like a true artisan.
Wood engraving is not just a craft, but an expression of creativity and passion. It offers a unique opportunity to leave a lasting mark on a natural material, creating a piece that tells a story and evokes emotions. From personalized gifts to intricate decorations, the possibilities are endless when it comes to wood engraving. Throughout this guide, we will cover everything from selecting the right wood and tools, mastering engraving techniques, and adding finishing touches to bring your creations to life. So, grab your chisels and let’s embark on a journey into the captivating world of wood engraving.
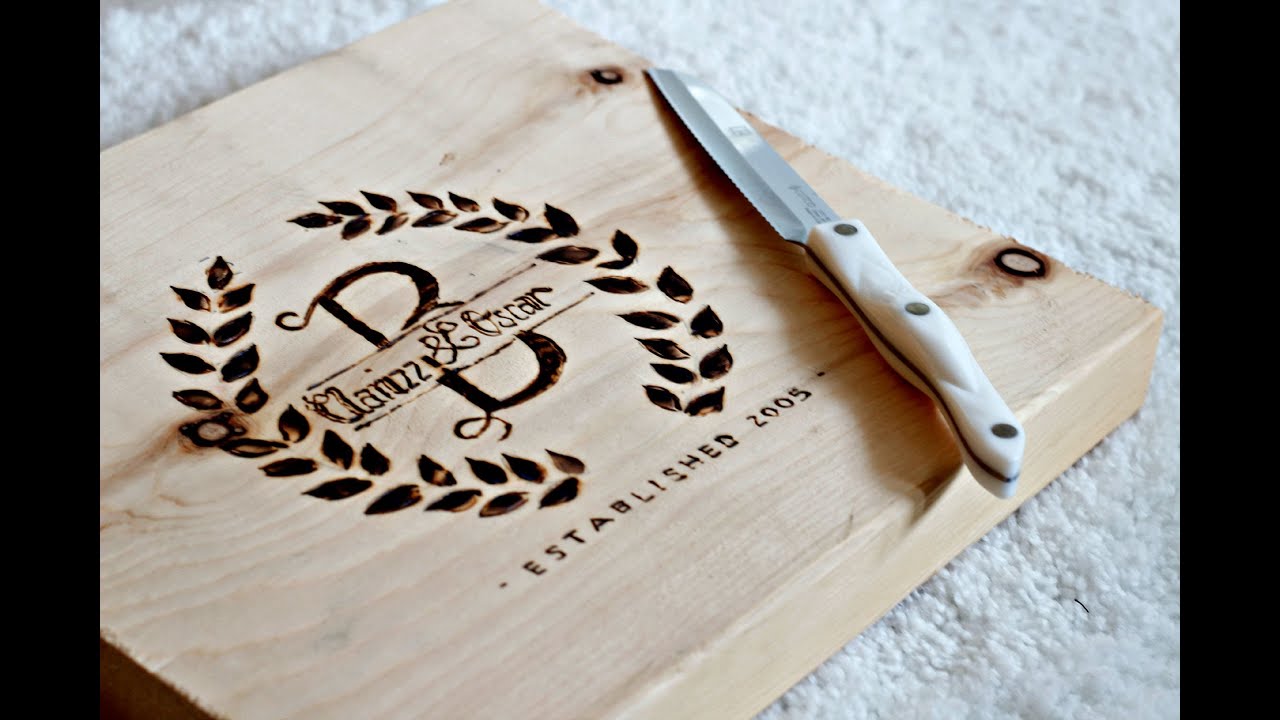
How to Engrave into Wood:
- Choose the design or text you want to engrave.
- Prepare the wood surface by sanding and cleaning it.
- Transfer the design onto the wood using a pencil or stencil.
- Select the appropriate engraving tool, such as a Dremel or chisel.
- Start engraving, following the outlines of the design.
- Take breaks to prevent the wood from heating up.
- Once finished, clean the wood and remove any dust or debris.
- Apply a protective finish, such as varnish or wax, to preserve the engraving.
Engraving into Wood: A Step-by-Step Guide
Engraving into wood is a skill that can add a personal touch to your woodworking projects or create beautiful designs on wooden surfaces. Whether you are a beginner or an experienced woodworker, this step-by-step guide will walk you through the process of engraving into wood with precision and professionalism.
Step 1: Selecting the Right Tools and Materials
Before you begin engraving into wood, it is essential to gather the necessary tools and materials. First, choose a high-quality wood that is suitable for engraving, such as maple or cherry. Next, gather your engraving tools, including a woodburning pen or a rotary tool with engraving bits. Additionally, you will need sandpaper, masking tape, and a design template if you wish to create a specific pattern.
Ensure that your tools are clean, sharp, and in good working condition. Dull tools can affect the quality of your engraving and make the process more challenging. Also, consider wearing protective gear like safety goggles and a dust mask to safeguard yourself from wood particles and fumes during the engraving process.
Step 2: Preparing the Wood Surface
Before starting the engraving process, it is crucial to prepare the wood surface adequately. Begin by sanding the wood to create a smooth and even surface. This step is essential as it helps the engraving tool glide smoothly across the wood and prevents any rough patches from interfering with the design.

Once the wood is sanded, clean it thoroughly to remove any dust or debris. This can be done using a clean cloth or compressed air. Next, apply masking tape to the areas of the wood that you do not want to engrave. The tape acts as a protective barrier, ensuring that your design remains precise and focused.
Step 3: Transferring or Creating a Design
Now that your wood surface is prepared, it’s time to transfer or create a design that you want to engrave. If you have a specific pattern or image in mind, you can use a design template and trace it onto the wood using carbon paper. Alternatively, you can unleash your creativity and draw your design directly onto the wood surface with a pencil or a fine-tip marker.
Take your time during this step to ensure that your design is accurate and well-suited for engraving. Remember that intricate designs may require more attention to detail and precision. Once your design is ready, double-check it to ensure it meets your expectations before moving on to the next step.
Step 4: Engraving into the Wood
Now comes the exciting part – engraving into the wood. If you are using a woodburning pen, plug it in and allow it to heat up according to the manufacturer’s instructions. Start by carefully following the lines of your design, applying gentle and consistent pressure. Take your time and work slowly to maintain control over the engraving tool.
If you are using a rotary tool with engraving bits, choose the appropriate bit for your desired effect and attach it securely. Begin by lightly tracing the design lines, gradually increasing the pressure as you become more comfortable. Remember to keep the tool moving smoothly to prevent any uneven or deep lines.
Throughout the engraving process, it is essential to maintain focus and precision. Take breaks if needed to rest your hand and avoid fatigue, as this can affect the quality of your work. Remember, engraving into wood requires patience and practice, so don’t be discouraged if your first attempts are not perfect.
Step 5: Finishing and Protecting the Engraved Wood
Once you have completed the engraving, it’s time to add the finishing touches to your wood piece. Use sandpaper to smooth any rough edges or imperfections caused during the engraving process. Next, wipe the wood with a damp cloth to remove any dust or debris.
If desired, you can apply a protective finish to your engraved wood to enhance its appearance and longevity. There are various options to choose from, such as wood varnish, lacquer, or oil finishes. Follow the manufacturer’s instructions for the chosen product and apply it evenly across the entire wood surface.
Allow the finish to dry completely before handling or displaying your engraved wood piece. Once dry, you can proudly showcase your craftsmanship or gift it to someone special.
Step 6: Further Enhancements and Personalization
If you want to take your engraving skills to the next level, consider exploring additional techniques and tools. Experiment with different engraving depths, shading techniques, or incorporating color into your designs. The possibilities are endless, and with practice, you can achieve stunning and intricate wood engravings.
Additionally, you can personalize your engraved wood pieces by incorporating names, dates, or meaningful quotes. This adds a unique touch and makes your creations even more special.
Step 7: Sharing Your Wood Engraving Journey
Once you have mastered the art of engraving into wood, don’t hesitate to share your creations with others. Display your engraved wood pieces at local art exhibitions or woodworking events. You can also showcase your work on social media platforms or create an online portfolio to inspire and connect with fellow woodworkers.
Remember, engraving into wood is a skill that improves with practice and patience. So, keep refining your techniques and exploring new designs to continue growing as an engraver. With dedication and passion, you can create stunning wood engravings that leave a lasting impression.
Frequently Asked Questions
Engraving into wood can be a beautiful and artistic way to personalize your projects or create custom designs. If you’re new to wood engraving or looking for some guidance, we’ve compiled a list of frequently asked questions to help you get started.
1. How do I choose the right wood for engraving?
When selecting wood for engraving, it’s important to consider the hardness and grain of the wood. Softer woods like pine or cedar are easier to engrave and are suitable for beginners. Hardwoods like oak or maple require more skill and precision. It’s also important to choose wood that is free from knots or imperfections, as they can affect the quality of the engraving.
Additionally, consider the color and texture of the wood, as it can greatly impact the final appearance of your engraving. Experimenting with different types of wood will give you a better understanding of how each wood type reacts to engraving techniques.
2. What tools do I need for wood engraving?
There are several tools you can use for wood engraving, depending on the complexity of your design. The most basic tools include a wood burning pen or a rotary tool with a small engraving bit. These tools allow you to create precise lines and details in your wood. For more advanced techniques, you may also need chisels, gouges, or carving knives to add depth and texture to your engravings.
It’s crucial to invest in high-quality tools to ensure clean and accurate engravings. Take the time to research and test different tools to find the ones that work best for your projects and skill level.
3. How do I prepare the wood for engraving?
Before you start engraving, it’s essential to prepare the wood surface properly. Begin by sanding the wood to create a smooth and even surface. This will help the engraving tool glide more easily and prevent any rough or jagged lines. Use fine-grit sandpaper and sand in the direction of the wood grain to avoid scratches.
Once the wood is sanded, you can apply a coat of wood sealer or finish to protect the surface and enhance the appearance of your engraving. Allow the sealer or finish to dry completely before starting the engraving process.
4. What techniques can I use for wood engraving?
There are various techniques you can employ to achieve different effects in wood engraving. The most common techniques include line engraving, stippling, and shading. Line engraving involves creating precise lines and patterns, while stippling involves using dots to create texture and shading. Shading can be achieved by varying the depth of the engraving or using different techniques such as cross-hatching.
Experimenting with different techniques and combining them can help you create unique and visually appealing engravings. Take the time to practice and develop your skills to master different techniques.
5. How do I maintain and preserve my wood engravings?
To ensure the longevity of your wood engravings, proper care and maintenance are essential. Avoid exposing your engravings to direct sunlight, excessive moisture, or extreme temperatures, as these can damage the wood and fade the engraving over time. If the engraving is on a functional item, such as a cutting board or a furniture piece, use food-safe finishes or varnishes to protect the wood and make it easier to clean.
Regularly dust your engravings using a soft, lint-free cloth to remove any debris or dirt that may accumulate. If necessary, you can also use a small brush or compressed air to clean hard-to-reach areas. Avoid using harsh chemicals or abrasive materials that may scratch or damage the wood surface.

Remember, patience and practice are key when it comes to mastering the art of wood engraving. Don’t be discouraged if your initial attempts don’t turn out as expected – every mistake is an opportunity to learn and improve. Take your time to choose the right tools, experiment with different techniques, and let your imagination guide you. With dedication and a passion for woodworking, you will soon find yourself creating intricate designs and leaving your mark on the beautiful canvas of wood. So, grab your tools, unleash your creativity, and embark on an exciting adventure in the world of wood engraving. Happy engraving!
- How to Clean Pottery Barn Wood Furniture - April 25, 2024
- How to Clean Amish Wood Furniture - April 25, 2024
- How to Treat Eucalyptus Wood - April 25, 2024