Are you tired of seeing unsightly gaps in your beautiful wood floor? Don’t worry, you’re not alone. Many homeowners face the challenge of filling gaps in their wood floors, whether it’s due to natural expansion and contraction, wear and tear, or simply the passage of time. But fear not, because in this guide, we will delve into the art of filling gaps in wood floors, providing you with step-by-step instructions and invaluable tips to restore the seamless beauty of your flooring.
Before we jump into the nitty-gritty of the process, it’s important to understand why gaps occur in wood floors. Wood is a natural material that reacts to changes in temperature and humidity, causing it to expand and contract. Over time, these fluctuations can lead to gaps between the floorboards, creating an unsightly and potentially problematic situation. But worry not, as we will equip you with the knowledge and techniques to tackle this issue head-on, ensuring your wood floor looks flawless once again. So, grab your tools and let’s get started on filling those pesky gaps in your wood floor!
How to Fill Gaps in Wood Floor:
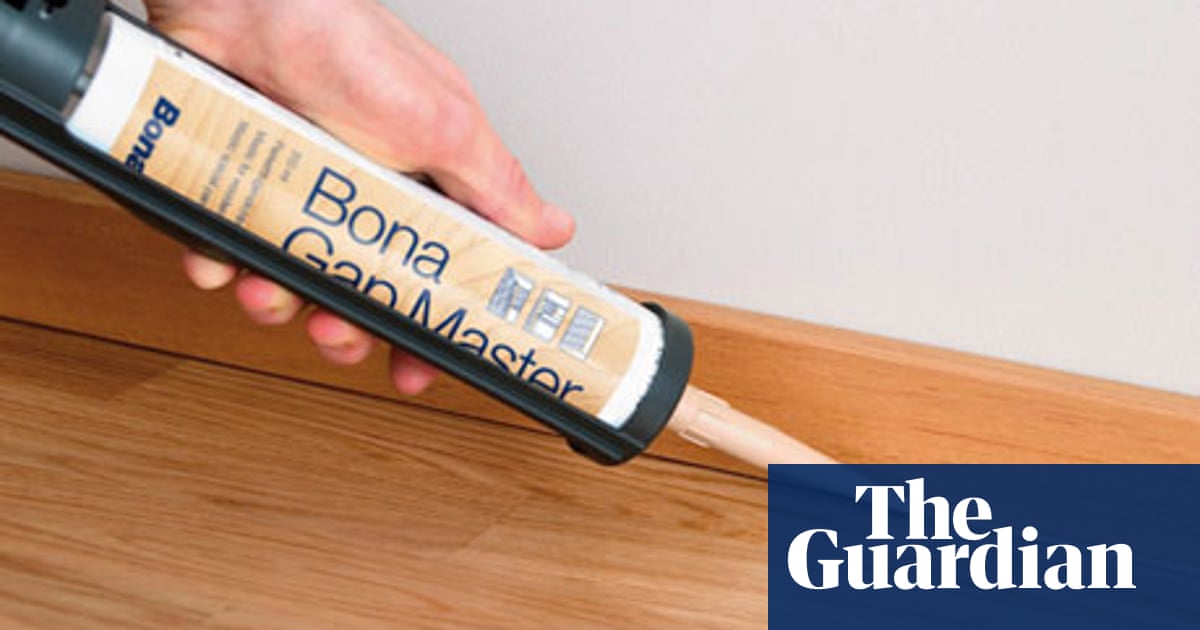
- Start by cleaning the gaps with a vacuum or broom.
- Use a putty knife to apply wood filler into the gaps, making sure to fill them completely.
- Smooth the filler with a putty knife or a damp cloth.
- Allow the filler to dry according to the manufacturer’s instructions.
- Sand the filled areas until they are smooth and level with the rest of the floor.
- Finally, apply a matching stain or sealant to blend the repaired areas with the rest of the floor.

How to Fill Gaps in Wood Floor
In this article, we will guide you through the step-by-step process of filling gaps in your wood floor. Whether you have recently installed a new wood floor or have an older floor that has developed gaps over time, this guide will help you restore its beauty and prevent further damage. With just a few tools and materials, you can easily fill the gaps and ensure your wood floor looks flawless.
Step 1: Prepare the Floor
Before you begin filling the gaps, it is essential to prepare the floor properly. Start by thoroughly cleaning the area to remove any dirt, dust, or debris that may be present. Use a broom or vacuum cleaner to ensure the surface is clean and free from any loose particles. This will allow the filler material to adhere properly to the wood floor.
Next, inspect the gaps and assess their size. If the gaps are wider than 1/4 inch, you may need to use a backer rod to fill the space before applying the filler. A backer rod is a flexible foam rod that helps provide stability and prevents the filler from sinking into the gap.
Step 2: Choose the Right Filler
Selecting the right filler material is crucial for a successful gap-filling project. There are various types of fillers available, including latex-based and epoxy-based options. Latex-based fillers are ideal for smaller gaps and are easy to work with. Epoxy-based fillers, on the other hand, are more durable and suitable for larger gaps.

Consider the color of your wood floor and choose a filler that closely matches its shade. This will ensure a seamless blend and make the filled gaps less noticeable. You can find fillers in different colors or opt for a stainable filler that can be tinted to match your floor’s exact color.
Step 3: Apply the Filler
Now it’s time to apply the filler to the gaps in your wood floor. Start by squeezing a small amount of filler into each gap, using a putty knife or a similar tool. Make sure to press the filler firmly into the gap to ensure it fills the entire space. Smooth out any excess filler, taking care not to damage the surrounding floor surface.
If you are using an epoxy-based filler, follow the manufacturer’s instructions regarding mixing and application time. Some epoxy fillers require a two-part mixing process, while others can be applied directly from the tube. Ensure you work efficiently, as epoxy fillers tend to harden quickly.
Step 4: Sand and Finish
After the filler has dried, usually within a few hours, it’s time to sand the filled gaps to achieve a smooth and even finish. Use a fine-grit sandpaper and sand in the direction of the wood grain. Be careful not to sand too aggressively, as this may damage the surrounding floor.
Once you have achieved a smooth surface, clean the area again to remove any sanding dust. Finish the filled gaps with an appropriate wood floor finish, such as polyurethane or varnish, to match the rest of the floor. Apply the finish according to the manufacturer’s instructions and allow it to dry completely.
By following these steps, you can effectively fill gaps in your wood floor and restore its appearance. Remember to take your time and work carefully to achieve the best results. With proper maintenance and regular inspections, you can prevent further gaps from forming and enjoy a beautiful, seamless wood floor for years to come.
Frequently Asked Questions
Here are some commonly asked questions about how to fill gaps in wood floors:
Question 1: Why do gaps appear in wood floors?
There are several reasons why gaps can appear in wood floors. One common cause is natural expansion and contraction of the wood due to changes in temperature and humidity. Another reason could be improper installation or settling of the floor over time. Gaps can also occur if the wood dries out or shrinks.
To fix the issue, it’s important to determine the underlying cause of the gaps and address it accordingly. This may involve adjusting the humidity levels in the room, fixing any structural issues, or using appropriate fillers to close the gaps.
Question 2: Can I fill the gaps in my wood floor myself?
Yes, you can fill the gaps in your wood floor yourself. However, it’s important to assess the severity and size of the gaps before deciding on the appropriate method. For smaller gaps, you can use wood filler or putty to fill them in. For larger gaps, you may need to consider more extensive solutions such as using wooden shims or replacing damaged floorboards.
Keep in mind that filling gaps in wood floors requires some level of skill and precision. If you’re unsure or uncomfortable with the process, it’s always best to consult a professional to ensure a proper and long-lasting fix.
Question 3: What type of wood filler should I use to fill gaps in my floor?
The type of wood filler you should use to fill gaps in your floor depends on the size and location of the gaps. For smaller gaps, a ready-to-use wood filler or putty can be sufficient. These fillers are typically available in various colors to match your floor’s finish.
For larger or more significant gaps, it’s recommended to use a two-part epoxy wood filler. This type of filler is stronger and more durable, making it suitable for wider gaps. It’s important to follow the manufacturer’s instructions when using any wood filler and ensure it is compatible with your specific wood floor.
Question 4: How do I apply wood filler to fill the gaps in my floor?
To apply wood filler to fill the gaps in your floor, start by cleaning the gaps thoroughly and removing any debris or loose wood. Then, using a putty knife or a spatula, press the wood filler into the gaps, ensuring it is evenly distributed and fills the entire gap.
Once the filler is applied, scrape off any excess using the putty knife or spatula. Allow the filler to dry according to the manufacturer’s instructions, and then sand it down to achieve a smooth and even surface. Finally, finish the filled gaps with a suitable stain or sealant to match the surrounding floor.
Question 5: How can I prevent gaps from appearing in my wood floor?
To prevent gaps from appearing in your wood floor, it’s important to maintain a consistent indoor environment. Keep the humidity levels in the room between 40-60% to minimize wood shrinkage or expansion. Consider using a humidifier or dehumidifier if necessary.
Additionally, avoid excessive exposure to direct sunlight, as it can cause the wood to dry out and shrink. Regularly inspect and maintain your wood floor, addressing any issues promptly to prevent further damage. Finally, ensure proper installation by hiring a professional or following the manufacturer’s guidelines if you’re installing the floor yourself.
Furthermore, it is essential to understand that prevention is key to maintaining a gap-free wood floor. Regularly inspecting and maintaining your floor, such as keeping humidity levels stable and promptly addressing any signs of damage, can help prevent gaps from forming in the first place. By taking proactive measures and utilizing the techniques discussed in this guide, you can ensure that your wood floor remains in optimal condition for years to come. So, don’t let those gaps go unnoticed – take action today and enjoy a flawless wood floor that adds warmth and value to your home.
- How to Waterproof the Inside of a Wood Planter Box - May 11, 2024
- How to Build a Raised Garden Bed With Wood - May 11, 2024
- How to Transfer Photos to Wood With Nail Polish Remover - May 11, 2024