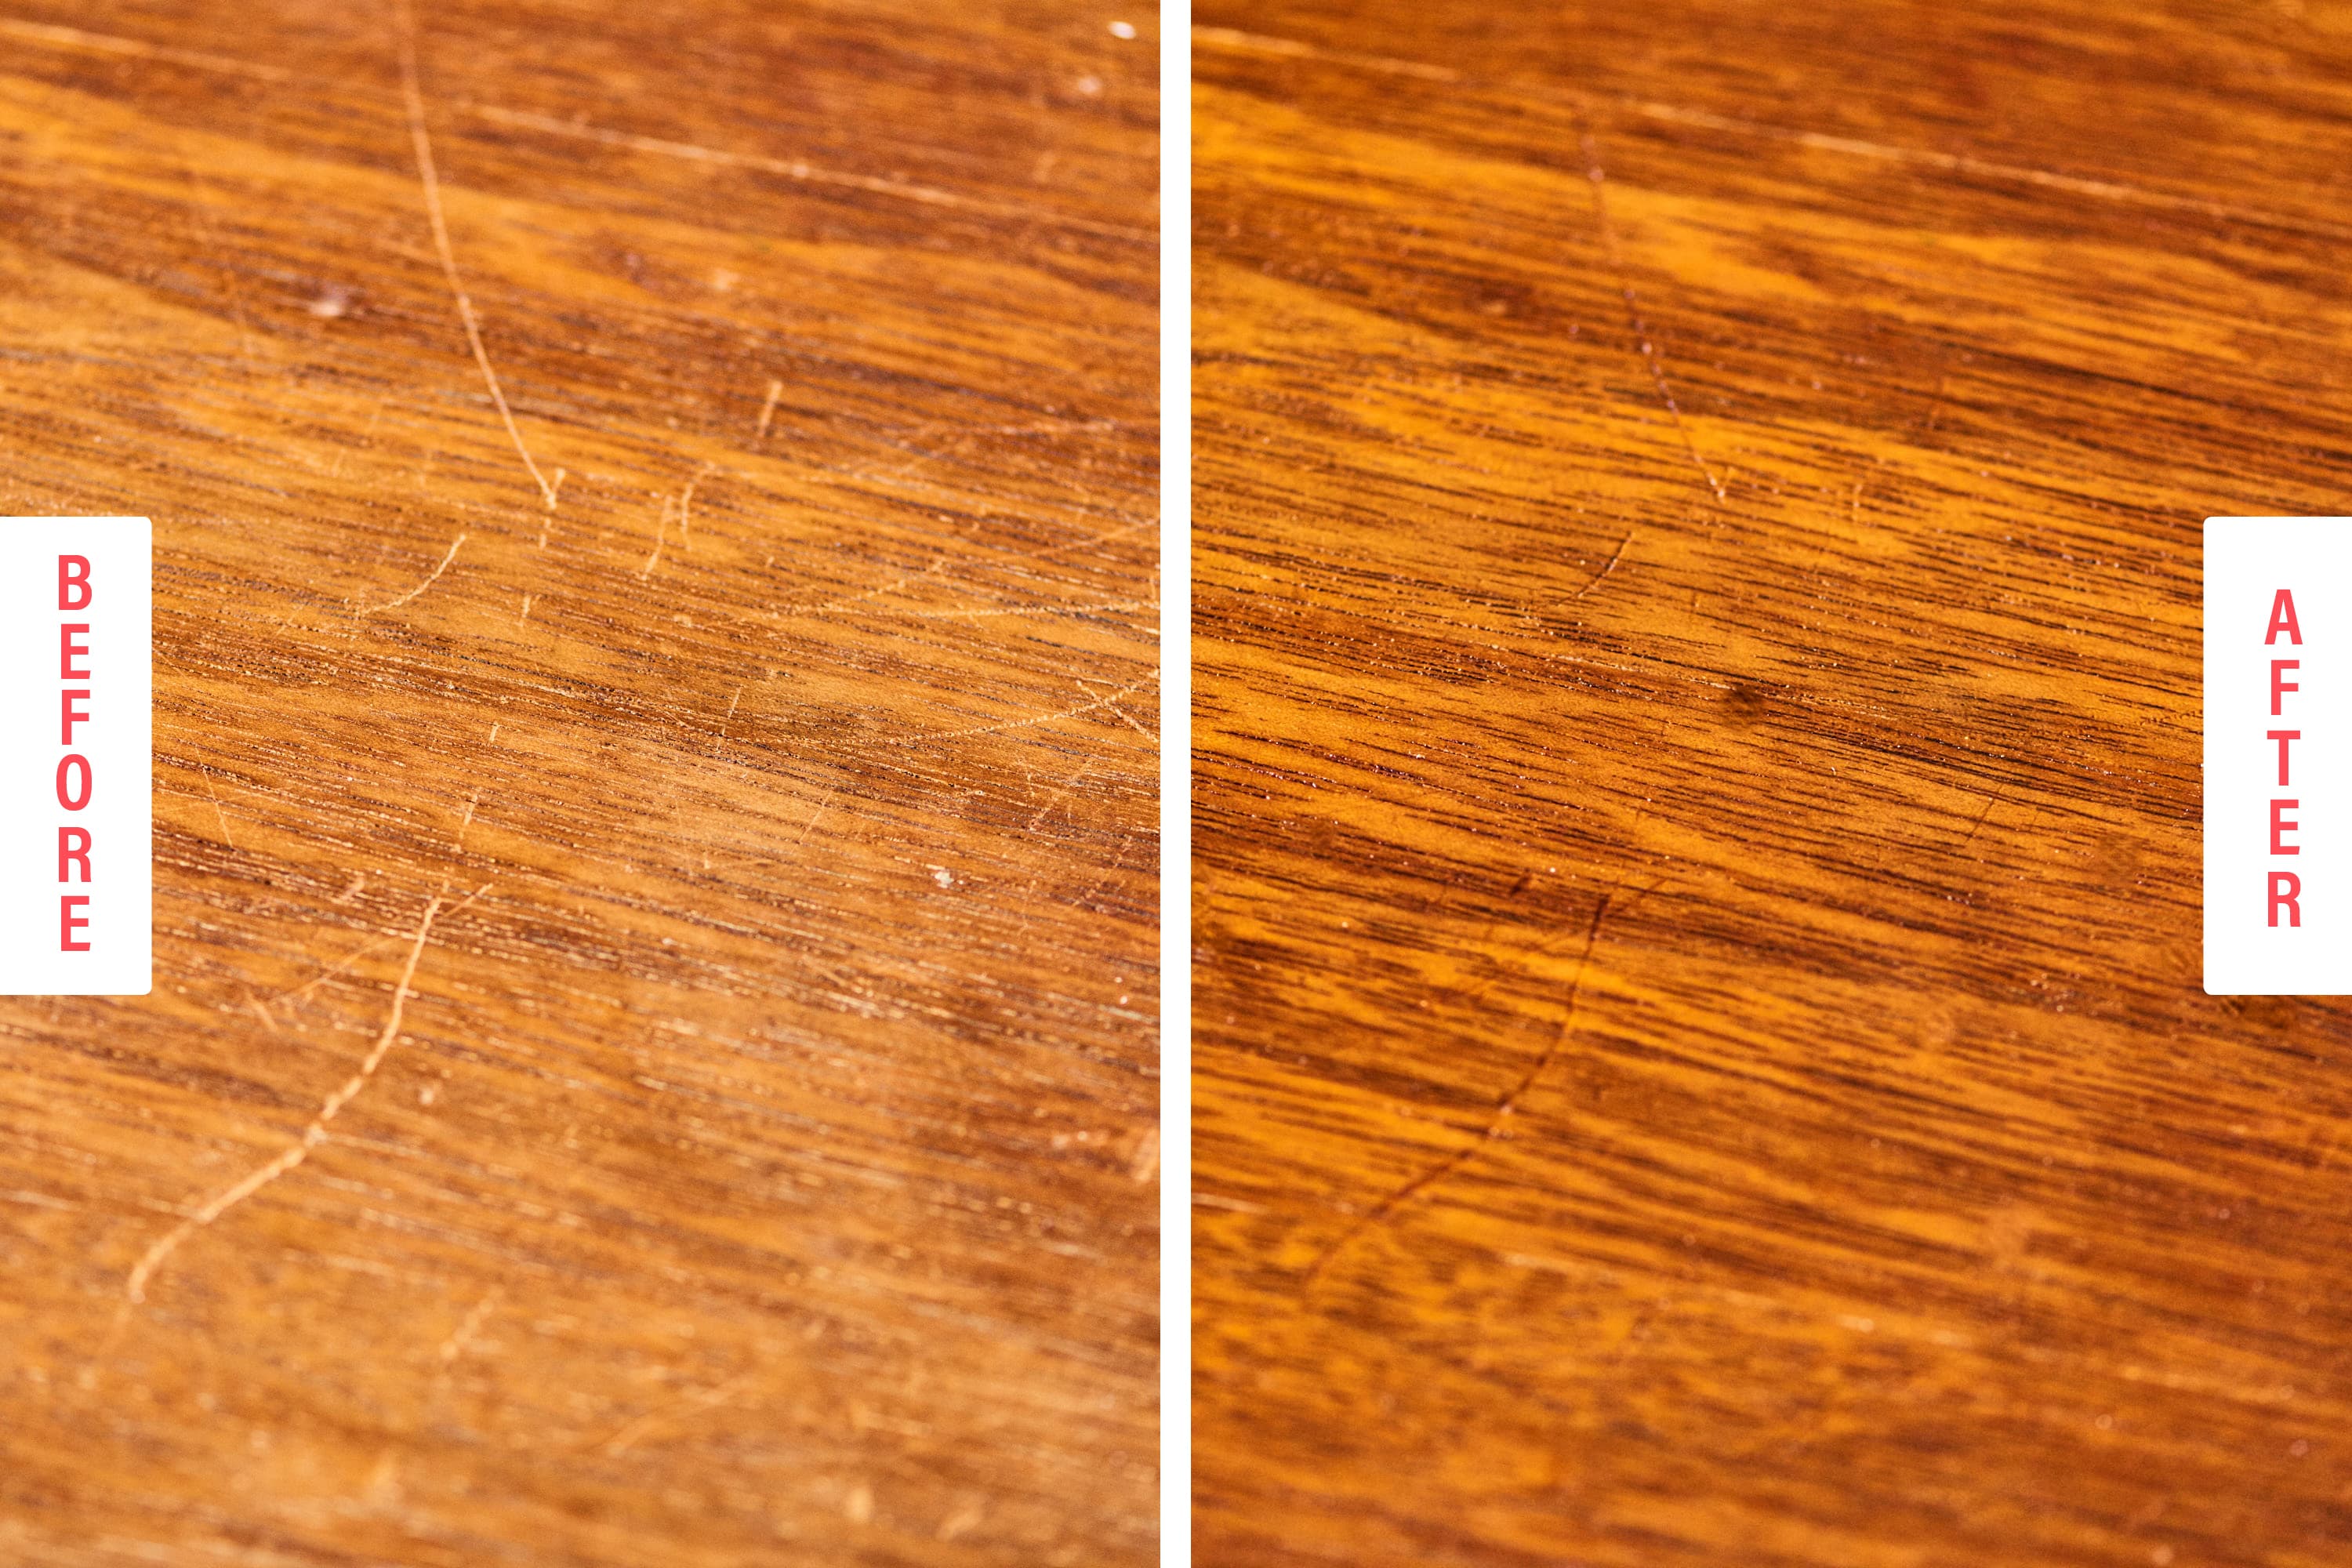
Wooden furniture and flooring can add a touch of elegance and warmth to any home. However, over time, scratches and scuffs can mar its beauty, leaving you in search of a solution to restore its original charm. Don’t worry! In this guide, we will explore the art of fixing scratched wood, equipping you with the knowledge and techniques to bring your wooden surfaces back to life.
Whether it’s a cherished heirloom piece or a contemporary investment, learning how to repair scratched wood is an essential skill for any homeowner or DIY enthusiast. From minor surface scratches to deeper gouges, there are various methods and tools at your disposal to tackle each unique challenge. By following our step-by-step instructions and utilizing the right products, you can transform your scratched wood into a flawless masterpiece, enhancing the overall aesthetic appeal of your living space. So, roll up your sleeves, grab your toolkit, and let’s dive into the fascinating world of wood restoration!
How to Fix Scratched Wood:
- Identify the severity of the scratch.
- For light scratches, use a mixture of equal parts olive oil and vinegar to gently rub the scratch.
- For deeper scratches, fill them with wood filler matching the color of your wood.
- Sand the filled scratch until it is smooth and level with the surrounding surface.
- Apply a wood stain marker or touch-up pen to match the color of the wood.
- Finish by applying a wood polish or wax to protect the repaired area.
How to Fix Scratched Wood: A Step-by-Step Guide
In this informative guide, we will walk you through the process of fixing scratched wood. Whether you have a beloved piece of furniture or wooden flooring that’s seen better days, this step-by-step tutorial will help you restore its beauty. By following these instructions carefully, you can bring new life to your scratched wood surfaces.
Step 1: Assess the Damage
The first step in fixing scratched wood is to assess the extent of the damage. Take a close look at the scratches and determine their depth. Superficial scratches can often be easily fixed with simple DIY techniques, while deeper scratches may require more intensive repairs.
If the scratches are shallow and only affect the surface finish, you can proceed with light repairs. However, if the scratches have penetrated the wood itself, you may need to consider more advanced methods, such as sanding and refinishing.
Step 2: Clean the Surface
Before attempting any repairs, it’s important to thoroughly clean the wood surface. Use a mild detergent or wood cleaner and a soft cloth to remove any dirt, grime, or wax buildup. Make sure the surface is completely dry before proceeding.

Cleaning the surface not only prepares it for repair but also ensures that any loose debris won’t interfere with the repair process. It also allows you to see the extent of the scratches more clearly.
Step 3: Use a Wood Filler
If the scratches are shallow, you can use a wood filler to fill in the damaged areas. Choose a filler that matches the color of your wood to achieve a seamless repair. Apply the filler to the scratches using a putty knife, ensuring that it fills the entire scratch. Smooth out the excess filler and let it dry according to the manufacturer’s instructions.
Once the filler is dry, gently sand it down using fine-grit sandpaper until it is flush with the surrounding wood. Wipe away any dust with a clean, damp cloth.
Step 4: Apply a Wood Stain or Wax
If the scratched area is still noticeable after using a wood filler, you can further camouflage it by applying a matching wood stain or wax. Use a small brush or cloth to carefully apply the stain or wax to the repaired area. Blend it in with the surrounding wood, ensuring a seamless finish.
Allow the stain or wax to dry completely before applying any sealant or additional finish. This step will help to enhance the appearance of the repair and make it less visible.
Step 5: Apply a Protective Finish
Once you are satisfied with the repair, it’s important to apply a protective finish to the entire wood surface. This will not only provide added durability but also help to blend the repaired area with the rest of the wood.
Choose a finish that is suitable for your specific wood surface, such as polyurethane, varnish, or wax. Apply the finish according to the manufacturer’s instructions, ensuring even coverage. Allow the finish to dry completely before using or placing any objects on the wood surface.
Step 6: Maintain and Prevent Future Scratches
To prevent future scratches, it’s important to take proper care of your wood surfaces. Use coasters or protective pads under objects to prevent them from scratching the wood. Regularly dust and clean the surface with a gentle cleaner to remove any debris that could cause scratches.
If you do notice any new scratches, address them promptly using the techniques outlined in this guide. By staying proactive and maintaining your wood surfaces, you can keep them looking beautiful for years to come.
Frequently Asked Questions
Here are some commonly asked questions about how to fix scratched wood:
1. How can I fix shallow scratches on wood furniture?
To fix shallow scratches on wood furniture, you can start by cleaning the scratched area with a mild soap and water solution. Once the area is clean and dry, you can use a crayon or a wax stick that matches the color of the wood to fill in the scratch. Apply the crayon or wax stick directly onto the scratch, making sure to fill it completely. Then, use a clean cloth to buff the area and remove any excess wax. If the scratch is still visible, you can lightly sand the area with fine-grit sandpaper and apply a wood stain or polish to match the surrounding area.
If the scratch is deep or extends beyond the surface layer of the wood, it may require more extensive repair. In such cases, it is recommended to seek professional help or consult a furniture repair specialist.
2. What can I do to fix deep scratches on wooden floors?
Fixing deep scratches on wooden floors can be a bit more challenging. One option is to use wood filler or putty to fill in the scratch. Start by cleaning the area and removing any dirt or debris. Then, apply the wood filler or putty to the scratch, making sure to fill it completely. Use a putty knife or a similar tool to smooth out the surface of the filler and remove any excess. Allow the filler to dry according to the manufacturer’s instructions, and then lightly sand the area to ensure a smooth finish. Finally, you can apply a wood stain or finish to the repaired area to match the rest of the floor.
If the scratch is too severe or extends across a large area, it may be necessary to replace the damaged floorboards or seek professional assistance for a more extensive repair.
3. How can I fix scratches on a wooden table without refinishing the entire surface?
If you have scratches on a wooden table and want to fix them without refinishing the entire surface, there are a few options you can try. One method is to use a walnut or pecan. Simply rub the nut along the scratch, applying gentle pressure. The natural oils in the nut can help to darken the scratch and make it less noticeable. Another option is to use a mixture of olive oil and vinegar. Mix equal parts of olive oil and vinegar, then apply the mixture to the scratch using a soft cloth. Allow it to sit for a few minutes, then wipe away any excess. This method can help to moisturize the wood and reduce the appearance of the scratch.
Keep in mind that these methods may not completely eliminate deep or severe scratches, and they may not be suitable for all types of wood. If the scratches are extensive or the table has a valuable finish, it is recommended to consult a professional furniture restorer for the best results.
4. Can I use a wood repair kit to fix scratches on my wooden furniture?
Yes, you can use a wood repair kit to fix scratches on your wooden furniture. Wood repair kits often include a variety of products, such as wax fillers, putties, and touch-up markers, that are specifically designed to repair scratches and other minor damages on wood surfaces. These kits typically come with detailed instructions on how to use each product and may also include color-matching guides to help you find the right shade for your furniture. Before using a wood repair kit, make sure to clean the scratched area and follow the instructions provided with the kit for the best results.
It’s worth noting that while wood repair kits can be effective for minor scratches, they may not be suitable for deep or extensive damages. In such cases, it is advisable to seek professional help or consult a furniture repair specialist.
5. How can I prevent future scratches on my wooden furniture?
Preventing future scratches on your wooden furniture can help to maintain its appearance and prolong its lifespan. Here are a few tips to consider:
– Use coasters, placemats, or tablecloths to protect the surface of your furniture from spills and stains.
– Avoid placing hot or sharp objects directly on the wood surface, as they can cause scratches or burn marks.
– Use furniture pads or felt pads on the bottom of chairs, tables, or other furniture to prevent them from scratching the floor or the furniture itself.
– Regularly dust and clean your wooden furniture using a soft, lint-free cloth to remove any dirt or debris that could potentially cause scratches.
– Consider applying a protective finish or sealant to your wooden furniture to provide an extra layer of protection against scratches and other damages.
By following these preventive measures, you can help to minimize the risk of scratches and keep your wooden furniture looking its best for years to come.

How to Fix Wood Scratches | Ask This Old House
In conclusion, learning how to fix scratched wood can be a valuable skill for any homeowner or DIY enthusiast. Not only does it save you money by avoiding costly professional repairs, but it also allows you to restore the beauty and functionality of your wooden furniture and surfaces. By following the step-by-step process outlined in this article, you can confidently tackle minor scratches and bring new life to your beloved wooden items.
Remember, patience and attention to detail are key when it comes to repairing scratched wood. Take the time to assess the damage, gather the necessary materials, and carefully follow the recommended techniques. With practice, you will become more skilled at addressing scratches and imperfections, ensuring that your wood remains looking its best for years to come. So, don’t fret the next time you discover a scratch on your wooden furniture – armed with the knowledge gained from this guide, you can confidently take on the challenge and restore your wood to its former glory.
- How to Remove Mold From Plywood - April 18, 2024
- How to Get Rid of Green Mold on Wood - April 18, 2024
- How to Prevent Mold on Wood - April 18, 2024