Are you looking for a unique and patriotic way to display your love for your country? Look no further than the art of making wooden flags. Crafting your own wooden flag not only allows you to showcase your creativity, but also gives you a chance to pay homage to your nation’s flag in a truly special and personalized way. In this guide, we will explore the steps and techniques required to create stunning wooden flags that will become the centerpiece of any room or outdoor space. So, whether you are a seasoned woodworker or a beginner looking for a new project, get ready to embark on a journey of craftsmanship and American pride as we delve into the world of making wooden flags.
The process of making wooden flags combines the beauty of woodworking with the symbolism and history of national flags. By using different types of wood, various staining techniques, and precise measurements, you can create a stunning replica of your country’s flag that will capture the attention and admiration of all who see it. Not only will you learn how to select the right materials and tools, but you will also discover the secrets behind creating intricate designs, adding texture, and achieving that timeless, weathered look that gives wooden flags their unique charm. So, whether you want to hang your flag indoors as a statement piece, or display it proudly outside your home, this guide will equip you with the knowledge and skills to create a wooden flag that is truly one-of-a-kind. Get ready to unleash your creativity and let the art of making wooden flags ignite your passion for craftsmanship and national pride.
How to Make Wooden Flags
- Gather the necessary materials, including wooden planks, paint, sandpaper, and a saw.
- Measure and cut the wooden planks into the desired flag shape.
- Sand the edges and surfaces of the wooden planks for a smooth finish.
- Paint the wooden planks with the desired flag design, allowing each coat to dry before applying the next.
- Once the paint is dry, you can add additional details or distress the flag for a rustic look.
- Attach a hanging mechanism to the back of the wooden flag.
- Your wooden flag is now ready to be displayed and admired!
How to Make Wooden Flags
Wooden flags are a popular and meaningful decoration that you can make yourself. Whether you want to display your patriotism or simply add a rustic touch to your home, making a wooden flag can be a fun and rewarding project. In this article, we will guide you through the step-by-step process of creating your own wooden flag, from selecting the right materials to adding the finishing touches.
Step 1: Gather Your Materials
Before you start making your wooden flag, you’ll need to gather all the necessary materials. Here’s a list of what you’ll need:
- Wooden boards
- Saw
- Sandpaper
- Paint
- Paintbrushes
- Masking tape
- Measuring tape
- Pencil
- Wood glue
- Nails
Make sure you have everything on hand before you begin, as it will make the process much smoother.
Step 2: Prepare the Wooden Boards
Start by cutting your wooden boards into the desired size for your flag. You can choose to make a small flag to hang on the wall or a larger one to display outdoors. Use a saw to carefully cut the boards to the correct dimensions. Once you have the pieces cut, use sandpaper to smooth any rough edges or surfaces.

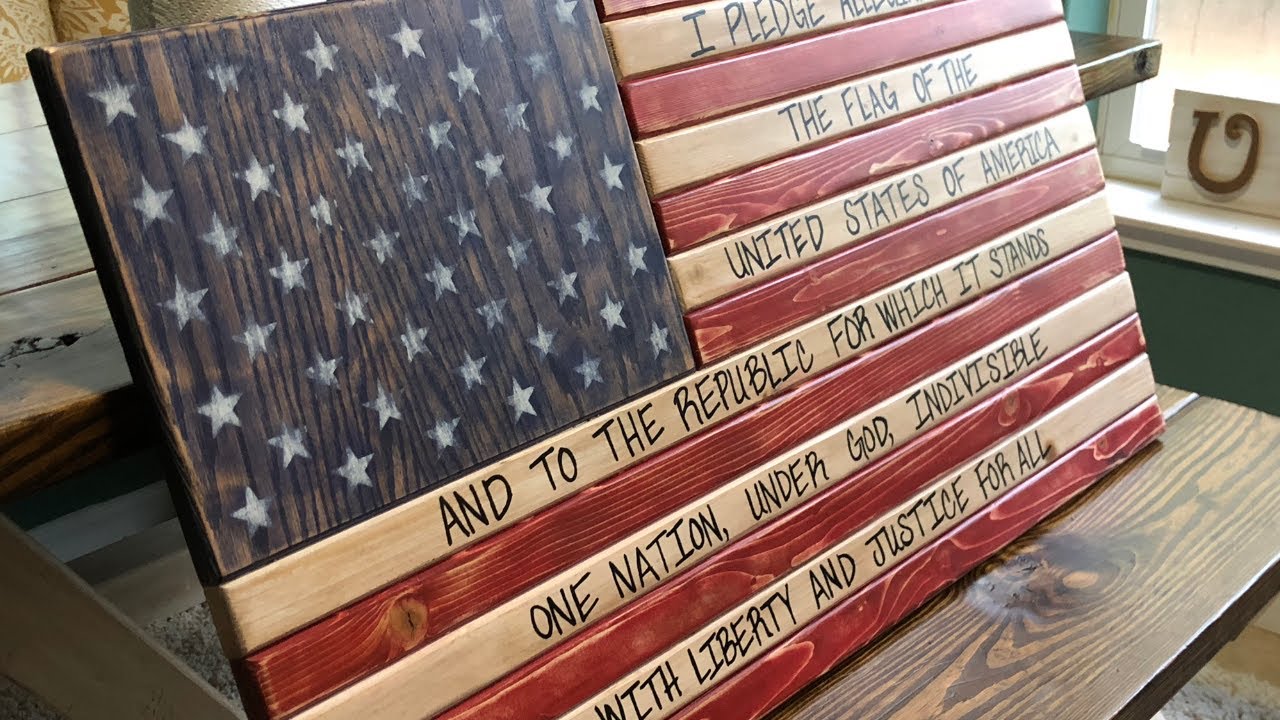
Next, determine the number of stripes you want on your flag and mark the areas where each stripe will be painted. Use a measuring tape and pencil to ensure the stripes are evenly spaced. If you want a star field in the corner of your flag, mark the area for it as well.
Step 3: Paint the Flag
Now it’s time to start painting your wooden flag. Begin by painting the star field in the corner, if desired. Use masking tape to create clean, straight lines for the field. Apply blue paint within the taped-off area and let it dry completely.
Once the star field is dry, remove the masking tape and start painting the stripes. Use masking tape to create straight lines for each stripe and apply paint to the designated areas. Allow each stripe to dry before moving on to the next one.
Step 4: Assemble the Flag
After all the paint has dried, it’s time to assemble the flag. Start by applying wood glue to the back of each painted board and carefully position them together, aligning the edges to create a seamless flag. Use clamps to hold the boards in place while the glue dries.
Once the glue has dried, reinforce the boards by nailing them together from the back. This will ensure that your wooden flag is sturdy and long-lasting. Hammer nails into the boards at regular intervals, making sure they are driven in securely.
Step 5: Add the Finishing Touches
Finally, add any finishing touches to your wooden flag. You can lightly sand the surface to smooth out any rough areas or edges. Apply a coat of clear varnish or sealant to protect the paint and enhance the natural beauty of the wood. Once the varnish is dry, your wooden flag is ready to be displayed!
Remember, making a wooden flag requires precision and attention to detail. Take your time with each step, and don’t be afraid to make adjustments along the way. With a little patience and creativity, you’ll have a stunning wooden flag to proudly showcase in your home.
Frequently Asked Questions
Here are some commonly asked questions about how to make wooden flags:
Q: What materials do I need to make a wooden flag?
To make a wooden flag, you will need the following materials:
– A piece of wood, preferably plywood, in the desired size for your flag
– Sandpaper for smoothing the wood surface
– Paint or stain in the colors you want for your flag
– Painter’s tape for creating clean lines and precise designs on the flag
– A paintbrush or foam brush for applying the paint or stain
– Optional: Clear coat or sealant to protect the finished flag
Q: How do I prepare the wood for painting or staining?
Before painting or staining the wood, it’s important to prepare the surface properly. Follow these steps:
1. Start by sanding the wood with sandpaper to smooth out any rough edges or imperfections.
2. Wipe away any dust or debris from sanding with a clean cloth or tack cloth.
3. If desired, apply a wood conditioner to the surface to help the paint or stain adhere better.
4. Allow the wood to dry completely before proceeding with painting or staining.
Q: How can I create a stencil for the flag design?
To create a stencil for your wooden flag design, you can use one of the following methods:
– Print out a design or pattern on paper and cut it out to create a stencil template.
– Use a stencil cutting machine or cutter to create a custom stencil from a digital design.
– Use pre-made stencils or stencils available at craft stores.
Once you have your stencil, secure it onto the wood surface using painter’s tape or a temporary adhesive.
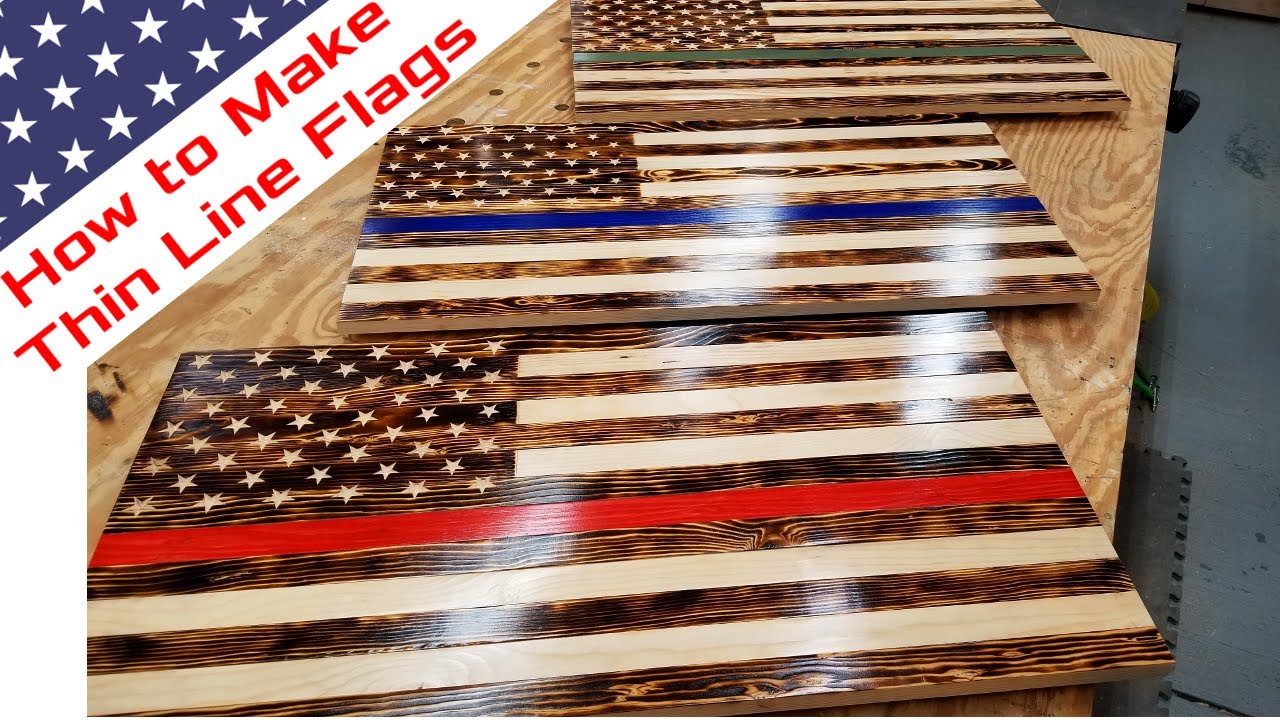
Q: Should I paint or stain the wooden flag?
Whether to paint or stain your wooden flag is a personal preference. Here are some considerations:
– Painting allows for more vibrant and varied color options, as well as the ability to create intricate designs.
– Staining brings out the natural beauty of the wood and provides a more rustic or aged look.
– You can also combine painting and staining techniques to achieve a unique effect.
Ultimately, the choice between painting and staining depends on your desired aesthetic and the overall theme of the flag.
Q: How do I protect the finished wooden flag?
To protect the finished wooden flag and ensure its longevity, you can apply a clear coat or sealant. Follow these steps:
1. Once the paint or stain has dried completely, use a clean brush to apply a thin, even coat of clear coat or sealant.
2. Allow the first coat to dry according to the product instructions.
3. Apply additional coats if desired, following the recommended drying times between coats.
4. Once the sealant is fully dry, your wooden flag will be protected from moisture, dirt, and damage.
Most In-Depth Wood American Flag Build | Make Money Woodworking! | How to
In conclusion, learning how to make wooden flags is not only a fun and creative endeavor, but it also allows individuals to showcase their patriotism and sense of pride. By following the step-by-step instructions provided, anyone can create a stunning wooden flag that will become a cherished piece of decor or a thoughtful gift. The beauty of this craft lies in its versatility, as individuals can personalize their flags by choosing different colors, designs, and sizes, making each creation truly unique.
Furthermore, making wooden flags serves as a wonderful way to connect with one’s heritage and pay homage to the values and ideals that the flag represents. It is a reminder of the sacrifices made by those who fought for freedom and a symbol of unity and solidarity. Whether displayed in a home, office, or other public spaces, wooden flags can evoke a sense of pride and admiration in all who see them. So, why not embark on this fulfilling journey of creating wooden flags and let your creativity soar?
- How to Apply Eco Wood Treatment - April 13, 2024
- How to Use Pc Woody Wood Epoxy - April 13, 2024
- How to Treat Wood Fungus - April 13, 2024