Are you a proud owner of a wood stove and in need of a chimney installation? Look no further! In this informative guide, we will walk you through the step-by-step process of installing a chimney for your wood stove. Whether you are a seasoned DIY enthusiast or a novice homeowner, this comprehensive tutorial will provide you with all the necessary information and expert tips to ensure a successful installation.
A properly installed chimney is essential for the efficient and safe operation of your wood stove. It not only helps to direct the smoke and gases out of your home but also prevents the risk of fire hazards. By following our easy-to-understand instructions, you will be able to confidently tackle this project and enjoy the warmth and comfort of your wood stove in no time. So, let’s get started on this exciting journey of installing a chimney for your wood stove!
How to Install Chimney for Wood Stove:
- Choose the right location for your wood stove, ensuring it meets the necessary clearance requirements.
- Measure and cut a hole in the ceiling and roof for the chimney pipe.
- Install the chimney pipe through the roof and secure it with a chimney flashing.
- Attach the chimney cap to the top of the chimney pipe to prevent rain and debris from entering.
- Connect the stovepipe to the chimney pipe using a connector and secure it with screws.
- Ensure all connections are tight and secure.
- Test the wood stove to ensure proper functioning.
How to Install a Chimney for a Wood Stove
Installing a chimney for a wood stove is a crucial step in ensuring the safe and efficient functioning of your heating system. A well-installed chimney will effectively remove smoke and gases from your home, while also preventing the risk of fire hazards. In this step-by-step guide, we will walk you through the process of installing a chimney for your wood stove, providing you with the necessary information and guidelines to do it correctly.
1. Measure and Plan
The first step in installing a chimney for a wood stove is to carefully measure and plan the installation. Start by determining the location of the wood stove and select a suitable spot for the chimney. Consider factors such as proximity to combustible materials, clearances required by local building codes, and the most efficient route for the chimney to exit your home.
Once you have selected the location, measure the height of the ceilings and the distance from the stove to the ceiling. This will help you determine the length of chimney pipe and other components needed for the installation. Consult the manufacturer’s instructions for specific requirements and recommendations.
2. Assemble the Components
After measuring and planning, it’s time to assemble the components of the chimney system. Start by connecting the stove to the chimney pipe using a stovepipe adapter or collar. Ensure a proper fit and secure the connection according to the manufacturer’s instructions.

Next, assemble the chimney pipe sections by sliding them together, making sure to follow the correct orientation and alignment. Use locking bands or screws to secure the joints between the sections. Install a chimney cap at the top of the chimney pipe to prevent debris and animals from entering.
3. Install Support Brackets
Proper support for the chimney pipe is essential to prevent any structural damage or sagging. Install support brackets at regular intervals along the length of the chimney pipe, following the manufacturer’s recommendations. These brackets will ensure the stability and integrity of the chimney system.
Secure the support brackets to the wall or ceiling studs using appropriate screws or anchors. Make sure they are installed securely and can withstand the weight of the chimney pipe. Double-check the alignment and levelness of the pipe to ensure optimal performance.
4. Connect to the Exterior
To complete the installation, connect the chimney pipe to the exterior of your home. Choose an appropriate location for the chimney exit, considering factors such as distance from windows, doors, and other openings. Install a wall thimble or similar device to provide a safe and insulated passage for the chimney pipe through the wall.
Attach the chimney pipe to the wall thimble or similar device using the provided components or connectors. Ensure a tight and secure fit to prevent any leaks or drafts. Finally, seal any gaps or openings around the chimney pipe with fire-resistant caulking or insulation to maintain the efficiency and safety of the installation.
5. Conduct a Safety Check
Once the chimney installation is complete, it is crucial to conduct a thorough safety check before using the wood stove. Inspect all the connections, joints, and supports to ensure they are secure and properly installed. Test the draft and airflow by lighting a small fire in the wood stove and observing the smoke movement.
If you notice any issues or concerns during the safety check, consult a professional chimney installer or technician for further guidance. It is important to address any problems before regular use to prevent the risk of fire or carbon monoxide poisoning.
6. Maintain and Clean Regularly
After installing the chimney for your wood stove, it is essential to maintain and clean it regularly to ensure its optimal performance and safety. Follow the manufacturer’s guidelines for routine maintenance and cleaning procedures, including chimney sweeping to remove creosote buildup.
By keeping your chimney clean and well-maintained, you can prevent chimney fires, reduce the risk of blockages, and maintain efficient airflow. Regular inspections and maintenance will also help identify any potential issues early on, allowing for timely repairs and a longer lifespan for your chimney system.
Frequently Asked Questions
Here are some commonly asked questions about installing a chimney for a wood stove:
Q: What materials are needed to install a chimney for a wood stove?
A: To install a chimney for a wood stove, you will need the following materials:
The chimney pipe, chimney cap, chimney flashing, stovepipe, adjustable elbows, wall thimble, support brackets, high-temperature sealant, and chimney insulation.
Q: How high should the chimney be for a wood stove?
A: The height of the chimney for a wood stove is an important factor for the efficient operation of the stove. The chimney should extend at least 3 feet above the highest point where it passes through the roof. Additionally, the chimney should be at least 2 feet taller than any nearby roofline or structure within a 10-foot radius.
This ensures proper draft and prevents smoke from being blown back into the house by wind or other factors.
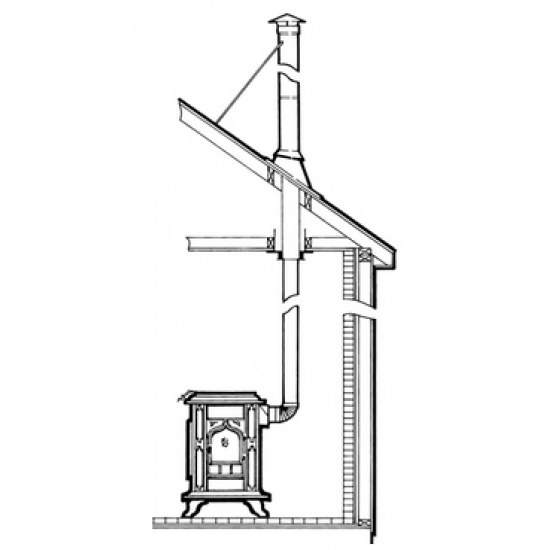
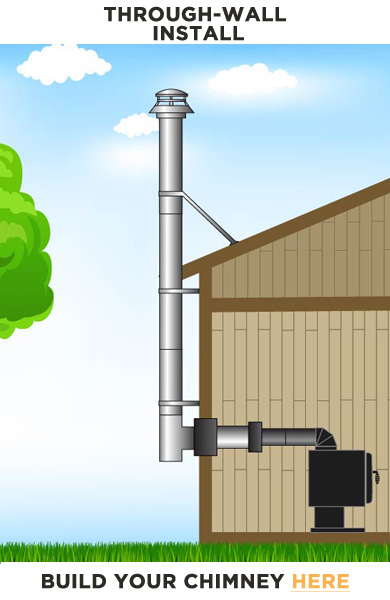
Q: Can I install a wood stove chimney through a wall?
A: Yes, it is possible to install a wood stove chimney through a wall. However, it requires the use of a wall thimble and proper clearance from combustible materials. A wall thimble is a metal sleeve that protects the wall from the heat of the chimney pipe. It is important to follow the manufacturer’s instructions and local building codes for safe installation.
It is recommended to consult with a professional chimney installer or a qualified contractor for proper installation through a wall.
Q: How do I ensure a proper draft in my wood stove chimney?
A: A proper draft is crucial for the efficient operation of a wood stove. Here are some tips to ensure a proper draft:
1. Make sure the chimney is tall enough and extends above the roofline.
2. Ensure the chimney is properly insulated to maintain high temperatures.
3. Clean the chimney regularly to remove any creosote buildup.
4. Check for any obstructions or blockages in the chimney pipe.
5. Use a damper or draft regulator to control the airflow in the stove.
Q: Do I need a chimney cap for my wood stove?
A: Yes, it is highly recommended to install a chimney cap for your wood stove. A chimney cap serves multiple purposes:
1. It prevents rain, snow, and debris from entering the chimney, which can cause damage or blockages.
2. It helps to prevent downdrafts by creating a barrier against wind.
3. It keeps birds and animals from nesting or entering the chimney.
A chimney cap should be installed securely and regularly inspected for any signs of damage or wear.
Installing a chimney for a wood stove may seem like a daunting task, but with the right information and guidance, it can be done successfully. By taking the time to understand the necessary steps and precautions, you can create a safe and efficient heating system that will provide warmth and comfort for years to come. Remember to prioritize safety, consult with professionals when needed, and always adhere to local building codes and regulations. With these considerations in mind, you can confidently embark on the installation process and enjoy the many benefits of a properly installed chimney for your wood stove.
- How to Remove Glue From Wood Floor - April 14, 2024
- How to Dissolve Wood Glue - April 14, 2024
- How to Remove Wood Glue - April 14, 2024