Are you tired of living with a sloping floor that seems to defy gravity? Do you find yourself constantly tripping over uneven surfaces or struggling to place furniture in your home? Well, fret no more! In this guide, we will delve into the art of leveling a sloping floor with plywood, providing you with the knowledge and techniques to transform your uneven terrain into a smooth, level foundation.
A sloping floor can be not only an aesthetic concern but also a safety hazard. Uneven surfaces can cause accidents and make everyday activities a challenge. However, with the right tools, materials, and a step-by-step approach, you can conquer this problem and restore balance to your living space. Whether you’re a DIY enthusiast or a homeowner looking to tackle this project, we’ve got you covered. So, roll up your sleeves, grab your measuring tape, and let’s dive into the world of leveling a sloping floor with plywood.
How to Level a Sloping Floor with Plywood:
- Measure the slope: Use a level and tape measure to determine the extent of the slope.
- Prepare the floor: Remove any existing flooring and clean the surface.
- Cut the plywood: Cut plywood sheets into strips according to the width of the slope.
- Install the plywood: Starting at the lowest point, attach the plywood strips to the floor using screws or adhesive.
- Check levelness: Use a level to ensure the floor is now level. Make any necessary adjustments.
- Finish the floor: Once leveled, you can install new flooring over the plywood.
How to Level a Sloping Floor with Plywood
In this guide, we will walk you through the step-by-step process of leveling a sloping floor using plywood. Whether you are dealing with a minor slope or a more significant incline, this method can help you achieve a level and stable floor surface. Before you begin, gather the necessary tools and materials to ensure a smooth and successful project. With some patience and careful execution, you can restore the balance and functionality of your floor.
Step 1: Assess the Slope
The first step is to thoroughly assess the slope of your floor to determine the extent of the problem. Use a long level and a measuring tape to identify the high and low points. This will help you understand the slope’s magnitude and plan the required plywood thickness for leveling. Remember to take accurate measurements in multiple areas of the room to get a comprehensive view of the slope. Once you have a clear understanding of the floor’s condition, you can proceed to the next step.
Step 2: Prepare the Surface
Before you start installing the plywood, it is crucial to prepare the surface properly. Begin by removing any existing flooring, such as carpet or tiles, to expose the subfloor. Clean the subfloor thoroughly, removing any debris or loose materials. If there are any protruding nails or screws, make sure to either remove them or drive them flush with the floor. Additionally, check for any structural issues that may be causing the slope, such as damaged joists or supports. Addressing these issues beforehand will ensure a more effective leveling process.
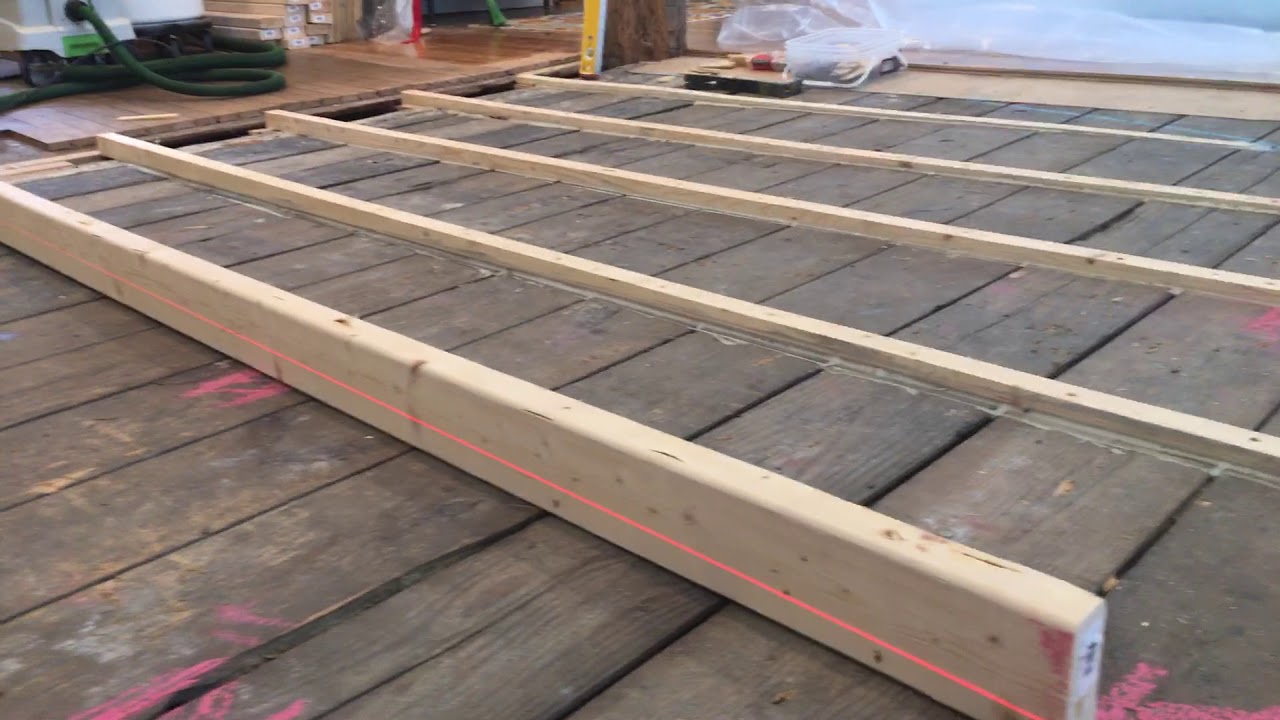
Step 3: Cut and Install the Plywood
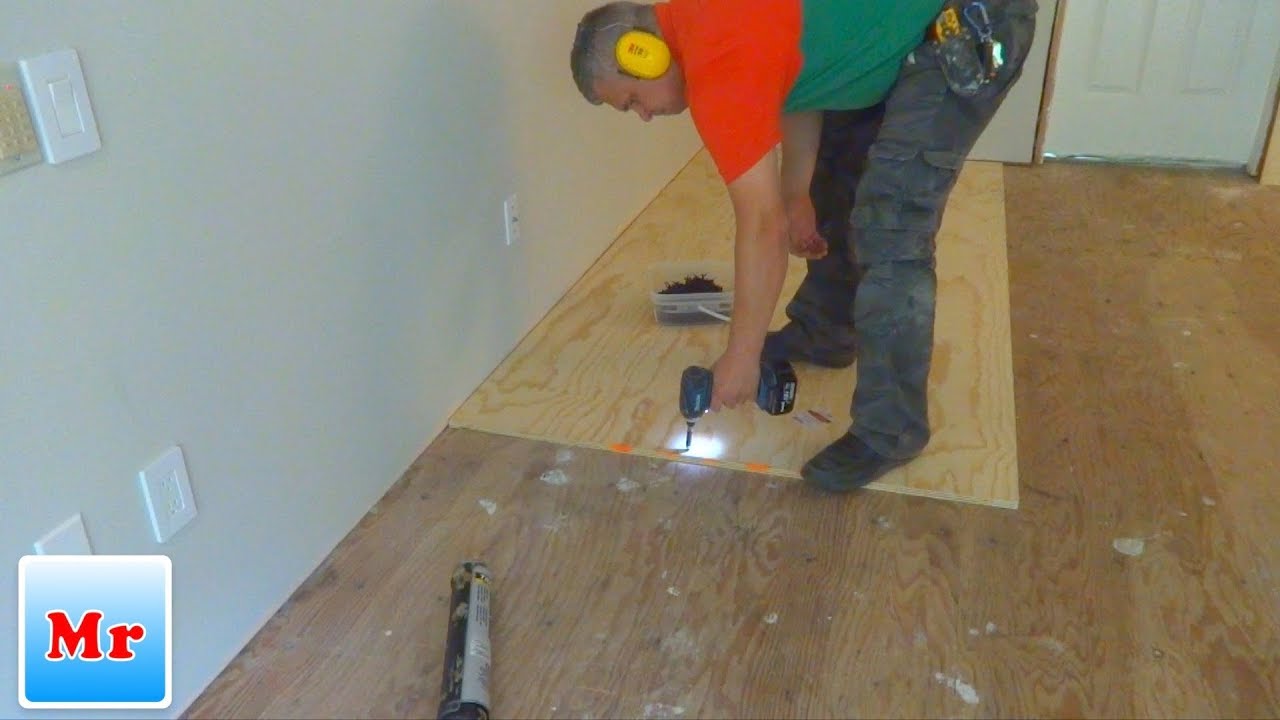
Now it’s time to cut and install the plywood sheets to level the sloping floor. Measure the dimensions of the area that needs leveling and transfer those measurements onto the plywood sheets. Use a circular saw or a table saw to cut the plywood according to the marked dimensions. Start by installing the plywood at the lowest point of the slope. Apply construction adhesive to the subfloor and lay the plywood sheet on top, ensuring it is flush with the surrounding floor. Secure the plywood with nails or screws, placing them approximately 6 inches apart along the edges and every 8 inches within the field. Repeat this process for each plywood sheet, working your way up the slope until the floor is level.
Step 4: Finishing Touches

After installing the plywood, check the level of the floor using a long level. If any areas are still not level, you can add shims or additional layers of plywood to achieve the desired result. Once the floor is perfectly level, you can proceed with installing your desired flooring material over the plywood. Follow the manufacturer’s instructions for the specific flooring type you have chosen. Remember that leveling a sloping floor with plywood is a temporary solution, and it is essential to address any underlying structural issues for a long-term fix. Regularly monitor the floor’s condition and make any necessary adjustments to maintain its levelness over time.
Step 5: Maintain and Enjoy
Now that you have successfully leveled your sloping floor with plywood, it’s important to maintain it properly to ensure its longevity. Regularly inspect the floor for any signs of movement or deterioration. Address any issues promptly to prevent further damage. Additionally, follow proper cleaning and maintenance practices for your chosen flooring material to keep it in optimal condition. By taking these steps, you can enjoy a level and stable floor for years to come.
Frequently Asked Questions
In this section, we have compiled some commonly asked questions about how to level a sloping floor with plywood. If you are planning to tackle this project, these answers will provide you with helpful insights and guidance.
1. How do I determine if my floor needs leveling?
If you notice that your floor slopes noticeably in one direction or if objects placed on the floor tend to roll or slide, it is likely that your floor needs leveling. You can also use a long level and place it on various areas of the floor to determine if there are any significant variations. If the level indicates an uneven surface, it’s time to level your floor with plywood.
To fix the sloping floor, you will need to remove the existing flooring and address the underlying cause of the slope. This could involve adding additional support beams or shims to level the subfloor. Once the subfloor is leveled, you can proceed with installing plywood to create a level surface.
2. What materials will I need to level a sloping floor with plywood?
To level a sloping floor with plywood, you will need the following materials:
– Plywood sheets of appropriate thickness (typically 1/4 inch to 3/4 inch)
– Construction adhesive
– Screws
– Circular saw or table saw
– Drill
– Level
– Measuring tape
– Pry bar
– Safety equipment (goggles, gloves, etc.)
3. How do I prepare the subfloor before installing plywood?
Before installing plywood, it is crucial to prepare the subfloor properly. Start by removing the existing flooring and any debris or nails that may be sticking out. Use a pry bar to remove any baseboards or trim that may interfere with the installation of the plywood.
Next, thoroughly clean the subfloor to ensure there are no dirt, dust, or other particles that could affect the adhesive’s bond. Inspect the subfloor for any damage or rot and repair or replace any affected areas. Once the subfloor is clean and in good condition, you can proceed with the plywood installation.
4. What is the process for installing plywood to level a sloping floor?
The process for installing plywood to level a sloping floor involves the following steps:
1. Measure and cut the plywood sheets to fit the area where the floor needs leveling.
2. Apply construction adhesive to the back of the plywood sheets, ensuring even coverage.
3. Place the plywood sheets on the subfloor, starting from the lowest point of the slope and working towards the highest point.
4. Secure the plywood to the subfloor using screws, making sure to countersink them slightly.
5. Repeat the process for all the plywood sheets, ensuring they are tightly butted against each other.
6. Use a level to check the flatness of the newly installed plywood, making any necessary adjustments.
7. Allow the adhesive to dry according to the manufacturer’s instructions before proceeding with any further flooring installation.
5. Can I level a sloping floor with plywood on my own, or should I hire a professional?
Leveling a sloping floor with plywood can be a DIY project if you have basic carpentry skills and the necessary tools. However, it is essential to accurately assess your abilities and the complexity of the project before deciding to do it yourself.
If you are unsure about your skills or if the sloping floor issue is extensive or related to structural problems, it may be best to consult a professional. A professional contractor or carpenter will have the expertise to accurately diagnose the issue, recommend the appropriate solutions, and ensure the floor is properly leveled.
Not only does leveling a sloping floor with plywood improve the aesthetics of a space, but it also enhances the overall functionality and safety of the area. Whether it is for a residential or commercial property, having a level floor ensures that furniture, appliances, and fixtures can be securely placed without the risk of instability or damage. Additionally, a leveled floor provides a solid base for the installation of flooring materials, such as hardwood or tile, allowing for a seamless and professional finish.
Overall, leveling a sloping floor with plywood is a worthwhile investment for any homeowner or property owner looking to improve the functionality and appearance of their space. By following the steps and guidelines provided in this guide, individuals can confidently tackle this project and achieve a level and stable floor that will stand the test of time.
- How to Remove Glue From Wood Floor - April 14, 2024
- How to Dissolve Wood Glue - April 14, 2024
- How to Remove Wood Glue - April 14, 2024