Are you tired of spending a fortune on picture frames? Do you want to add a personal touch to your home decor? Look no further! In this comprehensive guide, we will delve into the art of making picture frames from wood. Whether you’re a seasoned DIY enthusiast or a beginner looking to unleash your creativity, this step-by-step tutorial will equip you with the knowledge and skills to create stunning frames that will showcase your cherished memories in style.
Imagine the satisfaction of crafting a picture frame that perfectly complements your favorite photograph or artwork. With a few simple tools and materials, you can transform ordinary pieces of wood into beautiful frames that will instantly elevate the aesthetic appeal of any space. In this guide, we will explore various techniques such as measuring and cutting wood, assembling the frame, and even adding unique finishes to create a truly one-of-a-kind piece. So, unleash your inner craftsman, grab your tools, and let’s embark on this exciting journey of creating custom picture frames that will leave your guests in awe. Get ready to showcase your creativity and turn your cherished memories into timeless works of art!
How to Make Picture Frames from Wood:
- Measure and cut the wood to the desired size.
- Sand the edges and surfaces of the wood for a smooth finish.
- Apply wood glue to the corners and join them together.
- Use clamps to hold the corners in place until the glue dries.
- Once the frame is dry, sand it again for a polished look.
- Stain or paint the frame to your preferred color.
- Attach a hanging hardware at the back of the frame.
- Insert your picture and secure it with a backing board.
How to Make Picture Frames from Wood
In this step-by-step guide, we will walk you through the process of making beautiful picture frames from wood. Whether you want to display your favorite photographs or create unique gifts for your loved ones, this project is a great way to showcase your creativity and woodworking skills. With the right tools and materials, you’ll be able to create custom frames that perfectly complement your artwork. Let’s get started!
Step 1: Gather Your Materials
Before you begin, make sure you have all the necessary materials and tools. Here’s what you’ll need:
- Wood boards of your choice (such as oak, pine, or maple)
- Miter saw or miter box and hand saw
- Measuring tape
- Sandpaper or sanding block
- Wood glue
- Clamps
- Nails or screws
- Hammer or screwdriver
- Wood stain or paint (optional)
- Picture frame hardware (such as hanging hooks or wire)
Once you have all the materials ready, you can move on to the next step.
Step 2: Measure and Cut the Wood
Begin by measuring the dimensions of the picture you want to frame. Add an extra inch to both the width and height to allow for the frame’s overlap. Using a miter saw or a miter box and hand saw, cut four pieces of wood to the desired lengths. Make sure to cut two longer pieces for the top and bottom, and two shorter pieces for the sides. Remember to cut the wood at a 45-degree angle to create clean and precise corners.

After cutting the wood, use sandpaper or a sanding block to smooth any rough edges or surfaces. This will ensure a professional and polished look for your frames.
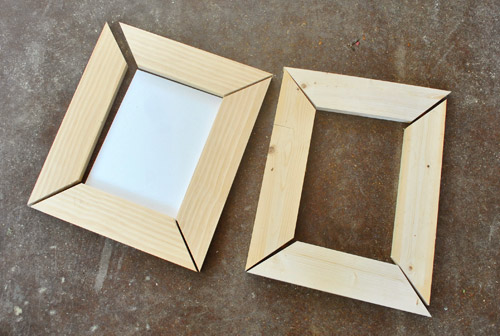
Step 3: Assemble the Frame
Apply wood glue to the cut ends of the wood pieces and join them together to form the frame. Use clamps to hold the pieces firmly in place while the glue dries. Alternatively, you can use nails or screws to secure the corners of the frame. Make sure the frame is square by measuring the diagonals and adjusting if necessary. Allow the glue to dry completely before proceeding to the next step.
If desired, you can further enhance the appearance of the frame by applying a wood stain or paint. This step is optional and can be customized to match your personal style or the decor of the room where the frame will be displayed.
Step 4: Add Picture Frame Hardware
Finally, attach the appropriate picture frame hardware to the back of the frame. This may include hanging hooks or wire, depending on your preference. Make sure the hardware is securely attached and properly aligned to ensure easy and safe hanging of the frame.
Once the hardware is in place, your wooden picture frame is ready to be displayed! Insert your chosen picture or artwork, and enjoy the satisfaction of creating a beautiful and personalized frame from scratch.
Frequently Asked Questions
Here are some commonly asked questions about how to make picture frames from wood:
Q: What materials do I need to make a picture frame from wood?
To make a picture frame from wood, you will need the following materials:
– Wood boards or moulding
– A saw for cutting the wood to size
– Sandpaper for smoothing the edges
– Wood glue or screws for securing the corners
– Clamps to hold the frame together while the glue dries (if using glue)
– Stain or paint for finishing the frame
– Picture frame hardware for hanging the frame
– A measuring tape and a pencil for marking the dimensions
These are the basic materials required, but you can also add decorative elements or embellishments based on your preference.
Q: How do I measure and cut the wood for a picture frame?
To measure and cut the wood for a picture frame, follow these steps:
1. Measure the dimensions of the picture you want to frame.
2. Add an extra allowance of about 1/4 inch to each side of the picture for the frame border.
3. Cut the wood boards or moulding to the desired lengths using a saw, based on the measurements taken.
4. Double-check the dimensions and make any necessary adjustments.
5. Use sandpaper to smooth the cut edges of the wood.
It’s important to measure accurately and cut precisely to ensure a proper fit for your picture frame.
Q: How do I assemble the wooden picture frame?
To assemble a wooden picture frame, you can use either wood glue or screws to secure the corners.
1. Apply wood glue to the ends of the wood pieces that will form the corners.
2. Join the corners together, making sure they are aligned properly.
3. Use clamps to hold the frame together firmly while the glue dries. If using screws, pre-drill holes and then screw the corners together.
4. Allow sufficient time for the glue to dry or tighten the screws properly.
5. Once the frame is secure, check for any gaps or unevenness and make necessary adjustments.
Remember to follow the manufacturer’s instructions for the specific adhesive or hardware you are using.
Q: How can I finish the wooden picture frame?
Finishing a wooden picture frame involves several steps to enhance its appearance and protect the wood.
1. Sand the entire frame surface to ensure it is smooth.
2. Apply wood stain or paint of your choice, following the manufacturer’s instructions.
3. Allow the stain or paint to dry completely.
4. Optionally, you can apply a clear coat or varnish to add a protective layer.
5. Polish the frame gently to remove any imperfections and bring out the shine.
Remember to work in a well-ventilated area and use appropriate safety precautions when applying finishes.
Q: What are some tips for hanging a wooden picture frame?
When hanging a wooden picture frame, consider the following tips:
– Use appropriate picture frame hardware, such as D-rings or sawtooth hangers, based on the weight of the frame.
– Measure and mark the desired location on the wall before drilling or hammering any nails.
– Use a level to ensure the frame is straight.
– For larger frames, consider using multiple hanging points for added stability.
– Avoid hanging the frame in direct sunlight or areas with excessive moisture to prevent wood damage.
Following these tips will help you hang your wooden picture frame securely and display it aesthetically.
Not only will making your own picture frames save you money, but it will also give you the opportunity to personalize your home decor and create unique gifts for loved ones. The versatility of wood allows for endless design possibilities, whether you prefer a rustic, modern, or vintage aesthetic. So, gather your tools, select your favorite wood species, and let your imagination run wild as you bring your vision to life. With practice, patience, and dedication, you will soon find yourself with a collection of stunning picture frames that will undoubtedly become cherished heirlooms for years to come.
- How to Design Wood Carving - May 7, 2024
- How to Carve Wood - May 7, 2024
- How to Remove Cat Urine From Wood Furniture - May 7, 2024