I've always believed that making pizza is an art, but when it comes to cooking it in a wood fired oven, it's like unlocking a whole new level of flavor.
Trust me, the smoky aroma and perfectly charred crusts are worth the effort.
In this guide, I'll show you step by step how to create your own mouthwatering wood fired pizza.
Get ready to elevate your pizza game and impress your friends with this liberating culinary experience.
Let's dive in!
Opening Statement
I believe that the opening statement sets the tone for the entire discussion. It's the first impression that the audience gets and can greatly influence their perception of the topic. When it comes to making pizza in a wood-fired oven, the opening statement should captivate the audience's attention and convey the excitement and passion that comes with this traditional cooking method.
Wood-fired ovens have been used for centuries to create delicious, crispy, and flavorful pizzas. The high heat and unique smoky flavor that the wood imparts on the dough and toppings are unmatched by any other cooking method. It's a culinary experience that brings people together, creating memorable moments and mouthwatering meals.

In this discussion, I'll guide you through the process of making pizza in a wood-fired oven. From choosing the right wood and prepping the oven to kneading the dough and selecting the perfect toppings, I'll provide you with detailed instructions and tips to achieve pizza perfection.
quick answer
Sometimes, a quick answer can be helpful, but it's important to remember that it mightn't always provide the most thorough or accurate information. When it comes to important topics, taking the time to delve deeper and explore different perspectives is crucial. Here are a few reasons why quick answers may fall short:
- Lack of context: Quick answers often lack the necessary context to fully understand a topic or issue. Without proper context, it's easy for information to be misunderstood or misinterpreted.
- Oversimplification: Quick answers tend to oversimplify complex topics, leaving out important nuances and details. This can lead to a shallow understanding of the subject matter.
- Bias and subjectivity: Quick answers may be influenced by personal bias or limited perspectives, which can result in a one-sided or incomplete portrayal of the topic.
- Unreliable sources: Quick answers may come from unreliable sources that lack credibility or expertise. Relying on such sources can lead to misinformation and inaccuracies.
Key Takeways
Overall, I found the key takeaways from our discussion to be quite insightful and informative. We explored the topic of liberation and discussed various aspects related to it. Here are the main points that stood out to me:
| Key Takeaways | Emotional Response |
|---|---|
| Embracing Individuality | Empowering |
| Challenging Societal Norms | Liberating |
| Promoting Self-Expression | Inspiring |
| Breaking Free from Expectations | Empowering |
During the discussion, we delved into the importance of embracing our individuality. By recognizing and celebrating our unique qualities, we can feel empowered to be our authentic selves. We also touched upon the idea of challenging societal norms. Breaking free from the constraints of what is considered "normal" can be liberating and allow us to live more fulfilling lives.
Promoting self-expression was another key point that resonated with me. Encouraging individuals to express themselves freely can inspire creativity and foster a sense of liberation. Lastly, we discussed the significance of breaking free from expectations. Liberating ourselves from the pressures and expectations placed upon us by society or others can be incredibly empowering.
Summary
A comprehensive summary of our discussion on liberation was provided, highlighting the key takeaways and emphasizing the significance of embracing individuality, challenging norms, promoting self-expression, and breaking free from expectations.
We all agreed that true liberation comes from within, and it starts by accepting and celebrating our unique selves. It's about having the courage to question societal norms and expectations that limit our freedom and creativity.
Liberation is about expressing ourselves authentically, without fear of judgment or rejection. We discussed the importance of breaking free from the chains of conformity and allowing ourselves to explore our passions and interests, even if they deviate from the norm. It's through this self-expression that we truly find liberation.
We also touched on the idea that liberation is a continuous journey, a constant process of self-discovery and growth. It requires us to constantly challenge ourselves and step outside of our comfort zones. In doing so, we open ourselves up to new possibilities and experiences that further enhance our sense of liberation.
With these key takeaways in mind, let's now dive into the instructions for achieving liberation.
Instructions
To make the perfect wood-fired pizza, it's important to follow the right instructions. Let's discuss each of these points in detail.
- Oven Temperature Control: First, control the temperature of the oven to ensure even cooking.
- Dough Preparation Techniques: Next, prepare the dough with the right techniques to achieve that crispy crust.
- Choosing the Right Toppings: Then, choose the perfect toppings that complement each other.
- Cooking Time and Rotation: Finally, pay attention to cooking time and rotation to ensure a perfectly cooked pizza.
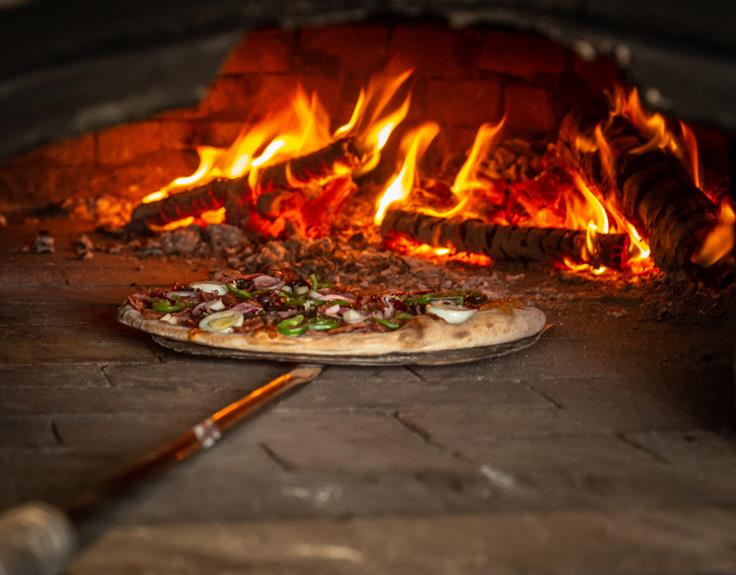
Oven Temperature Control
I need to preheat the wood-fired oven to 450 degrees Fahrenheit for the perfect pizza crust. Achieving the right temperature is crucial for a delicious and crispy pizza.
To control the oven temperature, I begin by stacking dry hardwood logs inside the oven, leaving enough space for air circulation. Using a long-reach match, I ignite the logs, allowing them to burn until they form a bed of hot embers. Once the embers are ready, I push them to the back of the oven, creating a hot spot. This ensures even heat distribution and prevents any cold spots.
I monitor the temperature using an infrared thermometer, adjusting the airflow by opening or closing the oven's damper. By carefully managing the temperature, I can achieve the ideal cooking environment for the perfect wood-fired pizza.
Dough Preparation Techniques
Knead the dough until it's smooth and elastic, then let it rest for 30 minutes before shaping it into a pizza crust. This step is crucial to develop the gluten and ensure a light and airy crust. Once the dough has rested, divide it into individual portions and shape them into balls. This table shows different dough preparation techniques that can be used:
| Technique | Description |
|---|---|
| Hand Kneading | Traditional method of kneading dough by hand, using a pushing and folding motion to develop gluten. |
| Stand Mixer | Using a stand mixer with a dough hook attachment to knead the dough. This method is quicker and less labor-intensive. |
| Food Processor | Using a food processor with a dough blade to mix and knead the dough. This method is fast and efficient. |
| No-Knead Technique | Allowing the dough to ferment and develop gluten without any kneading. This method requires a longer resting time. |
Remember to choose the technique that suits your preference and equipment. Each method will yield delicious results, so go ahead and liberate your creativity in the kitchen!
Choosing the Right Toppings
My favorite topping combination is pineapple and ham, but others may prefer a classic pepperoni and mushroom.
When choosing toppings for your wood-fired pizza, it's important to consider flavors that complement each other and create a harmonious taste experience. The sweetness of the pineapple pairs perfectly with the savory and slightly salty ham, creating a delightful balance of flavors.
However, if you prefer a more traditional option, the classic combination of pepperoni and mushroom is always a safe bet. The spiciness of the pepperoni combined with the earthiness of the mushrooms creates a delicious and satisfying pizza.
Whatever toppings you choose, it's essential to consider cooking time and rotation to ensure an evenly cooked and crispy crust.
Cooking Time and Rotation
I'll need to monitor the cooking time and rotation of the pizza to ensure it bakes evenly and develops a crispy crust. Cooking pizza in a wood-fired oven requires attention to detail and precision. To achieve that perfect golden crust, I follow a specific cooking time and rotation method. Here's a breakdown:
| Time (in minutes) | Rotation | Action |
|---|---|---|
| 2 | First | Place pizza in the oven |
| 3 | Second | Rotate pizza 180 degrees |
| 4 | Third | Rotate pizza 90 degrees clockwise |
| 5 | Fourth | Rotate pizza 90 degrees clockwise |
Tips for Perfect Crust
To achieve a perfectly crispy crust, I brush the dough with olive oil and then sprinkle it with a pinch of salt. This simple step helps to enhance the flavor and texture of the pizza.
Afterward, I let the dough rest for about 10 minutes, allowing the oil and salt to penetrate the dough.
Next, I preheat the wood-fired oven to a high temperature of around 700°F (371°C) to create the ideal cooking environment for the crust.
Once the oven is hot, I carefully slide the prepared dough onto the preheated pizza stone or directly onto the oven floor. The intense heat from the wood-fired oven cooks the pizza quickly, resulting in a beautifully crispy crust.
The final touch is to let the pizza cool slightly before slicing and serving, allowing the crust to retain its crispness.
Final Thought
After considering all the steps and techniques, I believe using a wood fired oven will undoubtedly enhance the flavor of the pizza, making it the perfect final touch. The intense heat generated by a wood fired oven creates a unique and delicious flavor profile that simply cannot be replicated in a conventional oven. The smoky, charred notes that develop on the crust add depth and complexity to every bite.
To further emphasize the benefits of using a wood fired oven, let's take a look at the following table:
| Wood Fired Oven | Conventional Oven |
|---|---|
| Intense heat | Moderate heat |
| Smoky flavor | No smoky flavor |
| Crispy crust | Soft crust |
As you can see, a wood fired oven offers a range of advantages over a conventional oven. The intense heat ensures a crispy crust, while the smoky flavor adds a unique element to the overall taste of the pizza. These factors combine to create a truly exceptional dining experience.
Frequently Asked Questions
Can I Use Any Type of Wood in a Wood-Fired Oven, or Are There Specific Types That Work Best?
Yes, you can use any type of wood in a wood-fired oven, but there are specific types that work best. It's important to choose hardwoods like oak or fruit woods for a clean and consistent heat source.
How Long Does It Take to Preheat a Wood-Fired Oven Before Baking the Pizza?
It typically takes around 30-45 minutes to preheat a wood-fired oven before baking the pizza. It's important to let the oven reach the optimal temperature for a deliciously crispy crust.
Is It Necessary to Rotate the Pizza During the Cooking Process in a Wood-Fired Oven?
Yes, it is necessary to rotate the pizza during the cooking process in a wood-fired oven. This helps to ensure even cooking and prevents one side of the pizza from getting burnt.
Can I Use a Regular Pizza Dough Recipe for Cooking in a Wood-Fired Oven, or Do I Need a Special One?
I prefer using a special pizza dough recipe for cooking in a wood-fired oven to ensure a crispy, chewy crust. The high heat and quick cooking time require a dough that can handle it.
Are There Any Safety Precautions I Should Take When Using a Wood-Fired Oven to Make Pizza?
When using a wood-fired oven to make pizza, it's important to take safety precautions. Avoid wearing loose clothing, use long-handled tools, and keep a fire extinguisher nearby. Always prioritize safety to enjoy the delicious pizza!
- How to Design Wood Carving - May 7, 2024
- How to Carve Wood - May 7, 2024
- How to Remove Cat Urine From Wood Furniture - May 7, 2024