Are you looking for a cost-effective and stylish solution to upgrade your kitchen or bathroom countertops? Look no further than a plywood countertop! Plywood countertops have gained popularity in recent years for their affordability, versatility, and unique aesthetic. Whether you’re a seasoned DIY enthusiast or a novice looking to tackle your first home improvement project, this guide will provide you with step-by-step instructions on how to make a plywood countertop that will transform the look of your space.
In this comprehensive tutorial, we will explore the materials and tools needed to create a plywood countertop, as well as the various design options available to suit your personal style. From measuring and cutting the plywood to applying a durable finish, we will walk you through each stage of the process, ensuring that you achieve a professional-looking result. So, roll up your sleeves and get ready to unleash your creativity as we delve into the world of plywood countertops and discover how they can enhance the beauty and functionality of your home.
How to Make a Plywood Countertop:
- Measure and cut the plywood according to your countertop dimensions.
- Sand the edges and surface of the plywood to ensure a smooth finish.
- Apply a layer of wood primer and let it dry.
- Coat the plywood with multiple layers of water-resistant sealant, allowing each layer to dry before applying the next.
- Sand the countertop again to achieve a smooth and even surface.
- Apply a final coat of sealant and let it dry completely.
- Install the plywood countertop onto your cabinets or support structure.

How to Make a Plywood Countertop
In this step-by-step guide, we will walk you through the process of making a plywood countertop. Whether you are looking to update your kitchen or create a unique surface for a DIY project, plywood can be a cost-effective and versatile material to work with. With proper planning and execution, you can create a beautiful and durable countertop that suits your needs.
1. Planning and Measurements
Before you begin, it is essential to plan out your plywood countertop project. Start by measuring the area where you want to install the countertop. Take accurate measurements of the length, width, and depth. Consider any additional features you may want to incorporate, such as sink cutouts or edge profiles. This information will help you determine the amount of plywood and other materials you will need.
Once you have your measurements, sketch out a design for your countertop. Consider the layout, seams, and any supports that may be necessary. This planning stage is crucial to ensure that your countertop fits properly and meets your aesthetic and functional requirements.
2. Selecting and Preparing the Plywood
When choosing plywood for your countertop, opt for a high-quality, cabinet-grade plywood. This type of plywood is more stable and less prone to warping or splitting. Look for plywood that has a smooth surface and minimal defects.

Before you start cutting the plywood, make sure to acclimate it to the environment where it will be installed. Plywood can expand or contract depending on the humidity levels, so allowing it to adjust to the space for a few days is essential.
Next, cut the plywood to the desired dimensions using a circular saw or a table saw. Ensure that your cuts are clean and accurate. If you have any sink or cooktop cutouts, make those carefully to match the dimensions of your fixtures.
3. Joining the Plywood Pieces
If your countertop requires multiple plywood pieces, you will need to join them together. Apply wood glue along the edges of the plywood and use clamps to hold them in place. Make sure the pieces are aligned correctly and wipe off any excess glue. Allow the glue to dry according to the manufacturer’s instructions before proceeding.
For added strength and stability, reinforce the joints with screws. Pre-drill holes to prevent splitting and then secure the pieces together using screws. Countersink the screws slightly below the surface to ensure a smooth, even countertop.
4. Finishing and Sealing
Once the plywood is securely joined, sand the surface to remove any rough edges or imperfections. Start with a coarser grit sandpaper and gradually move to a finer grit for a smooth finish.
After sanding, choose a suitable finish for your countertop. You can opt for a clear varnish to highlight the natural beauty of the wood or choose a stain for a different look. Apply the finish in thin, even coats, following the manufacturer’s instructions. Allow each coat to dry completely before applying the next.
Finally, seal your plywood countertop with a water-resistant sealant. This will provide protection against moisture, stains, and everyday wear and tear. Apply the sealant according to the product instructions, and make sure to cover all surfaces, edges, and seams.
5. Installing the Countertop
With your plywood countertop complete, it’s time to install it in your desired location. Ensure that the supporting cabinets or structures are sturdy and level. Apply a bead of adhesive along the top edges of the cabinets and carefully place the countertop on it. Use clamps or weights to hold it in place while the adhesive sets.
Once the countertop is securely in place, connect any plumbing fixtures or appliances if necessary. Check for any gaps or unevenness and make adjustments if needed.
Remember to regularly clean and maintain your plywood countertop to preserve its beauty and durability. Avoid placing hot objects directly on the surface and use cutting boards when preparing food to prevent scratches.
6. Additional Tips and Considerations
– Consider adding edge banding or trim to give your plywood countertop a finished look.
– If you prefer a more rustic appearance, you can leave the plywood edges exposed for a unique aesthetic.
– Before starting the project, ensure you have all the necessary tools and safety equipment, such as goggles and gloves.
– Take your time during each step to ensure accuracy and quality.
– Seek professional assistance if you are unsure about any aspect of the project.
7. Maintenance and Care
– Regularly clean your plywood countertop using a mild soap and water solution.
– Avoid using abrasive cleaners or scrub brushes that can damage the finish.
– Wipe up spills promptly to prevent staining.
– Apply a fresh coat of sealant every few years to maintain the countertop’s protective barrier.
8. Troubleshooting
– If you notice any warping or movement in your plywood countertop, it may be due to moisture. Check for any sources of water leakage or high humidity levels in the surrounding area.
– If your countertop develops scratches or dings over time, you can sand them out and reapply the appropriate finish or sealant.
– For major repairs or refinishing, consult a professional for guidance.
9. Cost and Time Considerations
The cost of making a plywood countertop will depend on various factors, such as the size, type of plywood used, and additional features. However, plywood countertops are generally more affordable compared to other materials like granite or quartz.
The time required to complete the project will vary based on your skill level and the complexity of the design. It is advisable to allocate sufficient time for each step, ensuring accuracy and attention to detail.
10. Enjoying Your Plywood Countertop
Once you have completed the installation and maintenance of your plywood countertop, take a step back and admire your work. Enjoy the unique beauty and functionality that plywood can bring to your space. With proper care and maintenance, your plywood countertop can provide years of satisfaction and practicality.
Frequently Asked Questions
In this section, you will find answers to common questions about how to make a plywood countertop.
Q: What materials do I need to make a plywood countertop?
First, you will need a sheet of plywood that is the desired size for your countertop. You will also need a circular saw or jigsaw to cut the plywood to the correct dimensions. Additionally, you will need sandpaper, wood glue, a paintbrush, and a sealant such as polyurethane. Optional materials include edge banding, stain, and a foam roller for applying the sealant.
It is important to note that the specific materials you need may vary depending on your desired design and the tools you have available. Always follow the instructions provided by the manufacturer for any products you use.
Q: How do I measure and cut the plywood for the countertop?
To measure the plywood for your countertop, start by taking accurate measurements of the area where the countertop will be installed. Add any necessary overhangs or allowances for sinks and appliances. Once you have your measurements, mark them on the plywood sheet using a pencil and a straight edge.
Next, using a circular saw or jigsaw, carefully cut along the marked lines to shape the plywood to the correct dimensions. Take your time during this step to ensure accurate and clean cuts. Remember to wear appropriate safety gear, such as safety goggles and gloves, when operating power tools.
Q: How do I prepare the plywood for finishing?
Before applying any finish to the plywood, it is essential to properly prepare the surface. Start by sanding the entire plywood countertop with sandpaper to smooth out any rough edges or imperfections. This will also help the finish adhere better to the wood.
After sanding, remove any dust or debris from the surface using a clean, damp cloth. Allow the plywood to dry completely before proceeding to the next step. Once dry, you can apply a wood primer or a sealant such as polyurethane to protect the plywood and provide a smooth finish.
Q: Can I add edge banding to my plywood countertop?
Yes, adding edge banding is an optional step that can enhance the appearance and durability of your plywood countertop. Edge banding is a thin strip of veneer or laminate that is applied to the exposed edges of the plywood to create a finished look.
To apply edge banding, start by cutting the banding material to the appropriate length. Then, using a hot iron or a specialized edge banding tool, carefully apply heat to the banding while pressing it onto the plywood edge. Trim any excess banding using a sharp utility knife. Finally, sand the edges of the plywood and the edge banding to create a smooth, seamless finish.
Q: How do I maintain and care for a plywood countertop?
To keep your plywood countertop looking its best, it is important to follow proper maintenance and care practices. Avoid placing hot pots or pans directly on the surface to prevent heat damage. Clean up spills promptly to prevent staining and water damage.
Regularly clean the countertop using a mild soap and water solution, and avoid using abrasive cleaners or scouring pads, as they can scratch the surface. Applying a fresh coat of sealant every few years can help protect the plywood from moisture and wear. Additionally, be mindful of sharp objects that could scratch or gouge the surface, and use cutting boards or protective mats when necessary.
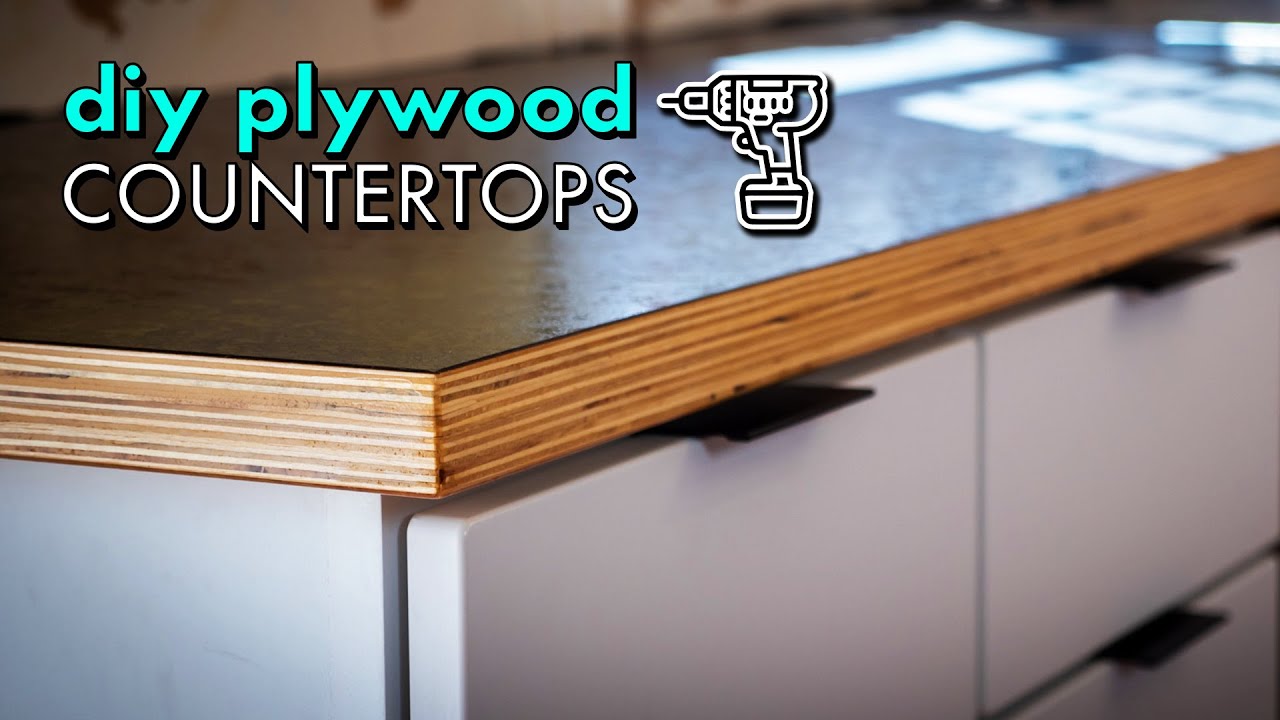
Building DIY WOOD COUNTERTOPS from PLYWOOD & LAMINATE for $300 // Kitchen Remodel Pt. 2
In conclusion, learning how to make a plywood countertop can be a cost-effective and rewarding DIY project for homeowners. By utilizing plywood as the main material, not only can you save money compared to purchasing a traditional countertop, but you can also showcase your creativity and craftsmanship. With the right tools, techniques, and a little bit of patience, you can transform a simple sheet of plywood into a beautiful, durable, and functional countertop that meets your specific needs and style preferences.
However, it is important to remember that safety should always be a top priority when working with power tools and materials. Always wear protective gear such as goggles, gloves, and a mask, and follow the manufacturer’s instructions for the tools you are using. Additionally, make sure to properly seal and finish your plywood countertop to protect it from moisture and wear over time.
By following these guidelines, you can confidently embark on your plywood countertop project, knowing that you are equipped with the knowledge and skills to create a stunning addition to your home. So why not roll up your sleeves, gather your tools, and get started on your journey to a beautiful and functional plywood countertop today?
- How to Make Wood Alchemy 2 - May 15, 2024
- How to Stain Weathered Wood - May 15, 2024
- How to Stain Wood Rustic Look - May 15, 2024