Are you tired of your old, worn-out wooden fence bringing down the overall appeal of your property? If so, it’s time to unleash your inner artist and give that fence a fresh new look! Painting a wooden fence may seem like a daunting task, but with the right tools and techniques, you can transform it into a stunning focal point that enhances the beauty of your outdoor space.
In this comprehensive guide, we will walk you through the step-by-step process of painting a wooden fence, ensuring that you achieve professional-quality results. From prepping the surface and choosing the right paint, to mastering the brush strokes and adding those final touches, we’ve got you covered. Whether you’re a seasoned DIY enthusiast or a beginner looking to take on a new project, this guide will provide you with the knowledge and confidence to tackle this task with ease. So, grab your paintbrushes and let’s dive into the wonderful world of fence painting!
How to Paint a Wooden Fence:
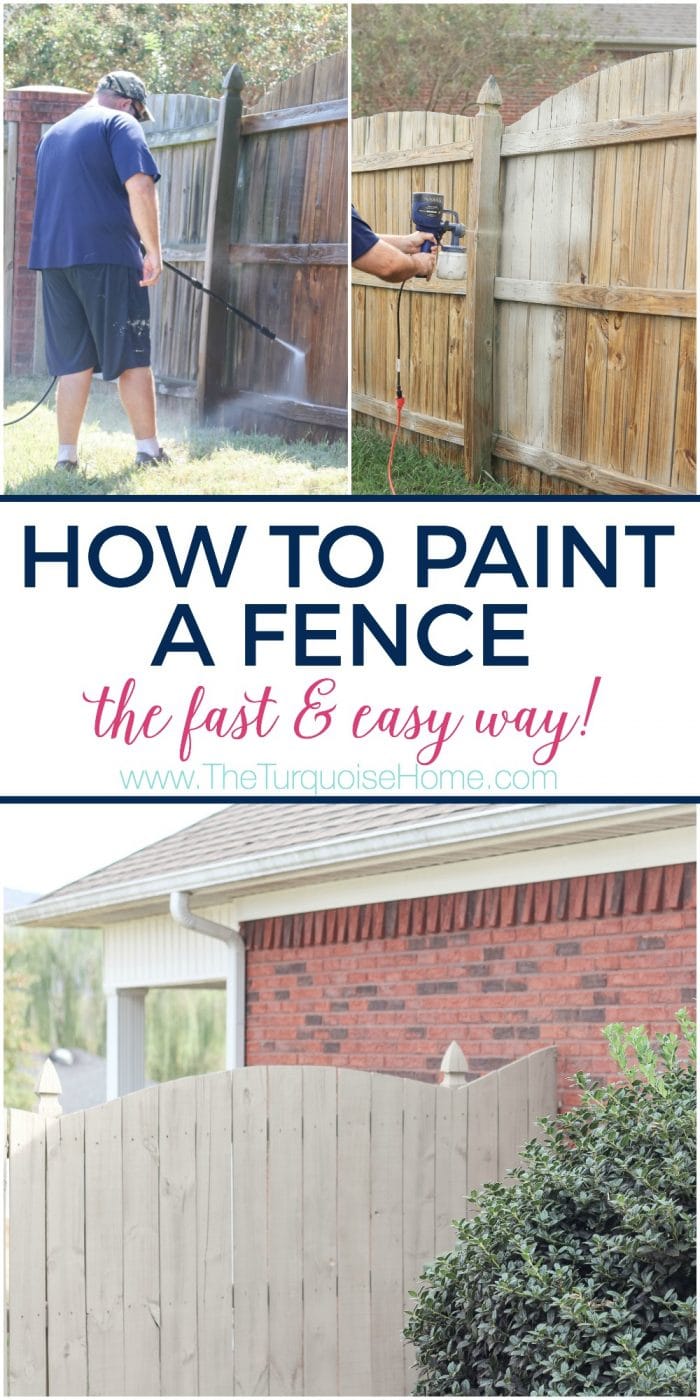
- Prepare the fence by cleaning it thoroughly with a power washer or a scrub brush and soapy water.
- Remove any loose or peeling paint using a scraper or sandpaper.
- Apply a primer to the fence to ensure better adhesion of the paint.
- Choose a high-quality exterior paint suitable for wooden surfaces.
- Using a brush or a sprayer, apply the paint evenly, starting from the top and working your way down.
- Allow the first coat to dry completely, and then apply a second coat for better coverage and durability.
Painting a Wooden Fence – Step by Step Guide
Painting a wooden fence is an essential part of maintaining its appearance and protecting it from the elements. By following these step-by-step instructions, you can ensure that your wooden fence remains in good condition for years to come.
1. Prepare the Fence
Before starting the painting process, it is important to prepare the wooden fence properly. Begin by removing any loose or peeling paint using a scraper or wire brush. Next, wash the fence with a mixture of water and mild detergent to remove dirt and grime. Allow the fence to dry completely before proceeding to the next step.
Additionally, if there are any damaged or rotten areas on the fence, it is crucial to repair or replace them before painting. This will ensure a smooth and even finish and prevent further deterioration of the wood.
2. Choose the Right Paint
When selecting paint for your wooden fence, it is important to choose a high-quality exterior paint that is specifically designed for outdoor use. Look for a paint that offers protection against UV rays and is resistant to mold, mildew, and moisture. Additionally, consider the color of the paint and how it will complement the overall aesthetic of your property.

Before applying the paint, it is recommended to test a small area of the fence to ensure that the color and finish meet your expectations. This will allow you to make any necessary adjustments before proceeding with the entire fence.
3. Prepare the Paint and Tools
Before starting the painting process, gather all the necessary tools and materials. These may include a paintbrush or roller, paint tray, drop cloths or plastic sheets to protect surrounding areas, painter’s tape to protect adjacent surfaces, and a ladder if needed.
Open the paint can and stir the paint thoroughly to ensure an even consistency. Pour a sufficient amount of paint into the paint tray and make sure your paintbrush or roller is clean and free from any debris.
4. Start Painting
Begin by applying a coat of paint to the top or bottom of the fence, depending on your preference. Use long, even strokes and work in small sections to ensure a smooth and uniform finish. If using a paintbrush, start at the top and work your way down, applying the paint in the direction of the wood grain.
Continue painting the entire length of the fence, making sure to fill in any gaps or crevices. If using a roller, roll the paint onto the wood in a back-and-forth motion, overlapping each stroke slightly. Take care not to apply too much paint, as this can lead to drips and runs.
5. Apply Multiple Coats
For optimal protection and coverage, it is recommended to apply multiple coats of paint to the wooden fence. Allow each coat to dry completely before applying the next one. This will ensure a durable and long-lasting finish that will stand up to the elements.
Remember to follow the manufacturer’s instructions regarding drying times between coats. It is also important to note that darker paint colors may require additional coats to achieve complete coverage.
6. Clean Up and Maintenance
Once you have finished painting the wooden fence, clean up any paint drips or spills immediately using a damp cloth or sponge. Remove any painter’s tape and plastic sheets, and allow the paint to dry fully.
To maintain the appearance and prolong the life of the painted fence, regular maintenance is necessary. Inspect the fence periodically for any signs of damage or wear, and touch up any areas that may require additional paint. Additionally, consider applying a protective sealant or topcoat to further enhance the longevity of the paint.
7. Enjoy Your Newly Painted Fence
With proper preparation, the right materials, and thorough execution, painting a wooden fence can be a rewarding and satisfying DIY project. Not only will it enhance the aesthetic appeal of your property, but it will also provide long-lasting protection to your wooden fence, ensuring its durability for years to come.
Frequently Asked Questions
Here are some frequently asked questions about how to paint a wooden fence:
1. How do I prepare the wooden fence for painting?
Before painting your wooden fence, it’s important to properly prepare the surface. Start by cleaning the fence thoroughly using a mild detergent and water. Remove any dirt, debris, or loose paint using a scrub brush or pressure washer. Allow the fence to dry completely before proceeding.
Next, inspect the fence for any damaged or rotten areas. Replace or repair any broken boards or posts to ensure a solid foundation. Sand the surface of the fence to smooth out any rough areas or old paint. Finally, apply a primer to the fence to create a smooth and even base for the paint to adhere to.
2. What type of paint should I use for a wooden fence?
When choosing paint for a wooden fence, it’s important to select a product specifically designed for exterior use. Look for a high-quality, weather-resistant paint that is suitable for wood surfaces. Acrylic latex paints are a popular choice for wooden fences as they offer excellent durability and color retention.
Consider the color of the paint as well. Lighter shades tend to reflect heat and sunlight, which can help prevent the fence from warping or fading over time. Darker colors, on the other hand, may absorb more heat and may require more frequent maintenance. Ultimately, choose a paint that complements your outdoor aesthetic and offers the level of protection and longevity you desire.
3. Should I use a brush or a sprayer to paint my wooden fence?
Both brushes and sprayers can be effective tools for painting a wooden fence, but choosing the right method depends on your personal preference and the size of the project. Brushes provide more control and precision, allowing you to reach into tight corners and ensure even coverage. They are ideal for smaller fences or intricate designs.
Sprayers, on the other hand, can cover larger areas more quickly and evenly. They are well-suited for larger fences or projects that require a faster painting process. However, using a sprayer requires more preparation and cleanup, as you’ll need to protect surrounding areas from overspray. Whichever method you choose, make sure to follow the manufacturer’s instructions for best results.
4. How many coats of paint should I apply to my wooden fence?
The number of coats of paint to apply to your wooden fence depends on the condition of the wood and the desired level of coverage. In most cases, it is recommended to apply at least two coats of paint to ensure adequate protection and longevity.
Before applying additional coats, make sure the previous coat is completely dry. Lightly sand the surface between coats to promote adhesion and create a smooth finish. Applying multiple thin coats is preferable to one thick coat, as it allows the paint to dry and cure properly.
5. How do I maintain and prolong the life of my painted wooden fence?
To maintain and prolong the life of your painted wooden fence, regular maintenance is key. Inspect the fence annually for any signs of damage, such as peeling or cracking paint. Touch up any areas that need attention to prevent moisture from seeping into the wood.
Additionally, consider applying a clear sealant or topcoat over the paint to provide an extra layer of protection against the elements. Clean the fence periodically using a mild detergent and water to remove dirt and grime. Avoid using harsh chemicals or abrasive cleaners that could damage the paint or wood. Lastly, trim any vegetation near the fence to prevent moisture buildup and reduce the risk of rotting.

As you embark on your painting journey, don’t be afraid to get creative and personalize your fence with colors that reflect your personal style and complement the surrounding environment. Whether you opt for a classic white or experiment with bold hues, painting a wooden fence can be an opportunity to showcase your artistic flair. So grab your brushes, put on some old clothes, and let your creativity flow as you transform your wooden fence into a stunning focal point that will be the envy of your neighborhood. Happy painting!
- How to Dry Wood in Oven - May 3, 2024
- How to Preserve Wood Slices With Bark - May 3, 2024
- How to Dry Wood Without Cracking - May 3, 2024