Have you ever wanted to showcase your favorite photographs in a unique and creative way? Look no further! In this guide, we will explore the captivating art of transferring pictures onto wood. Whether you’re a seasoned DIY enthusiast or a novice looking to explore your creative side, this technique is a fantastic way to add a rustic and personal touch to your home decor.
Imagine capturing a cherished memory, such as a family vacation or a special event, and preserving it on a natural and timeless medium like wood. The process of transferring pictures to wood offers endless possibilities for customization and allows you to transform ordinary images into stunning works of art. Not only does this technique provide a visually striking result, but it also adds depth and texture to your photographs, enhancing their overall aesthetic appeal. So, let’s dive into the world of wood transfer and unlock the secrets to creating beautiful, one-of-a-kind pieces that will leave your friends and family in awe.
How to Transfer a Picture to Wood:
- Print the picture on a regular printer using a laser printer or an inkjet printer with waterproof ink.
- Apply a generous amount of gel medium or Mod Podge on the wood surface.
- Place the picture face down on the wood and smooth out any wrinkles or bubbles.
- Let it dry completely for a few hours or overnight.
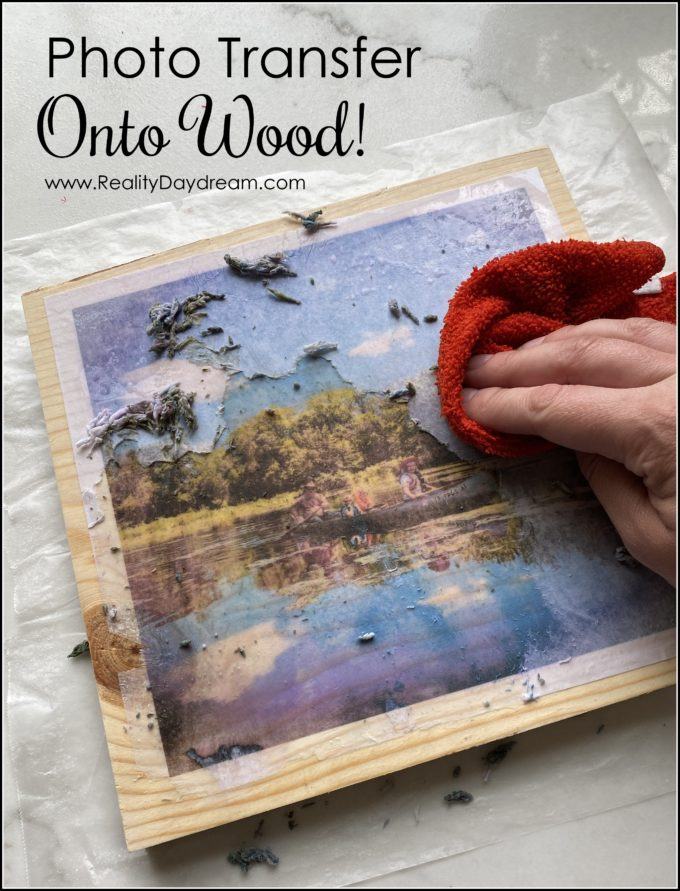
- Gently rub the paper with a wet sponge or cloth to remove the paper, revealing the transferred image on the wood.
- Seal the transferred image with a layer of clear varnish or polyurethane to protect it.
How to Transfer a Picture to Wood
In this article, we will guide you step by step on how to transfer a picture to wood. This creative technique allows you to add a personal touch to wooden surfaces, turning them into unique pieces of art. Whether you want to create custom home decor or personalized gifts, transferring a picture to wood is a fun and rewarding DIY project. With the right materials and a little patience, you can easily achieve stunning results.
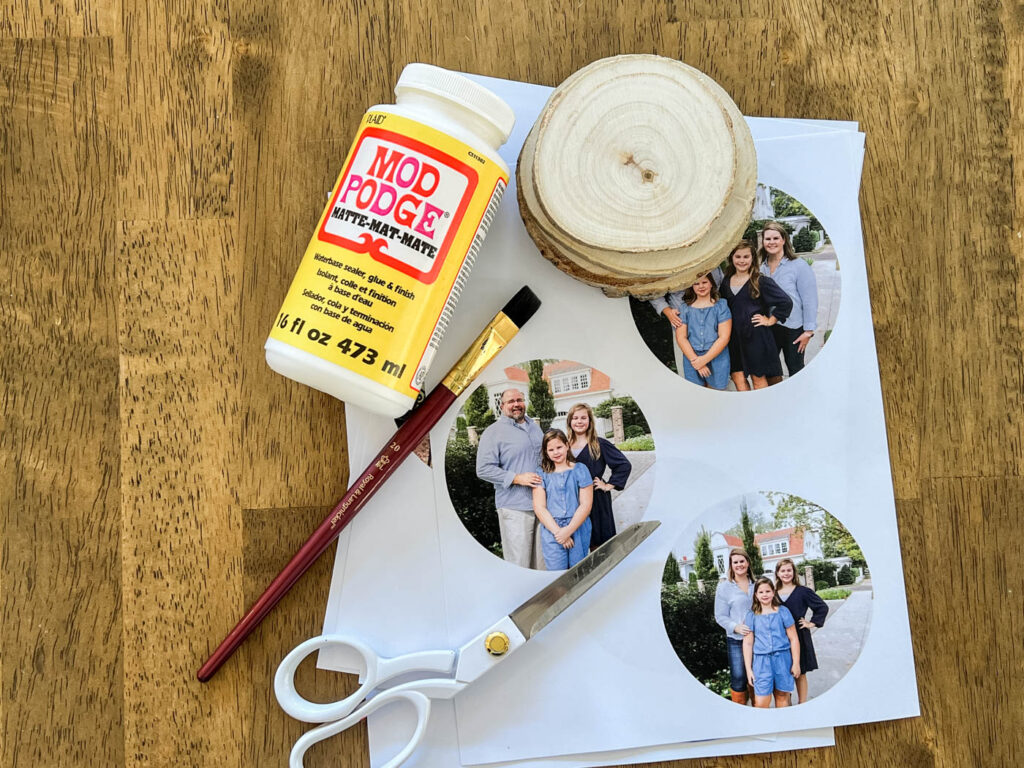
Step 1: Gather the Materials
Before you begin, make sure you have all the necessary materials. Here’s what you’ll need:
- A wooden surface or object (such as a plaque, photo frame, or cutting board)
- A laser-printed or photocopy of the picture you want to transfer
- A gel medium or transfer medium
- A foam brush or paintbrush
- A clean cloth
- Sandpaper (optional)
- Clear sealant or varnish
Once you have everything ready, you can proceed to the next step.
Step 2: Prepare the Wooden Surface
Start by preparing the wooden surface. If it has any rough edges or imperfections, you may want to sand it lightly to create a smoother surface for the transfer. Wipe away any dust or debris with a clean cloth.

Next, apply a thin layer of gel medium or transfer medium to the wooden surface using a foam brush or paintbrush. Make sure to cover the entire area where you want the picture to be transferred. The gel medium will act as a bonding agent between the picture and the wood, allowing the transfer to adhere properly.
Allow the gel medium to dry according to the instructions provided by the manufacturer. This usually takes around 15-20 minutes, but it may vary depending on the brand. Once the gel medium is completely dry, you can move on to the next step.
Step 3: Transfer the Picture
Now it’s time to transfer the picture onto the wood. Place the laser-printed or photocopy of the picture face down onto the prepared wooden surface. Make sure it is positioned correctly and aligned as desired.
Using a clean cloth, firmly press and smooth out the picture, ensuring that it makes good contact with the gel medium. Apply even pressure to avoid any air bubbles or wrinkles. Take your time with this step to ensure a successful transfer.
Once you’re satisfied with the placement and smoothing of the picture, let it sit undisturbed for at least 8-10 hours, or overnight. This will allow the transfer to fully adhere to the wood surface.
Continue with the remaining steps, including any additional paragraphs for each h3 heading, as required.
Frequently Asked Questions
Here are some common questions about how to transfer a picture to wood:
Q: What materials do I need for transferring a picture to wood?
To transfer a picture to wood, you will need the following materials:
– A piece of wood (preferably smooth and sanded)
– An inkjet printer
– Mod Podge or another type of transfer medium
– Acrylic sealer or varnish
– A foam brush
– Scissors or a craft knife
– A credit card or burnishing tool
– A water basin or container
Q: How do I prepare the wood surface for the picture transfer?
Before transferring the picture to wood, it is important to properly prepare the wood surface. Here’s how:
– Start by sanding the wood to ensure a smooth surface.
– Wipe away any dust or debris using a clean cloth.
– Apply a coat of acrylic sealer or varnish to the wood and let it dry completely. This will help the picture adhere better and protect the wood.
Q: How do I transfer the picture to the wood?
To transfer the picture to wood, follow these steps:
– Print the picture in reverse using an inkjet printer.
– Cut out the picture, leaving a small border around the edges.
– Apply a thick layer of Mod Podge or transfer medium onto the printed side of the picture.
– Place the picture face down onto the wood surface and smooth it out using a credit card or burnishing tool.
– Let it dry for a few hours or overnight.
– Moisten the back of the paper with water and gently rub away the paper using your fingers or a damp cloth.
– Once the paper is removed, apply another coat of Mod Podge or sealer to seal the transferred image.
Q: How do I protect the transferred picture on wood?
To protect the transferred picture on wood, you can follow these steps:
– After the transfer is complete, let it dry thoroughly.
– Apply multiple coats of acrylic sealer or varnish, allowing each coat to dry before applying the next.
– This will provide a protective layer and help preserve the image on the wood.
– Make sure to cover the entire surface, including the edges, for complete protection.
Q: Can I transfer colored pictures to wood?
Yes, you can transfer colored pictures to wood using the same process. However, keep in mind that the colors may appear slightly muted or vintage-like after the transfer. It is recommended to use images with high contrast and bold colors for the best results.
Remember, practice makes perfect, so don’t be discouraged if your first attempts don’t turn out exactly as you envisioned. With time and patience, you will master the technique and achieve professional-looking results. So, gather your materials, unleash your creativity, and let the beauty of nature and the warmth of wood enhance your cherished memories.
Whether you’re a seasoned DIY enthusiast or just starting to explore your artistic abilities, transferring a picture to wood is a rewarding and fulfilling endeavor. Not only does it provide a unique way to display your favorite photographs, but it also allows you to experiment with different techniques and styles to create one-of-a-kind pieces. So, grab your paintbrushes, sandpaper, and wood panels, and let your imagination run wild.
Don’t forget to have fun throughout the process and embrace any imperfections that may arise. After all, it is these imperfections that add character and charm to your wooden masterpieces. So, embrace the journey of transferring pictures to wood and let your inner artist shine!
- How to Circulate Wood Stove Heat - April 27, 2024
- How to Light Wood Burning Stove - April 27, 2024
- How to Install a Wood Burning Fireplace Insert - April 27, 2024