Are you a DIY enthusiast looking to enhance the natural beauty of wood? Do you want to learn how to transform your furniture, floors, or other wooden surfaces into stunning pieces that leave a lasting impression? Look no further! In this guide, we will delve into the art of staining wood, a technique that can elevate the appearance of any wooden object.
Staining wood is not only a practical skill but also an opportunity to showcase your creativity and artistic flair. Whether you are a beginner or have some experience in woodworking, this comprehensive guide will provide you with step-by-step instructions, expert tips, and essential information to help you achieve professional-looking results. From choosing the right type of stain for your project to preparing the wood surface, applying the stain, and ensuring a smooth, flawless finish, we will cover it all. Get ready to unlock the secrets of staining wood as we embark on this exciting journey together.
How to Stain Wood:
- Prepare the wood surface by sanding it smooth and removing any dust.
- Apply a wood conditioner to help the stain absorb evenly.
- Stir the stain thoroughly and test it on a small inconspicuous area.
- Apply the stain using a brush or cloth, following the wood grain.
- Wipe off any excess stain with a clean cloth and let it dry completely.
- Apply a second coat if desired for a darker color.
- Finish by applying a clear protective coat, such as varnish or polyurethane.

How to Stain Wood: A Step-by-Step Guide
Staining wood is a great way to enhance its natural beauty and protect it from the elements. Whether you’re staining a piece of furniture or an entire deck, this informative guide will walk you through the process step by step. By following these instructions and using the proper tools and materials, you’ll be able to achieve professional-looking results.
Preparing the Wood Surface
Before you begin staining, it’s important to properly prepare the wood surface. Start by cleaning the wood to remove any dirt, dust, or grease. Use a mild detergent and water solution, and scrub the surface gently with a soft brush or sponge. Rinse thoroughly and allow the wood to dry completely.
Next, inspect the wood for any imperfections or damages. Sand the surface using a medium-grit sandpaper to smooth out any rough spots or splinters. Be sure to sand along the direction of the wood grain to avoid leaving visible scratches. After sanding, remove any dust or debris with a tack cloth.
Choosing the Right Stain
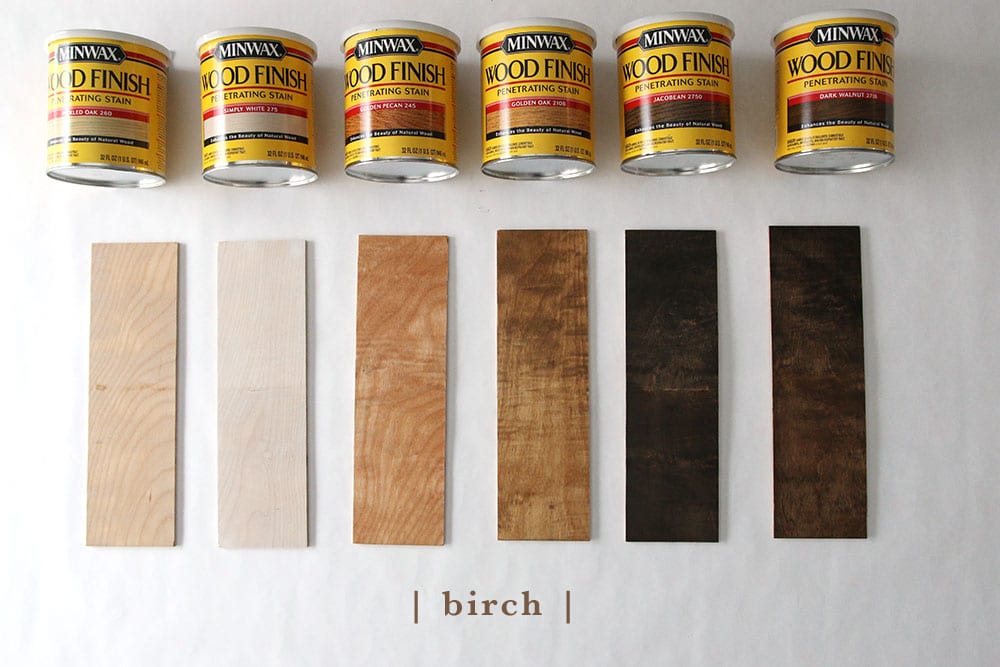
When it comes to choosing a stain, there are various options available, including oil-based, water-based, and gel stains. Consider the type of wood you’re working with and the desired outcome. Oil-based stains penetrate deep into the wood, providing long-lasting protection and enhancing its natural color. Water-based stains are easier to clean up and dry faster, making them a more convenient option. Gel stains are ideal for vertical surfaces as they don’t drip or run.

Before applying the stain, it’s recommended to test it on a small, inconspicuous area of the wood to ensure the desired color and finish. Once you’ve chosen the right stain, stir it thoroughly to mix any settled pigments, but avoid creating bubbles.
Applying the Stain
Now that the wood surface is prepared and the stain is ready, it’s time to apply the stain. Start by applying a thin, even coat using a brush, roller, or sprayer. Work with the grain, following the natural direction of the wood. Be careful to avoid drips or puddles, as they can result in an uneven finish.
Allow the first coat to dry completely according to the manufacturer’s instructions. Depending on the desired depth of color, you may need to apply multiple coats. Before applying each subsequent coat, lightly sand the surface with a fine-grit sandpaper to smooth out any raised wood fibers. Remove any dust and debris before applying the next coat.
Finishing Touches
Once you’re satisfied with the color and coverage, allow the final coat of stain to dry completely. This may take up to 24 hours or longer, depending on the type of stain and environmental conditions. Avoid using or placing any objects on the stained surface until it’s fully cured.
After the stain is dry, you can further protect and enhance the wood by applying a clear topcoat or sealer. This will provide additional durability and a glossy or matte finish, depending on your preference. Follow the manufacturer’s instructions for proper application and drying times.
Maintenance and Care
To maintain the beauty and longevity of your stained wood, regular maintenance is essential. Keep the surface clean by regularly dusting and wiping it with a damp cloth. Avoid using harsh chemicals or abrasive cleaners, as they can damage the stain. If the wood starts to look dull or worn over time, you can apply a fresh coat of stain following the same steps outlined in this guide.
Remember, staining wood requires patience and attention to detail. By following these step-by-step instructions and taking the necessary precautions, you’ll be able to achieve professional-looking results and enjoy the beauty of stained wood for years to come.
Frequently Asked Questions
Here are some commonly asked questions about how to stain wood:
Q: What is wood staining?
A: Wood staining is a process of applying a colored pigment or dye to wood surfaces to enhance its appearance. It is commonly used to add color, depth, and richness to the natural grain of the wood. Staining also helps protect the wood from moisture, UV rays, and other environmental factors that can cause damage over time.
There are various types of wood stains available, including oil-based stains, water-based stains, gel stains, and more. Each type has its own set of characteristics and application methods, so it’s important to choose the right stain for your project.
Q: How do I prepare the wood before staining?
A: Properly preparing the wood surface before staining is crucial for achieving a consistent and long-lasting finish. Start by sanding the wood to remove any existing finish, dirt, or imperfections. Use a medium-grit sandpaper to smooth out the surface, followed by a finer grit sandpaper for a smoother finish.
After sanding, clean the wood surface thoroughly to remove any dust or debris using a tack cloth or a damp cloth. Allow the wood to dry completely before proceeding with staining. Additionally, it’s recommended to apply a wood conditioner to help the wood absorb the stain more evenly.
Q: How do I apply wood stain?
A: To apply wood stain, start by stirring the stain thoroughly to ensure an even color distribution. Use a brush, rag, or foam applicator to apply the stain in the direction of the wood grain. Apply an even coat of stain, ensuring that the entire surface is covered.
After applying the stain, allow it to penetrate the wood for a few minutes, and then wipe off any excess stain with a clean cloth. The longer the stain is left on the wood, the darker the color will be. For a lighter shade, wipe off the excess stain sooner. Allow the stained wood to dry completely before applying any additional coats or finishes.
Q: Can I stain over an existing finish?
A: Yes, it is possible to stain over an existing finish, but it requires proper surface preparation and compatibility between the existing finish and the stain. Start by cleaning the surface thoroughly to remove any dirt, grease, or wax. Sand the existing finish lightly to create a rough surface for the stain to adhere to.
Before applying the stain, test it on a small, inconspicuous area to ensure that it adheres well and achieves the desired color. If the stain does not adhere or the color is not satisfactory, it may be necessary to remove the existing finish completely before applying the stain.
Q: How do I protect the stained wood?
A: Once the wood is stained, it’s essential to protect the finish to ensure its longevity. Applying a clear topcoat or sealer is recommended to protect the stain from wear, moisture, and UV damage. Choose a topcoat that is compatible with the type of stain used, such as a polyurethane, varnish, or lacquer.
Before applying the topcoat, ensure that the stained wood is clean and free of any dust or debris. Apply the topcoat using a brush, roller, or sprayer, following the manufacturer’s instructions. Allow the topcoat to dry completely between coats, and sand lightly between coats for a smoother finish. Apply multiple coats for added durability and protection.
How to stain wood LIKE A PRO! Pine wood staining tips and tricks
In conclusion, mastering the art of staining wood is a valuable skill that can enhance the beauty and longevity of your wooden furniture, flooring, or any other wooden surfaces. By following the step-by-step process outlined in this guide, you can achieve professional-looking results, even if you are a beginner. Remember to always prepare the wood properly, choose the right stain for your project, and apply the stain evenly and smoothly. With practice and patience, you can transform ordinary wood into stunning pieces that showcase your creativity and craftsmanship.
Furthermore, the satisfaction that comes from staining wood goes beyond the mere aesthetic appeal. It is a meditative and rewarding process that allows you to connect with the natural beauty of the material and leave your personal touch on each project. Whether you are refinishing an old piece of furniture or creating something entirely new, staining wood grants you the opportunity to unleash your creativity and bring out the unique characteristics of each piece. So, gather your tools, roll up your sleeves, and embark on your wood-staining journey. With dedication and a willingness to learn, you can take your woodworking skills to new heights and enjoy the timeless beauty of stained wood for years to come.
- How to Repair Split Wood Door - April 16, 2024
- How to Fix Gouges in Hardwood Floors - April 16, 2024
- How to Remove Wood Gorilla Glue - April 16, 2024