In today’s digital age, where we capture countless memories on our smartphones and cameras, it’s no wonder that we’re constantly seeking creative ways to display our favorite photos. While traditional frames and albums have their charm, one method that has gained popularity is transferring pictures onto wood. This unique technique not only adds a rustic and vintage touch to your photographs but also preserves them in a truly distinctive manner.
Imagine the possibilities: cherished family portraits transformed into timeless heirlooms, breathtaking landscapes etched onto pieces of natural wood, or even personalized gifts that will leave a lasting impression. Whether you’re a photography enthusiast, a DIY lover, or simply someone looking to add a touch of warmth to your living space, learning how to transfer pictures to wood is a skill worth exploring. In this guide, we will take you through the step-by-step process, providing tips, tricks, and inspiration along the way. Get ready to unleash your creativity and embark on a journey where art meets nature, and your memories come to life on a beautifully crafted wooden canvas.
How to Transfer Pictures to Wood:
- Print your desired picture onto a regular printer paper.
- Apply a generous amount of gel medium onto the wood surface.
- Place the printed picture face down onto the gel medium.
- Smooth out any air bubbles and let it dry for a few hours.
- Gently dampen the paper with water and start rubbing it off using your fingers or a damp cloth.
- Allow the wood to dry completely and seal it with a clear varnish.
How to Transfer Pictures to Wood
Introduction
Transferring pictures to wood is a great way to create personalized and unique pieces of artwork or home decor. Whether you want to transfer family photos, favorite quotes, or beautiful landscapes, this article will guide you through the step-by-step process of transferring pictures to wood. With a few simple materials and some patience, you can create stunning and customized wooden pieces that will be treasured for years to come.
Materials Needed
Before you begin, gather the following materials:
- A piece of wood (preferably smooth and sanded)
- An inkjet printer
- A digital image or design
- Gel medium or Mod Podge
- A foam brush or sponge
- A plastic card or scraper
- A clear acrylic sealer
- Sandpaper (optional)
- A soft cloth or sponge
- A pair of scissors
Step 1: Prepare the Wood
Start by preparing the wood surface. If the wood is rough, sand it gently to create a smooth and even surface. This will ensure better adhesion of the picture transfer. Wipe away any dust or debris using a soft cloth or sponge. Your wood is now ready for the transfer process.
Step 2: Print the Image

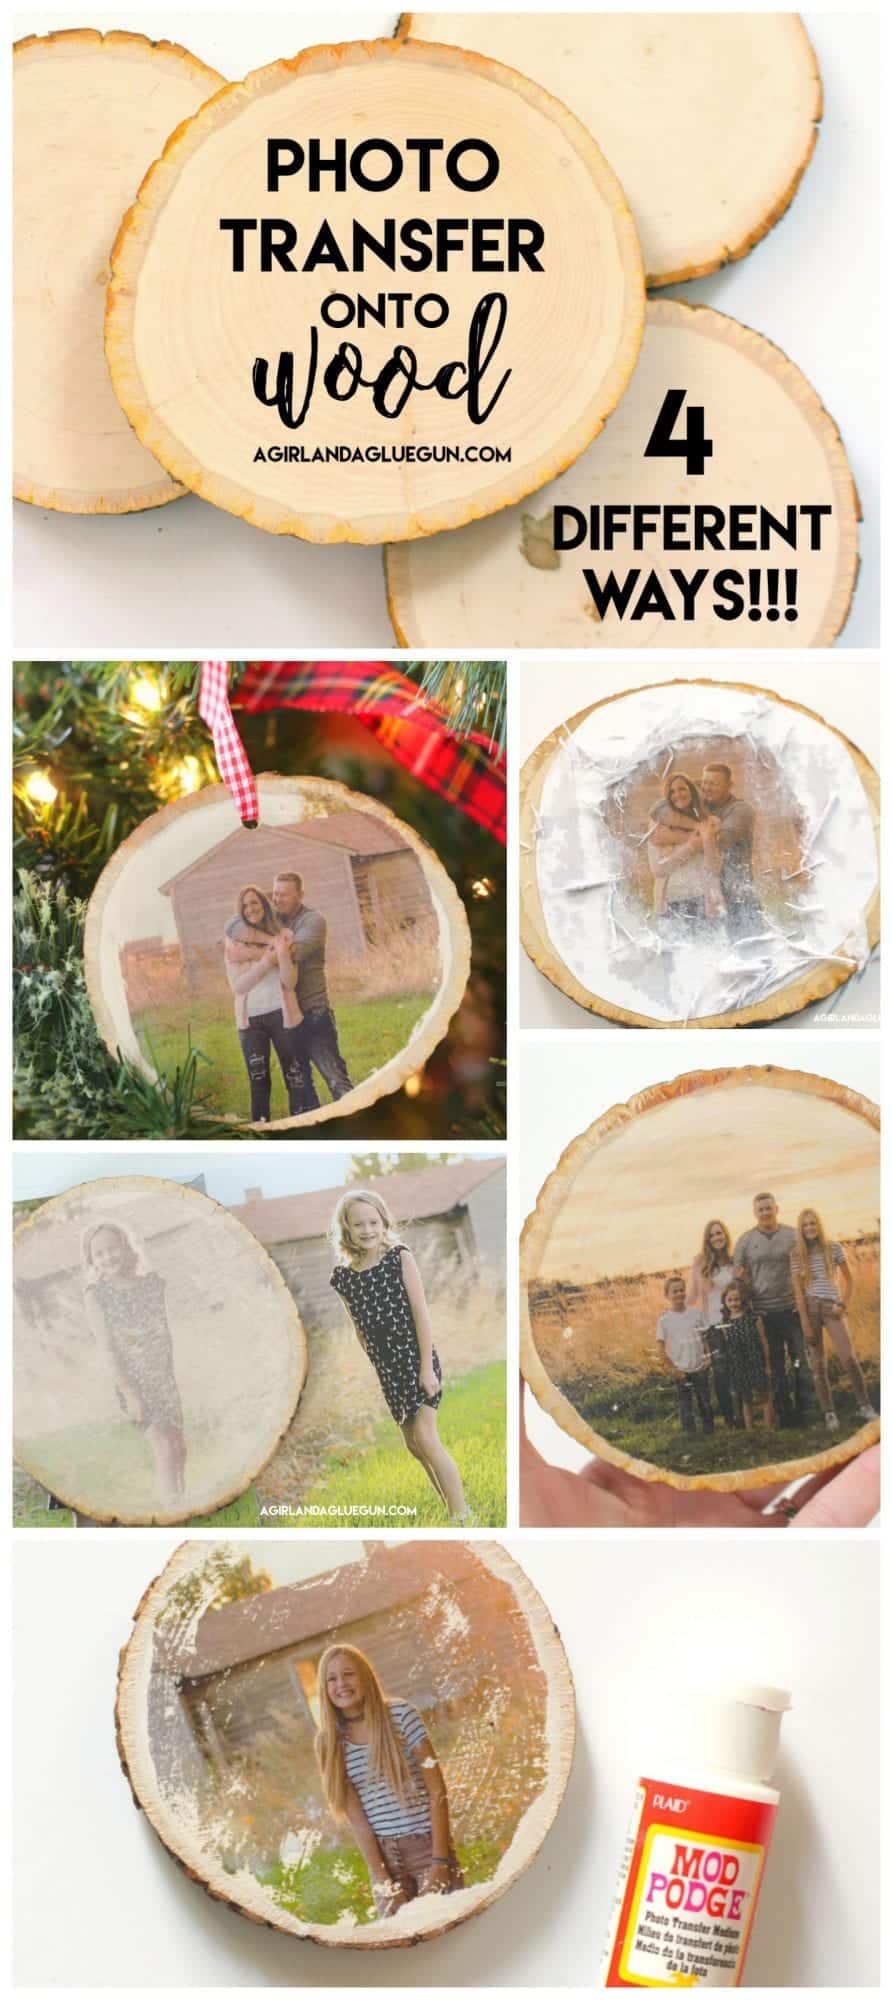
Next, select the digital image you want to transfer to the wood. Adjust the image size and orientation according to the size of your wood piece. Load the image into your inkjet printer and print it onto regular printer paper. Make sure to use the highest quality print settings for the best results.
Step 3: Apply the Gel Medium
Once the image is printed, apply a generous amount of gel medium or Mod Podge directly onto the printed side of the image. Use a foam brush or sponge to spread the gel medium evenly, making sure to cover the entire image. The gel medium will act as a transfer agent, allowing the image to adhere to the wood.
Step 4: Transfer the Image
Carefully place the gel medium side of the image onto the prepared wood surface. Press down firmly to ensure good contact between the image and the wood. Use a plastic card or scraper to smooth out any air bubbles or wrinkles. Allow the image to dry completely, preferably overnight.
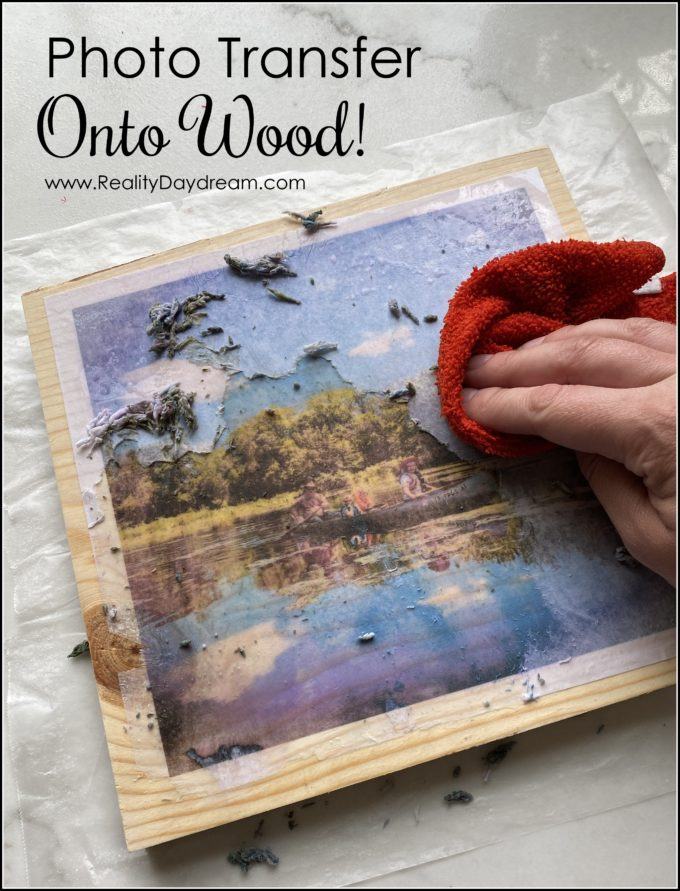
Step 5: Remove the Paper
Once the image is completely dry, it’s time to remove the paper. Moisten a soft cloth or sponge with water and gently rub the paper in circular motions. The water will help loosen the paper fibers, revealing the transferred image underneath. Be careful not to rub too hard, as this may damage the image. Continue rubbing until all the paper is removed.
Step 6: Seal the Image
To protect the transferred image and give it a finished look, apply a clear acrylic sealer over the entire surface of the wood. This will also enhance the colors and prevent any smudging or fading. Follow the manufacturer’s instructions for application and drying time.
Step 7: Optional Finishing Touches
If desired, you can add some finishing touches to your transferred image. For example, you can lightly sand the edges of the wood for a distressed look. You can also apply a coat of wood stain or paint to customize the background. Let your creativity guide you in adding those final details.
Step 8: Enjoy Your Transferred Picture
Once the sealer is dry, your transferred picture is ready to be displayed or used in any way you like. Whether it’s a wall art, a personalized gift, or a decorative item, your transferred picture on wood will surely make a statement. Enjoy your unique creation!
Frequently Asked Questions
Here are some commonly asked questions about how to transfer pictures to wood:
1. Can I use any type of wood for transferring pictures?
Yes, you can use various types of wood for transferring pictures. However, it is important to choose a smooth and flat surface to ensure a better transfer. Avoid using wood with a rough texture or uneven surface, as it may affect the quality of the transferred image. Popular choices for transferring pictures to wood include birch plywood, maple, and pine.
Additionally, make sure the wood is properly sanded and free from any dirt or dust particles before transferring the picture. This will help in achieving a clean and successful transfer.
2. What materials do I need for transferring pictures to wood?
To transfer pictures to wood, you will need the following materials:
– A printed image or photo on regular printer paper (not glossy photo paper)
– Mod Podge or a similar transfer medium
– A sponge or brush for applying the transfer medium
– A piece of wood with a smooth and flat surface
– Scissors or a craft knife
– A soft cloth or sponge for smoothing out any air bubbles
– Clear acrylic sealer or varnish to protect the transferred picture
Having these materials ready before starting the transfer process will help ensure a smooth and successful result.
3. How do I transfer pictures to wood?
To transfer pictures to wood, follow these steps:
1. Start by preparing the wood surface. Sand it down if needed and make sure it is clean and free from any dust or debris.
2. Print the desired image or photo on regular printer paper. Remember to reverse the image if there is any text or if you want the image to appear correctly on the wood.
3. Cut out the printed image, leaving a small border around it.
4. Apply a generous layer of Mod Podge or transfer medium to the wood surface.
5. Place the printed image face down onto the wood, making sure it is properly aligned.
6. Smooth out any air bubbles or wrinkles using a soft cloth or sponge.
7. Allow the transfer to dry completely, preferably overnight.
8. Once dry, gently wet the paper with water and start rubbing it off in circular motions. The transferred image should start to appear.
9. Continue rubbing off the paper until you are satisfied with the result, being careful not to rub too hard and remove the transferred image.
10. Seal the transferred picture with a clear acrylic sealer or varnish to protect it and give it a finished look.
4. Can I transfer colored pictures to wood?
Yes, you can transfer colored pictures to wood. However, it is important to note that the colors may appear slightly muted or have a vintage look once transferred. This is due to the natural texture and color of the wood, which can affect the final result.
If you want to preserve the vibrant colors of the original image, consider using a white or light-colored paint as a base coat on the wood before transferring the picture. This will create a blank canvas for the colors to stand out more prominently.
Experimenting with different types of wood and applying multiple layers of transfer medium can also help enhance the color saturation of the transferred image.
5. How can I protect the transferred picture on wood?
To protect the transferred picture on wood, it is recommended to apply a clear acrylic sealer or varnish. This will not only protect the transferred image from moisture, dust, and scratches but also give it a glossy or matte finish, depending on the type of sealer used.
Before applying the sealer, make sure the transferred image is completely dry. Use a clean brush or sponge to evenly apply the sealer in thin layers, allowing each layer to dry before applying the next one. This will help prevent any smudging or streaking.
Once the sealer is dry, inspect the transferred picture for any imperfections or areas that might need touch-ups. If necessary, carefully apply additional layers of sealer to ensure complete protection and a polished look.
DIY: Learn how to Easily Transfer your Photos onto Wood, with Mod Podge!
In conclusion, transferring pictures to wood is a fascinating and creative way to showcase your favorite memories or create unique and personalized home decor. By following the step-by-step process outlined in this guide, you can achieve stunning results that will leave everyone in awe of your artistic skills. Whether you choose to transfer family portraits, scenic landscapes, or abstract designs, the possibilities are endless when it comes to transforming ordinary pieces of wood into extraordinary works of art.
So, gather your materials, select your desired image, and dive into the world of picture transfer onto wood. With a little practice and experimentation, you will soon become adept at this technique and be able to create one-of-a-kind pieces that reflect your personal style and creativity. Let your imagination run wild and let the beauty of nature’s canvas merge with your own artistic vision. So go ahead, grab a brush and some wood, and let your pictures come to life on this timeless and organic medium.
- How to Remove Wood Vinyl - April 15, 2024
- How to Remove Tape From Hardwood Floor - April 15, 2024
- How to Remove Floor Adhesive From Wood Subfloor - April 15, 2024