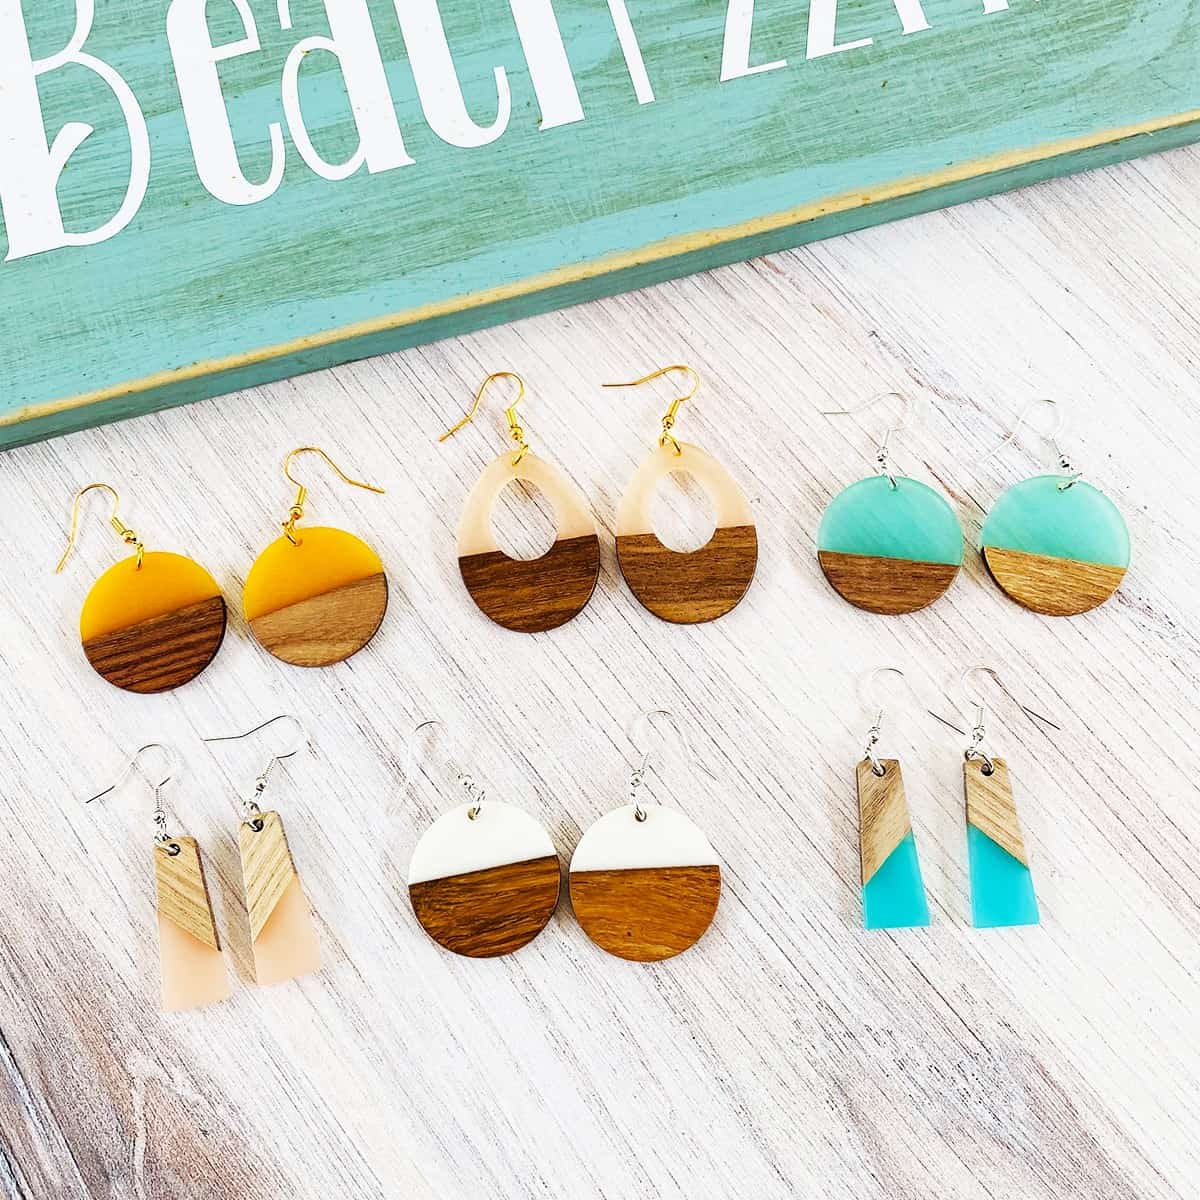
Wooden earrings are a stunning and unique accessory that can add a touch of nature-inspired elegance to any outfit. Whether you’re a seasoned crafter or a beginner looking to explore your creative side, learning how to make wooden earrings can be a rewarding and fulfilling experience. From choosing the right type of wood to mastering the art of carving and finishing, this guide will take you through the step-by-step process of creating your very own pair of wooden earrings that are sure to turn heads.
One of the most enticing aspects of making wooden earrings is the infinite possibilities it offers for customization. With a variety of wood types, colors, and shapes to choose from, you can easily tailor your earrings to match your personal style or give them as heartfelt handmade gifts to your loved ones. Not only will you have a unique and one-of-a-kind accessory to wear, but you’ll also have the satisfaction of knowing that you’ve created something beautiful with your own hands. So, roll up your sleeves, grab your tools, and let’s dive into the world of wooden earrings as we embark on this creative journey together.
- Gather the necessary materials: wooden beads, earring hooks, jump rings, and jewelry pliers.
- Select the desired wooden beads and arrange them in a pleasing design.
- Attach the wooden beads to the earring hooks using jump rings.
- Use jewelry pliers to securely close the jump rings.
- Repeat the steps for the second earring.
- Your homemade wooden earrings are now ready to wear or gift!
How to Make Wooden Earrings
In this step-by-step guide, we will walk you through the process of creating your own beautiful wooden earrings. Whether you are a beginner or an experienced crafter, this project is a great way to express your creativity and showcase your unique style. With just a few materials and some basic tools, you’ll be able to design and make stunning earrings that are sure to turn heads.
Step 1: Gather Materials and Tools
Before you begin, gather all the necessary materials and tools for making wooden earrings. You will need:
- Wooden blanks or small wooden pieces
- Saw or a pair of sharp scissors
- Sandpaper or a sanding block
- Drill or a small handheld rotary tool
- Earring hooks or posts
- Jewelry pliers
- Paints, stains, or varnishes (optional)
- Paintbrushes or small applicators (if using paints or stains)
Once you have all the materials and tools ready, you can proceed to the next step.
Step 2: Prepare the Wooden Blanks
Start by preparing the wooden blanks for your earrings. If you don’t have pre-cut blanks, you can use small wooden pieces and cut them into desired shapes using a saw or a pair of sharp scissors. Make sure the pieces are smooth and free from any rough edges by sanding them with sandpaper or a sanding block.
If you want to add some color or protect the wood, you can paint, stain, or varnish the blanks at this stage. Use paints, stains, or varnishes that are suitable for wood crafting and apply them using paintbrushes or small applicators. Allow the blanks to dry completely before moving on to the next step.
Step 3: Drill Holes for Earring Hooks

Next, you will need to drill small holes in the wooden blanks for attaching the earring hooks or posts. Use a drill or a small handheld rotary tool with a drill bit that matches the size of your earring hooks. Carefully drill a hole near the top edge of each wooden blank.
Make sure the holes are centered and symmetrical for a professional look. If you are using earring posts instead of hooks, you can skip this step and attach the posts directly to the back of the wooden blanks using strong adhesive.
Step 4: Attach Earring Hooks or Posts
Once the holes are drilled, it’s time to attach the earring hooks or posts. If you are using hooks, open the loop at the bottom of each hook using jewelry pliers. Insert the open loop into the hole and close it securely using the pliers. Repeat this process for each earring blank.
If you are using posts, apply a small amount of strong adhesive to the back of each wooden blank and press the posts firmly onto the adhesive. Allow the adhesive to dry completely before handling the earrings.
Step 5: Finishing Touches
Now that your wooden earrings are assembled, you can add any finishing touches or embellishments to make them even more unique. You can paint intricate designs, add beads or charms, or apply a clear coat of varnish for a glossy finish. Let your creativity guide you in this step!
Once you are satisfied with the final look of your wooden earrings, allow them to dry completely before wearing or gifting them. Congratulations, you have successfully made your own wooden earrings!
Frequently Asked Questions
Here are some commonly asked questions about how to make wooden earrings:
Q: What materials do I need to make wooden earrings?
To make wooden earrings, you will need the following materials:
– A piece of wood (preferably a hardwood like oak or walnut)
– Earring hooks or posts
– Sandpaper
– Saw
– Drill
– Wood glue
– Varnish or sealant
– Optional: Paint or stain for added color
These materials can be easily found in craft stores or online.
Q: How do I choose the right type of wood for my wooden earrings?
When choosing the right type of wood for your earrings, consider both the aesthetics and durability. Hardwoods like oak, walnut, or cherry are popular choices as they are sturdy and have a beautiful grain pattern. However, softer woods like pine or cedar can also be used if you prefer a lighter earring.
It’s important to select a piece of wood that is free from knots or cracks, as these imperfections can weaken the earrings. Additionally, make sure the wood is properly dried to avoid warping or shrinking.
Q: How do I shape the wooden earrings?
To shape the wooden earrings, you will need a saw. Start by drawing the desired shape of your earrings on the wood. Use a fine-toothed saw or a scroll saw to carefully cut along the lines. Take your time and make smooth, precise cuts to achieve the desired shape.
Once you have cut out the shape, use sandpaper to smooth the edges and surfaces of the earrings. This will give them a polished and professional look. Start with a coarse-grit sandpaper and gradually move to finer grits for a smooth finish.
Q: How do I attach the earring hooks or posts to the wooden earrings?
To attach the earring hooks or posts to the wooden earrings, you will need a drill and wood glue. Carefully mark the desired location for the hooks or posts on the earrings. Use a drill bit that matches the size of the hooks or posts to create holes at the marked spots.
Apply a small amount of wood glue to the ends of the hooks or posts and insert them into the drilled holes. Make sure they are securely in place and allow the glue to dry completely before wearing the earrings.
Q: How do I protect and finish the wooden earrings?
To protect and finish the wooden earrings, you can use varnish or a sealant. Apply a thin layer of varnish or sealant to the entire surface of the earrings using a brush or cloth. Allow it to dry according to the instructions on the product.
If desired, you can also paint or stain the earrings to add color or enhance the natural beauty of the wood. Use acrylic paint or wood stain, applying it with a brush or cloth. Allow the paint or stain to dry completely before applying the varnish or sealant.

Moreover, making wooden earrings can also be a great way to start a small business or generate extra income. With the rising popularity of handmade and eco-friendly products, there is a growing market for these types of accessories. By honing your skills and experimenting with different designs, you can create a collection that appeals to a wide range of customers. Whether you choose to sell your earrings online or at local craft markets, the possibilities are endless. So why not pick up some wood, gather your tools, and let your creativity soar as you embark on this exciting journey of making wooden earrings?
- How to Design Wood Carving - May 7, 2024
- How to Carve Wood - May 7, 2024
- How to Remove Cat Urine From Wood Furniture - May 7, 2024