Are you tired of spending endless hours searching for the perfect picture frame, only to be disappointed by the limited options available? Look no further! In this guide, we will unveil the art of creating exquisite wooden frames for your cherished pictures. Whether you’re a seasoned DIY enthusiast or a beginner looking to embark on a new creative journey, this step-by-step tutorial will equip you with the skills and knowledge to craft personalized frames that reflect your unique style and enhance the beauty of your photographs.
There’s something truly special about displaying pictures in handmade wooden frames. They add a touch of elegance and warmth to any space, making your memories come alive and transforming your home into an art gallery. With our expert guidance, you’ll learn the fundamentals of selecting the right wood, measuring and cutting materials, assembling the frame, and adding the finishing touches to create a stunning masterpiece. So, dust off your tools and unleash your creativity – it’s time to embark on a rewarding adventure in the world of woodworking as we unlock the secrets to crafting beautiful wooden frames for your precious pictures.
- Gather the necessary materials: wood, saw, sandpaper, wood glue, nails, and picture frame hardware.
- Measure and cut the wood to the desired frame size.
- Sand the cut edges to smooth them.
- Apply wood glue to the corners and join them together.
- Secure the corners with nails for added strength.
- Allow the glue to dry completely.
- Sand the frame to remove any rough areas.
- Attach the picture frame hardware to the back of the frame.
- Insert your picture and hang your new wooden frame.
How to Make Wooden Frames for Pictures
In today’s digital age, it’s easy to forget the beauty of printed photographs. However, there’s something special about displaying your favorite pictures in a wooden frame. Not only does it add a touch of elegance to the photo, but it also enhances the overall aesthetic of your home. In this step-by-step guide, we’ll walk you through the process of making wooden frames for pictures, allowing you to showcase your cherished memories in style.
Step 1: Gather Your Materials
Before you start making your wooden frames, it’s important to gather all the necessary materials. You’ll need:
- Wood boards (preferably hardwood) in the desired size for the frame
- Miter saw or a miter box and a backsaw
- Sandpaper (varying grits)
- Wood glue
- Clamps
- Nails or screws
- Hammer or screwdriver
- Measuring tape and ruler
- Pencil
- Finish (such as varnish or paint)
Once you have all these materials ready, you can proceed to the next step.
Step 2: Measure and Cut the Wood
The first step in constructing your wooden frame is to measure and cut the wood boards to the desired size. Use a measuring tape and ruler to determine the dimensions of your frame. Make sure to account for the width of the frame itself, as it will affect the overall size of the picture. Once you have the measurements, mark them on the wood boards using a pencil.
Next, using a miter saw or a miter box and a backsaw, carefully cut the wood boards at a 45-degree angle. This angle will allow the corners of the frame to fit together seamlessly. Take your time and ensure that the cuts are precise and accurate.
Step 3: Sand and Smooth the Edges

After cutting the wood, it’s essential to sand and smooth the edges for a polished finish. Start with a coarse-grit sandpaper and gradually switch to finer grits to achieve a smooth surface. Sand both the cut edges and the front and back surfaces of the wood boards. This step not only enhances the appearance of the frame but also prevents any potential splinters.
Be thorough in your sanding, paying attention to any rough spots or imperfections. Once you’re satisfied with the smoothness of the wood, wipe away any dust with a clean cloth or brush.
Step 4: Assemble the Frame
Now it’s time to assemble the wooden frame. Apply a thin layer of wood glue to the mitered edges of the wood boards. Carefully align the corners and press them together firmly. To ensure a tight bond, use clamps to hold the corners in place. Let the glue dry according to the manufacturer’s instructions.
Once the glue is dry, reinforce the corners by inserting nails or screws through the back of the frame. Choose an appropriate length for the nails or screws, making sure they don’t penetrate the front surface of the frame. Use a hammer or screwdriver to secure them firmly.
Step 5: Apply Finish
To protect and enhance the natural beauty of the wood, apply a finish to your frame. You can use varnish, paint, or any other finish of your choice. Follow the instructions provided with the finish and apply it evenly to all surfaces of the frame. Allow the finish to dry completely before proceeding.
Once the finish is dry, your wooden frame for pictures is ready to be used. Insert your favorite photo, artwork, or print into the frame, and proudly display it in your home or office. The handmade touch and natural warmth of the wooden frame will surely add a special touch to your cherished memories.
Frequently Asked Questions
Here are some commonly asked questions about how to make wooden frames for pictures:
Q: What materials do I need to make a wooden frame?
To make a wooden frame, you will need the following materials:
– Wood boards or lumber
– Measuring tape
– Saw (such as a miter saw or hand saw)
– Sandpaper
– Wood glue
– Clamps
– Nails or screws
– Screwdriver or hammer
Q: How do I measure and cut the wood for the frame?
Start by measuring the dimensions of the picture you want to frame. Add an extra inch to each side to allow for overlap. Use a measuring tape to mark the measurements on the wood boards, and then use a saw to cut the boards accordingly. Make sure to cut the ends at a 45-degree angle for a mitered corner. Sand the cut edges to smooth them out.
TIP: It’s always a good idea to double-check your measurements before cutting the wood to ensure a precise fit.
Q: How do I assemble the wooden frame?
Apply wood glue to the mitered corners of the wood boards. Press the corners together firmly and use clamps to hold them in place while the glue dries. If desired, you can reinforce the corners with nails or screws for added stability. Allow the glue to dry completely before removing the clamps.
TIP: Be sure to wipe off any excess glue with a damp cloth before it dries, as it can be difficult to remove once it hardens.
Q: How do I finish the wooden frame?
Once the frame is assembled, you can choose to leave it as it is for a natural wood look or apply a finish of your choice. Sand the entire frame to smooth out any rough patches or splinters. You can then stain or paint the frame to your desired color. Apply multiple coats if necessary, allowing each coat to dry before applying the next. Finish off with a protective topcoat, such as varnish or polyurethane, to seal and protect the wood.
TIP: Test the stain or paint on a small, inconspicuous area of the frame first to ensure you are happy with the color and finish.
Q: How do I attach the picture to the wooden frame?
To attach the picture to the wooden frame, you can use several methods. One option is to use small metal clips or brackets to hold the picture in place. Another option is to use adhesive, such as double-sided tape or glue dots, to secure the picture to a backing board. Make sure the picture is centered and aligned properly before securing it to the frame.
TIP: If you want to change the picture in the future, consider using removable adhesive or clips for easier replacement.
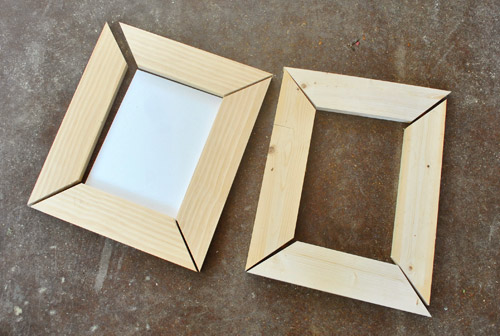
Not only does making wooden frames offer a cost-effective alternative to store-bought options, but it also allows you to customize your frames to perfectly match your personal style and the aesthetic of your space. From choosing the type of wood to selecting the finish, every aspect of the process can be tailored to your preferences. So, why settle for generic frames when you have the opportunity to create unique and exquisite pieces that truly reflect your artistic vision? Whether you’re a seasoned woodworker or a beginner looking to explore a new hobby, making wooden frames for pictures is an enjoyable and fulfilling craft that will undoubtedly bring a sense of pride and accomplishment.
- How to Know Wood Is Dry - May 4, 2024
- How to Season Wood Uk - May 4, 2024
- How to Make Good Wood - May 4, 2024