Are you tired of spending a fortune on picture frames that don’t quite match your style? Have you ever considered making your own wooden picture frames? Not only can it be a fun and rewarding DIY project, but it also allows you to add a personal touch to your home decor. In this guide, we will take you through the step-by-step process of creating beautiful wooden picture frames that will showcase your cherished memories in a truly unique way.
Creating wooden picture frames may seem like a daunting task, especially if you have limited woodworking experience. However, with the right tools, materials, and a little patience, you can easily become a master craftsman. Whether you’re a seasoned DIY enthusiast or a complete beginner, this comprehensive guide will provide you with all the information you need to get started. From selecting the perfect wood and tools to mastering the different techniques involved, we will walk you through each stage of the process, ensuring that you achieve professional-looking results every time. So, let’s roll up our sleeves and unlock your inner artist as we embark on this exciting journey of creating stunning wooden picture frames together!
How to Make Wooden Picture Frames
- Measure the dimensions of your picture and cut the wooden boards accordingly.
- Use a miter saw to create 45-degree angles on each end of the boards.
- Apply wood glue to the angled edges and join them together to form a frame.
- Secure the joints with clamps and let the glue dry overnight.
- Sand the frame to smooth any rough edges.
- Apply a coat of wood stain or paint to enhance the frame’s appearance.
- Insert your picture into the frame and secure it with small nails or clips.
How to Make Wooden Picture Frames
Wooden picture frames can add a touch of elegance and charm to any home decor. Whether you want to display your favorite family photos or showcase beautiful artwork, making your own wooden picture frames can be a fun and rewarding DIY project. In this step-by-step guide, we will show you how to make wooden picture frames that are not only visually appealing but also durable and long-lasting.
Gather the Materials and Tools
Before you begin making your wooden picture frames, you will need to gather the necessary materials and tools. Here’s a list of what you will need:
1. Wood – Choose a type of wood that suits your preference and budget. Common choices include oak, pine, and walnut.
2. Miter Saw – This tool will be used to cut the wood at precise angles.
3. Sandpaper – To smooth the edges of the cut wood.
4. Wood Glue – For joining the frame pieces together.
5. Clamps – These will help hold the frame together while the glue dries.
6. Nails or Screws – Depending on your preference, you can use nails or screws to reinforce the frame joints.
7. Picture Hanging Kit – To securely hang your finished frames on the wall.
8. Measuring Tape – For accurate measurements.
9. Pencil – To mark the wood for cutting.
10. Safety Equipment – Always wear safety goggles and gloves when working with tools.
Measure and Cut the Wood

Once you have all the materials and tools ready, it’s time to measure and cut the wood for your picture frames. Start by measuring the dimensions of the picture or artwork you want to frame. Add an extra inch to both the length and width to allow for the frame border.
Using a miter saw, carefully cut the wood at a 45-degree angle to create the frame corners. Make sure to measure and mark the wood before cutting to ensure accuracy. Repeat this step for all four frame pieces.
After cutting the wood, use sandpaper to smooth the edges and remove any splinters. This will give your frames a polished and professional look.
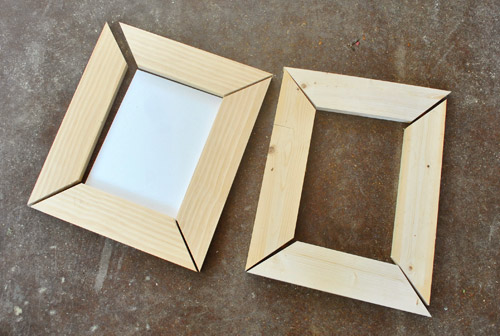
Assemble and Finish the Frames
Once the wood pieces are cut and sanded, it’s time to assemble the frames. Apply wood glue to the mitered corners and join the pieces together. Use clamps to hold the frame in place while the glue dries. If desired, you can reinforce the corners with nails or screws for added stability.
After the glue has dried and the frame is secure, you can add any finishing touches. This may include staining or painting the wood to enhance its appearance. Follow the instructions on the chosen finish product for best results.
Finally, attach a picture hanging kit to the back of the frame to make it ready for hanging. Ensure it is properly centered and securely fastened.
Repeat these steps for each wooden picture frame you want to make, and soon you’ll have beautiful, custom frames to showcase your favorite memories or artwork.
Remember, practice makes perfect, so don’t be discouraged if your first attempt doesn’t turn out exactly as expected. With time and experience, you’ll become more skilled at creating wooden picture frames that truly enhance your home decor.
Frequently Asked Questions
Here are some frequently asked questions about how to make wooden picture frames:
Question 1: What materials do I need to make a wooden picture frame?
To make a wooden picture frame, you will need the following materials:
– Wood: You can choose a type of wood that suits your preference, such as pine, oak, or maple. Make sure the wood is of good quality and free from defects.
– Measuring tools: You will need a tape measure, a ruler, and a square to measure and mark the wood accurately.
– Saw: A miter saw or a hand saw can be used to cut the wood at precise angles.
– Sandpaper: Sandpaper of various grits will be needed to smooth the wood’s surface before finishing.
Question 2: How do I measure and cut the wood for a picture frame?
Follow these steps to measure and cut the wood for a picture frame:
1. Measure the size of the picture you want to frame. Add an extra inch to each side to allow for the frame’s width.
2. Using a miter saw or a hand saw, cut the wood at a 45-degree angle according to the measurements obtained in step 1. Repeat this for all four pieces of wood.
3. Ensure that the angles match perfectly at the corners by dry-fitting the pieces together. Trim any excess if necessary.
4. Sand the cut edges of the wood to remove any roughness or splinters.
Question 3: How do I assemble the wooden picture frame?
To assemble the wooden picture frame, follow these steps:
1. Apply wood glue to the mitered ends of the wood pieces.
2. Join the corners of the frame together and hold them in place using clamps.
3. Allow the glue to dry according to the manufacturer’s instructions.
4. Once the glue has dried, remove the clamps and sand any excess glue or rough edges.
5. Optionally, you can reinforce the corners with small screws or nails for added stability.
Question 4: How do I finish the wooden picture frame?
Follow these steps to finish the wooden picture frame:
1. Sand the entire surface of the frame to smooth out any imperfections or rough spots.
2. Apply a wood stain or paint of your choice, following the instructions on the product.
3. Allow the stain or paint to dry completely.
4. Apply a clear protective finish, such as polyurethane, to seal and protect the wood.
Question 5: How do I attach a picture to the wooden frame?
To attach a picture to a wooden frame, you can use small nails or staples:
1. Place the picture facedown on a clean surface.
2. Position the wooden frame over the picture and align it as desired.
3. Using small nails or staples, secure the picture to the back of the frame.
4. Trim any excess picture or backing material if necessary.
5. Hang or display your framed picture with pride!
How to Make a Picture Frame 3 Ways | DIY Woodworking
In conclusion, learning how to make wooden picture frames is not only a rewarding creative endeavor, but it also allows you to showcase your cherished memories in a unique and personalized way. By following the step-by-step process outlined in this guide, you can confidently embark on this woodworking project and create stunning frames that will enhance the beauty of your photographs or artwork. Remember, practice makes perfect, so don’t be discouraged if your first attempt doesn’t turn out exactly as planned. With time and patience, you will master the techniques required to produce professional-looking frames that will be admired by all who see them.
Furthermore, making wooden picture frames not only adds a touch of elegance to your home decor, but it also provides a sense of satisfaction and accomplishment. As you work with different types of wood, experiment with various finishes, and incorporate unique design elements, you will develop your own style and aesthetic. This creative process allows you to express your personality and artistic vision, making each frame a true reflection of your individuality. Whether you choose to make frames as a hobby or as a potential business venture, the skills you acquire through this journey will undoubtedly enhance your woodworking abilities and open up a world of possibilities for future projects. So, grab your tools, unleash your creativity, and start crafting beautiful wooden picture frames today!
- How to Engrave Wood Without Cnc - May 6, 2024
- How to Personalise Wooden Items - May 6, 2024
- How to Make Wood Marquee Numbers - May 6, 2024