Woodworking is an age-old craft that has stood the test of time, captivating artisans and enthusiasts alike. At the heart of every woodworking project lies a trusty wood chisel, the tool responsible for creating those intricate and precise cuts that bring a piece to life. However, like any tool, chisels require regular maintenance to ensure their optimal performance. In this guide, we will delve into the art of sharpening wood chisels, equipping you with the knowledge and techniques needed to achieve razor-sharp edges and unleash your woodworking potential.
Picture this: you’re standing in your workshop, surrounded by stacks of rough-hewn timber, envisioning the beautiful creations that await. But as you begin to work with your chisel, you notice it’s not quite as sharp as it used to be. Frustration sets in as you struggle to make clean, precise cuts, hindering your progress and stifling your creativity. Fear not, for the skill of sharpening wood chisels is within your grasp. Whether you’re a seasoned woodworker looking to refine your technique or a novice eager to embark on this fascinating craft, this guide will act as your sharpening compass, leading you through the steps to achieve a keen edge that will effortlessly glide through even the toughest of timbers. So, grab your chisels, roll up your sleeves, and let’s embark on this journey together to unlock the full potential of your woodworking endeavors.
- Secure the chisel in a vise to prevent movement.
- Use a sharpening stone with medium grit to remove any nicks or dullness.
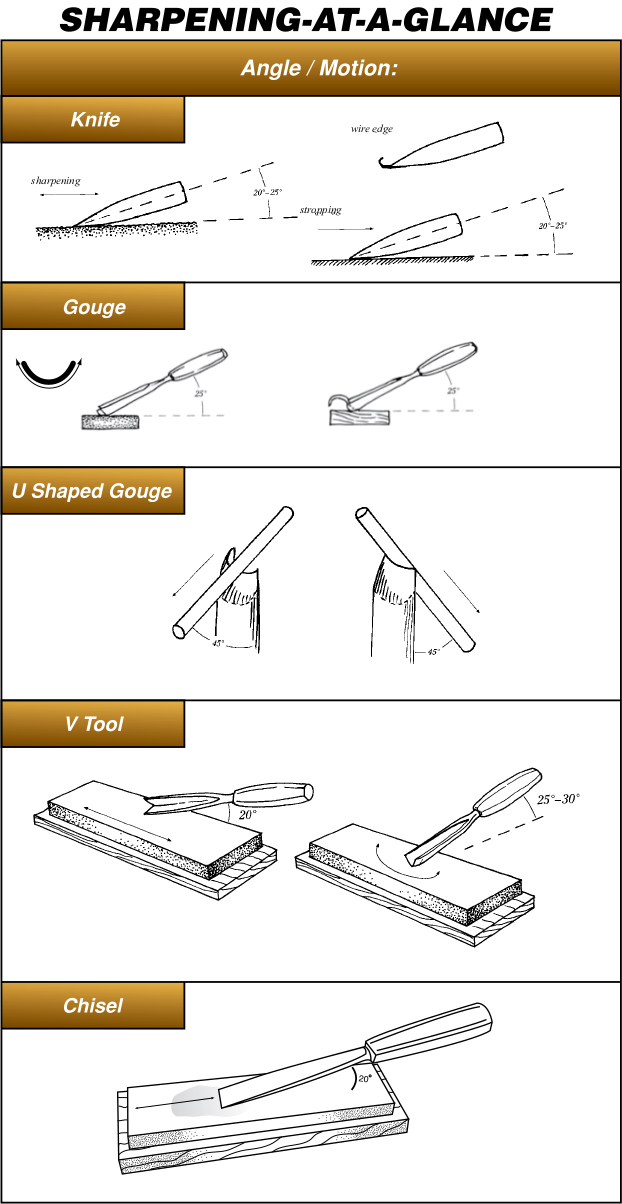
- Hold the chisel at a 25-degree angle and push it across the stone in a sweeping motion.
- Flip the chisel over and repeat on the other side to create a sharp edge.
- Finish with a fine-grit stone for a polished edge.
How to Sharpen Wood Chisels
Wood chisels are essential tools for any woodworking project. However, over time, the cutting edges of chisels can become dull and less effective. Sharpening your wood chisels is a crucial skill that every woodworker should master. In this guide, we will walk you through the step-by-step process of sharpening wood chisels, ensuring they are always in optimal condition for your woodworking needs.
Gather the Necessary Tools
Before you begin sharpening your wood chisels, it is essential to gather all the necessary tools. Here’s what you’ll need:
- Bench grinder or a sharpening stone
- Protective goggles and gloves
- Flat file or honing guide
- Water or honing oil
- Soft cloth or rag
Having these tools at hand will ensure a smooth and efficient sharpening process.
Prepare the Chisel
Prior to sharpening, it is important to prepare the wood chisel. Start by cleaning the chisel using a soft cloth or rag to remove any dirt or debris. Next, inspect the chisel for any signs of damage or chips. If you notice any significant damage, you may need to address it before sharpening. Minor nicks or chips can often be smoothed out during the sharpening process.
Once the chisel is clean and free from any major damage, you can move on to the sharpening stage. If you are using a bench grinder, make sure it is securely mounted and adjust the tool rest to the desired angle. If you prefer using a sharpening stone, soak it in water for a few minutes to ensure proper lubrication during sharpening.
Sharpen the Chisel

To sharpen the wood chisel, place it on the tool rest or the sharpening stone at the desired angle. Hold the chisel firmly with one hand and start the grinder or begin rubbing the chisel against the sharpening stone with moderate pressure. Move the chisel back and forth along the grinder or stone, ensuring an even sharpening across the entire cutting edge.
Keep a consistent angle and avoid overheating the chisel by periodically dipping it in water or applying honing oil. Repeat the sharpening process until you achieve a sharp and well-defined cutting edge. If using a bench grinder, be cautious not to remove too much material at once, as this can damage the chisel.
Test and Fine-Tune
After sharpening the chisel, it’s important to test its sharpness and make any necessary adjustments. Carefully run your finger along the cutting edge to check for smoothness and sharpness. If you notice any rough or dull spots, continue sharpening until you achieve the desired result.
For a final touch, you can use a flat file or honing guide to remove any burrs that may have formed during the sharpening process. This will ensure a clean and polished cutting edge.
Maintain Sharpness
Once your wood chisels are sharpened, it’s crucial to maintain their sharpness for future use. After each woodworking session, clean the chisels and store them in a dry and protective environment. Regularly inspect the cutting edges for any signs of dullness or damage. If needed, touch up the edges using the sharpening techniques described above.
By following these steps and staying consistent with your sharpening routine, you can ensure that your wood chisels remain in optimal condition, allowing you to achieve precise and clean cuts in your woodworking projects.
Frequently Asked Questions
Here are some common questions and answers about how to sharpen wood chisels:
Q: Why is it important to sharpen wood chisels?
Sharpening wood chisels is crucial for maintaining their performance and prolonging their lifespan. Dull chisels can make woodworking tasks more difficult and can lead to poor results. Sharp chisels, on the other hand, make cutting through wood smoother and more precise. Additionally, regular sharpening helps to remove any nicks or dents on the chisel’s edge, ensuring a clean and efficient cut.
By keeping your wood chisels sharp, you’ll also reduce the risk of accidents. Dull chisels require more force to cut through wood, increasing the chances of slips or the chisel getting stuck. So, sharpening your chisels not only improves their cutting ability but also enhances safety in the workshop.
Q: What tools do I need to sharpen wood chisels?
To sharpen wood chisels, you will need a few essential tools:
1. Honing guide: This tool helps to maintain a consistent angle while sharpening the chisel.
2. Sharpening stones: You’ll need a coarse stone for initial sharpening and a finer stone for honing and polishing the chisel’s edge.
3. Leather strop: A leather strop is used to refine the chisel’s edge and remove any burrs or imperfections.
4. Honing compound: This abrasive compound is applied to the strop to further polish the chisel’s edge.
With these tools, you’ll be able to effectively sharpen your wood chisels and keep them in optimal condition for woodworking projects.
Q: How often should I sharpen my wood chisels?
The frequency of sharpening your wood chisels depends on how often you use them and the type of wood you are working with. As a general rule, it is recommended to sharpen chisels when you notice a decrease in their cutting performance or if you see visible nicks or dullness on the edge.
If you frequently use your chisels for heavy-duty tasks or work with hardwoods, you may need to sharpen them more often. On the other hand, if you use your chisels infrequently or work with softer woods, you may be able to go longer between sharpening sessions.
Regular maintenance is key to keeping your chisels sharp, so it’s a good idea to develop a habit of inspecting their edges before each use and sharpening as needed.
Q: What is the proper technique for sharpening wood chisels?
Sharpening wood chisels involves a series of steps to achieve a sharp and polished edge:
1. Secure the chisel in a honing guide, ensuring the desired angle is set.
2. Begin sharpening on a coarse stone, applying even pressure and making smooth, controlled strokes along the entire bevel of the chisel.
3. Continue sharpening on a finer stone, repeating the same motion to refine the edge and remove any scratches left by the coarse stone.
4. Once the desired sharpness is achieved, move to a leather strop with honing compound. Drag the chisel along the strop, maintaining the same angle, to polish and remove any remaining burrs.
Remember to frequently check the sharpness of the chisel during the sharpening process by lightly running your finger along the edge. Once sharp, the chisel should cleanly slice through a piece of paper with minimal effort.
Q: Can I sharpen wood chisels without any specialized tools?
While having the right tools makes the sharpening process easier and more efficient, it is possible to sharpen wood chisels without specialized equipment. If you don’t have a honing guide, you can practice sharpening freehand by maintaining a consistent angle while moving the chisel along the sharpening stones.
If you don’t have access to sharpening stones, you can use sandpaper adhered to a flat surface as a substitute. Start with a coarse grit and work your way to finer grits to achieve the desired sharpness.
However, keep in mind that using specialized tools designed for sharpening chisels will provide better results and make the process more precise. Investing in the right tools will ensure that you can sharpen your wood chisels effectively and maintain their optimal performance.
How to Sharpen a Chisel | Paul Sellers
In conclusion, mastering the art of sharpening wood chisels is a skill that every woodworker should strive to acquire. By following the step-by-step process outlined in this guide, you can transform a dull and ineffective chisel into a precision tool that effortlessly slices through wood with ease. Remember, practice makes perfect, so don’t be discouraged if your first few attempts are not flawless. With time and dedication, you will become proficient in sharpening your chisels, enabling you to achieve impeccable woodworking results.
Furthermore, keeping your wood chisels sharp not only enhances their performance but also ensures your safety in the workshop. Dull chisels are more likely to slip, leading to accidents and potential injuries. By taking the time to regularly sharpen your chisels, you are investing in your craft and prioritizing your well-being. So, don’t delay any longer – grab your chisels, gather the necessary tools, and start sharpening. With a keen eye, a steady hand, and the knowledge gained from this guide, you can unleash the true potential of your wood chisels and take your woodworking skills to new heights.
- How to Install Wood Stove Pipe - April 30, 2024
- How to Install a Wood Burning Stove - April 30, 2024
- How to Make Pizza in a Wood Fired Oven - April 30, 2024