Are you tired of generic store-bought picture frames that lack character and personality? Have you ever considered building your own wooden picture frame, customized to perfectly showcase your cherished memories? Look no further! In this comprehensive guide, we will walk you through the step-by-step process of building a beautiful wooden picture frame from scratch. Whether you are a seasoned woodworker or a novice DIY enthusiast, these easy-to-follow instructions will empower you to create a stunning frame that will add a touch of elegance to any room.
Building a wooden picture frame is not only a rewarding and cost-effective endeavor, but it also allows you to unleash your creativity and craftsmanship. Imagine the satisfaction of showcasing your favorite photographs or artworks in a frame that you have crafted with your own hands. With our detailed instructions, you will learn everything from selecting the right type of wood to mastering the essential techniques of mitering, sanding, and finishing. So, grab your tools and get ready to embark on a fulfilling journey of creating a timeless masterpiece that will be admired and cherished for years to come.
- Measure and cut your wooden boards to desired frame size.
- Use a miter saw to create 45-degree angles on each board.
- Apply wood glue to the ends of the boards and clamp them together.
- Secure the joints with brad nails or screws.
- Sand the frame to smooth out any rough edges.
- Stain or paint the frame to your desired finish.
- Attach a backing board and picture hangers to complete the frame.
How to Build a Wooden Picture Frame: A Step-by-Step Guide
Building a wooden picture frame is a rewarding and practical DIY project that allows you to showcase your favorite photographs or artwork. With some basic woodworking skills and the right tools, you can create a beautiful frame that perfectly complements your decor. In this guide, we will take you through the step-by-step process of building a wooden picture frame, from selecting the materials to assembling and finishing the frame.
Step 1: Gather the Materials
The first step in building a wooden picture frame is gathering all the necessary materials. You will need:
- Wood boards: Choose a wood species that suits your taste and budget. Popular options include pine, oak, and walnut.
- Miter saw or miter box: A miter saw will provide more accurate cuts, but a miter box can also be used if you don’t have access to a saw.
- Measuring tape and pencil: These tools will help you mark the dimensions of the frame.
- Sandpaper: To smooth the rough edges and surfaces of the wood.
- Wood glue: A strong adhesive that will hold the frame together.
- Clamps: These will help secure the frame while the glue dries.
- Nails or screws: To reinforce the corners of the frame.
- Sawtooth hangers or picture wire: Depending on how you want to hang your frame.
- Stain or paint: To add color and protect the wood.
- Brushes or rags: For applying the stain or paint.
Once you have gathered all the materials, you can move on to the next step.
Step 2: Measure and Cut the Wood
Before cutting the wood, measure the size of the picture or artwork you want to frame. Add an extra 1/4 inch to each dimension to allow for a snug fit. Use a miter saw or miter box to cut four pieces of wood to the desired lengths. Remember to cut the ends at a 45-degree angle to create mitered corners that will fit together seamlessly.
After cutting the wood, use sandpaper to smooth any rough edges or surfaces. This will ensure a clean and professional-looking frame. Once the pieces are sanded, dry-fit them together to make sure they align properly.
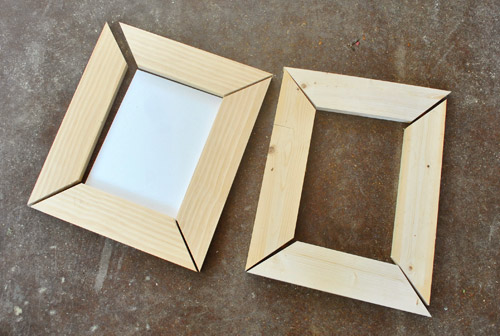
Step 3: Assemble the Frame

Now that you have the cut and sanded pieces, it’s time to assemble the frame. Apply wood glue to the mitered corners and join the pieces together. Use clamps to hold the frame in place while the glue dries. Wipe off any excess glue with a damp cloth.
Once the glue is dry, reinforce the corners by driving nails or screws through the joints. Make sure to countersink the nails or screws slightly to hide them. This will add strength and stability to the frame.
Step 4: Apply the Finish
After the frame is assembled, it’s time to apply the finish. If you want a natural wood look, you can skip this step. However, if you prefer a different color or want to protect the wood, apply a stain or paint of your choice. Use brushes or rags to evenly coat the frame, following the manufacturer’s instructions.
Allow the finish to dry completely before handling the frame. Once dry, you can attach sawtooth hangers or picture wire to the back of the frame for hanging. Be sure to secure them firmly to ensure the frame hangs securely on the wall.
Congratulations! You have successfully built a wooden picture frame. Now you can proudly display your favorite memories or artwork for everyone to admire.
Frequently Asked Questions
Here are some commonly asked questions about how to build a wooden picture frame:
Question 1: What materials do I need to build a wooden picture frame?
To build a wooden picture frame, you will need the following materials:
– Wood boards (preferably hardwood) for the frame itself
– A saw for cutting the boards to the desired length
– Sandpaper or a sander for smoothing the rough edges
– Wood glue or screws to join the frame pieces together
– A tape measure or ruler for accurate measurements
– Clamps to hold the frame pieces in place while you work
– Stain or paint for finishing the frame
Question 2: How do I measure and cut the wood for the picture frame?
To measure and cut the wood for the picture frame, follow these steps:
1. Measure the size of the picture you want to frame.
2. Add an extra inch to each side of the picture’s dimensions to allow for the frame’s width.
3. Using a tape measure or ruler, mark the measurements on the wood boards.
4. Use a saw to cut the boards according to the marked measurements.
5. Double-check the cut pieces against the picture’s size to ensure a proper fit.
6. Sand the cut edges to remove any roughness or splinters.
Question 3: How do I assemble the wooden picture frame?
To assemble the wooden picture frame, follow these steps:
1. Lay out the cut pieces of the frame on a flat surface.
2. Apply wood glue along the edges of the frame pieces that will be joined together.
3. Align the corners of the frame pieces and press them firmly together.
4. Use clamps to hold the frame pieces in place while the glue dries.
5. If using screws, pre-drill holes in the frame pieces and then attach them with screws.
6. Wipe off any excess glue with a damp cloth.
7. Allow the frame to dry and set completely before removing the clamps.
Question 4: How do I finish the wooden picture frame?
To finish the wooden picture frame, you can follow these steps:
1. Sand the entire frame to ensure a smooth surface.
2. Apply a wood stain or paint of your choice to enhance the frame’s appearance.
3. Allow the stain or paint to dry completely according to the manufacturer’s instructions.
4. If desired, apply a clear coat or varnish to protect the frame from moisture or damage.
5. Once the finish is dry, you can attach any hardware, such as hanging hooks or wire, to the back of the frame.
Question 5: Can I personalize or decorate the wooden picture frame?
Yes, you can personalize or decorate the wooden picture frame in various ways:
– You can sand the edges or corners to create a distressed or vintage look.
– Consider carving or engraving patterns or designs onto the frame.
– Apply decorative elements like beads, buttons, or small ornaments to the frame.
– Paint or stencil designs onto the frame for a unique touch.
– Add a personal touch by attaching a nameplate or a small plaque with a meaningful message.
How to Make a Picture Frame 3 Ways | DIY Woodworking
In conclusion, building a wooden picture frame is a rewarding and fulfilling project that allows for creativity and personalization. By following the step-by-step guide outlined in this article, one can successfully create a beautiful and sturdy frame to display cherished memories. Not only does this DIY project provide a sense of accomplishment, but it also offers an opportunity to learn new skills and techniques in woodworking.
Furthermore, building a wooden picture frame can serve as a meaningful gift or a unique addition to one’s home decor. With the ability to choose the type of wood, the finish, and the design, each frame becomes a one-of-a-kind masterpiece. Whether you are a seasoned woodworker or a beginner, this project can be approached with enthusiasm and passion. So, gather your tools, unleash your creativity, and embark on the journey of building your very own wooden picture frame.
- How to Waterproof the Inside of a Wood Planter Box - May 11, 2024
- How to Build a Raised Garden Bed With Wood - May 11, 2024
- How to Transfer Photos to Wood With Nail Polish Remover - May 11, 2024