Are you looking to add a touch of rustic charm and warmth to your home? Imagine the inviting ambiance of exposed wooden beams adorning your ceilings, reminiscent of a cozy cabin nestled in the woods. But what if installing real wood beams is impractical or simply out of your budget? Fear not! In this guide, we will explore the art of creating faux wood beams that are not only cost-effective but also remarkably authentic in appearance.
Crafting faux wood beams is a fantastic DIY project that allows you to unleash your creativity and transform any space into a haven of rustic elegance. With a few basic materials and some simple techniques, you can achieve stunning results that will leave your guests in awe. Whether you’re aiming to enhance the character of your living room, bedroom, or even your kitchen, this step-by-step guide will equip you with the knowledge and skills to make your vision a reality. So, let’s dive into the world of faux wood beams and embark on a journey of craftsmanship and ingenuity!
- Measure and cut foam boards to desired beam size.
- Use a heat gun to shape foam boards into a wood-like texture.
- Apply a wood grain tool to create realistic wood grain patterns.
- Paint foam boards with wood stain or acrylic paint for desired color.
- Install beams by attaching them to the ceiling with screws or adhesive.
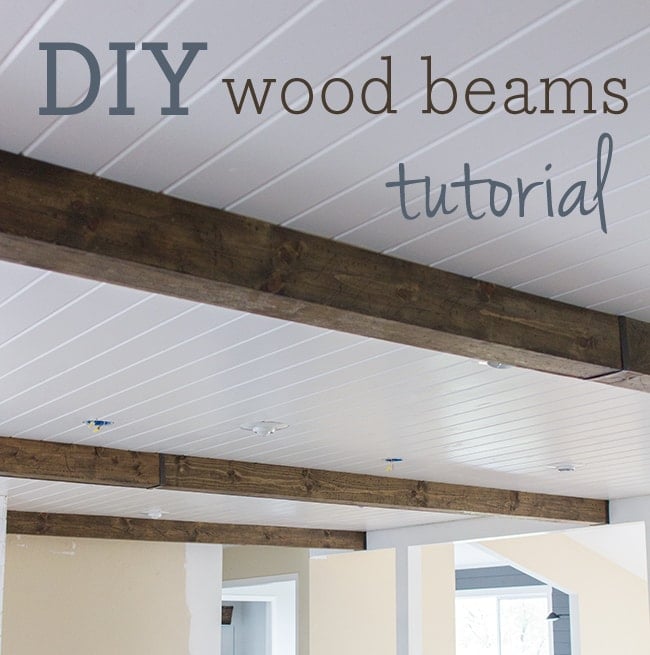
How to Make Faux Wood Beams: A Step-by-Step Guide
In this article, we will walk you through the process of creating faux wood beams for your home. Faux wood beams are a great way to add warmth and character to any space. Whether you want to create a rustic look or add a touch of elegance, these beams are sure to make a statement. By following these step-by-step instructions, you can easily achieve the look of real wood beams without the cost or hassle.
Step 1: Gather Your Materials
The first step in creating faux wood beams is to gather all the necessary materials. Here’s a list of what you’ll need:
- 2×4 boards
- Wood stain
- Paintbrush
- Saw
- Nail gun
- Sandpaper
- Measuring tape
Make sure you have all these materials before starting the project to ensure smooth progress.
Step 2: Measure and Cut the Boards
Once you have all the materials, it’s time to measure and cut the boards to the desired length. Use a measuring tape to determine the length of the beams you want. Mark the measurements on the 2×4 boards and use a saw to cut them accordingly. Remember to measure twice and cut once to avoid any mistakes.
After cutting the boards, use sandpaper to smooth out any rough edges or imperfections. This will ensure that your faux wood beams look polished and professional.
Step 3: Stain the Boards

Now it’s time to give your faux wood beams a realistic wood finish. Start by applying wood stain to the boards using a paintbrush. Choose a stain color that closely resembles the type of wood you want to imitate. Apply the stain evenly, following the grain of the wood, and let it dry completely.
If you want a more distressed or weathered look, you can also experiment with different staining techniques such as layering or dry brushing.
Step 4: Install the Beams
Once the stained boards are dry, it’s time to install them as faux wood beams. Decide on the placement of the beams and use a measuring tape and pencil to mark the positions on the ceiling or wall. Using a nail gun, attach the beams to the surface, making sure they are level and securely fastened.
For added stability, you can also use construction adhesive along with nails to secure the beams in place. This will ensure that they stay in position for years to come.
Step 5: Finishing Touches
After installing the beams, take a step back and admire your handiwork. You can further enhance the look of the faux wood beams by adding decorative hardware or trim. This will give them an authentic, finished appearance.
Additionally, consider adding a protective clear coat over the stained wood to prevent any damage or fading over time. This will help maintain the beauty and longevity of your faux wood beams.
Step 6: Enjoy Your Faux Wood Beams
Now that you’ve completed all the steps, it’s time to enjoy the beauty and charm of your faux wood beams. These beams will create a focal point in any room and add a touch of elegance to your home decor. Sit back, relax, and relish in the satisfaction of a job well done!
Step 7: Maintenance Tips
To keep your faux wood beams looking their best, regular maintenance is key. Dust the beams regularly to prevent any buildup and use a mild cleaning solution to remove any stains or marks. Avoid using harsh chemicals or abrasive materials, as these can damage the finish of the beams.
If you notice any damage or wear over time, you can easily touch up the beams with additional stain or paint. This will help maintain their appearance and ensure they continue to enhance the beauty of your space.
Step 8: Additional Ideas
Once you’ve mastered the art of making faux wood beams, you can get creative and explore different design possibilities. Consider adding decorative elements such as faux metal brackets or faux wood straps to further enhance the authenticity of the beams.
You can also experiment with different wood stain colors or even paint the beams to match your existing decor. The possibilities are endless!
Step 9: Share Your Creations
If you’re proud of your faux wood beams and want to inspire others, don’t hesitate to share your creations. Take pictures of your finished project and share them on social media or home improvement forums. Your work might just inspire someone else to embark on their own faux wood beam journey!
Step 10: Seek Professional Help if Needed
If you find the process of making faux wood beams overwhelming or if you’re unsure about any step, it’s always a good idea to seek professional help. There are experts and craftsmen who specialize in creating faux wood beams and can guide you through the process or even do the installation for you.
Remember, making faux wood beams is a fun and rewarding DIY project that can transform the look of your home. With the right materials, tools, and a little bit of patience, you can achieve stunning results that will impress everyone who sets foot in your space.
Frequently Asked Questions
Here are some commonly asked questions about how to make faux wood beams:
What materials do I need to make faux wood beams?
To make faux wood beams, you will need the following materials:
– Foam boards or rigid insulation panels
– Wood grain tool or rubber stamp with a wood grain pattern
– Construction adhesive
– Sandpaper (medium grit)
– Paint (desired wood color)
– Paintbrushes and a roller
How do I measure and cut the foam boards for the beams?
Start by measuring the length of the space where the faux wood beam will be installed. Use a straight edge and a pencil to mark the measurements on the foam board. Then, using a utility knife or a foam board cutter, carefully cut along the marked lines. Remember to measure and cut the end pieces at a 45-degree angle for a seamless look when joining the beams together.
It’s important to wear safety goggles and use a straight edge as a cutting guide to ensure precise and clean cuts. Take your time and make multiple passes with the knife to avoid tearing or ripping the foam board.
How do I create a wood grain texture on the foam boards?
To create a wood grain texture on the foam boards, you can use a wood grain tool or a rubber stamp with a wood grain pattern. Apply the desired wood color paint onto the tool or stamp, making sure to cover the entire surface. Then, press the tool or stamp firmly onto the foam board, starting from one end and working your way to the other. Repeat this process along the length of the foam board, making sure to overlap the grain pattern slightly to create a realistic look.
Allow the paint to dry completely before moving on to the next step. You can also use a dry brush technique to add depth and shading to the wood grain texture by lightly brushing a darker shade of paint over the raised areas.
How do I assemble the faux wood beams?
To assemble the faux wood beams, apply construction adhesive to the edges of the foam boards that will be joined together. Press the pieces together firmly and hold them in place for a few minutes to allow the adhesive to bond. You can also use clamps or heavy objects to keep the boards in place while the adhesive dries.
Once the adhesive has fully cured, use sandpaper to smooth out any rough edges or imperfections in the foam boards. Be gentle when sanding to avoid damaging the wood grain texture. After sanding, wipe away any dust with a clean cloth before applying the final coat of paint.
How do I install the faux wood beams?
To install the faux wood beams, measure and mark the desired location on the ceiling or wall where the beams will be mounted. Use a stud finder to locate the ceiling joists or wall studs, as these will provide the necessary support for the beams. Pre-drill holes into the foam boards and then attach them to the ceiling or wall using screws or nails.
Make sure to use proper safety precautions when working on a ladder or elevated surfaces. Additionally, consider enlisting the help of a friend or family member for easier and safer installation.

In addition to their aesthetic appeal, faux wood beams are also a sustainable choice. By using recycled materials and reducing the demand for real wood, you can contribute to the preservation of our forests and the environment. Furthermore, the process of making faux wood beams allows for creativity and customization, as you can choose from a variety of finishes and colors to match your personal style and décor. So why wait? Start your journey to creating beautiful faux wood beams today and enjoy the timeless beauty they bring to any room.
- How to Remove Glue From Wood Floor - April 14, 2024
- How to Dissolve Wood Glue - April 14, 2024
- How to Remove Wood Glue - April 14, 2024