Are you tired of buying expensive picture frames that don’t quite match your style or fit your artwork perfectly? Why not try your hand at making your own wood picture frame? Not only is it a cost-effective alternative, but it also allows you to unleash your creativity and create a frame that is truly unique. In this guide, we will take you through the step-by-step process of crafting a beautiful wood picture frame that will showcase your favorite moments and artwork with pride.
Creating a wood picture frame may seem like a daunting task, especially if you have little to no experience with woodworking. However, with the right guidance and a little patience, you will soon be able to transform a simple piece of wood into a stunning frame that will enhance the beauty of any photograph or artwork. Whether you’re a seasoned DIY enthusiast or an aspiring craftsman, this guide is designed to provide you with all the necessary instructions, tips, and tricks to make the process enjoyable and rewarding. So grab your tools, roll up your sleeves, and let’s dive into the art of making your very own wood picture frame.
How to Make a Wood Picture Frame:
- Measure and cut the wood boards to your desired frame size.
- Sand the edges of the boards to create a smooth finish.
- Apply wood glue to the joints and press the boards together.
- Secure the corners with clamps and let the glue dry.
- Drill pilot holes and insert screws to reinforce the frame.
- Sand the entire frame for a polished look.
- Apply a wood finish or paint to protect and enhance the frame.
- Attach a hanging wire or hooks to the back of the frame.
- Insert your picture and enjoy your homemade wood picture frame!
How to Make a Wood Picture Frame
Creating your own wooden picture frame is a great way to add a personal touch to your home decor. With just a few tools and materials, you can easily make a beautiful frame that will showcase your favorite photos or artwork. In this step-by-step guide, we will walk you through the process of making a wood picture frame.
Gather the Materials
Before you begin, gather all the necessary materials. You will need:
- Wood boards
- Saw
- Sandpaper
- Wood glue
- Clamps
- Nails
- Hammer
- Measuring tape
- Pencil
- Paint or stain (optional)
Once you have all the materials ready, you can move on to the next step.

Measure and Cut the Wood
Start by measuring the dimensions of the picture you want to frame. Add an extra inch to each side to allow for the frame border. Using a saw, cut the wood boards according to your measurements. Make sure to cut four pieces: two for the vertical sides and two for the horizontal sides.
After cutting the boards, use sandpaper to smooth any rough edges. This will ensure a clean and professional finish for your frame.
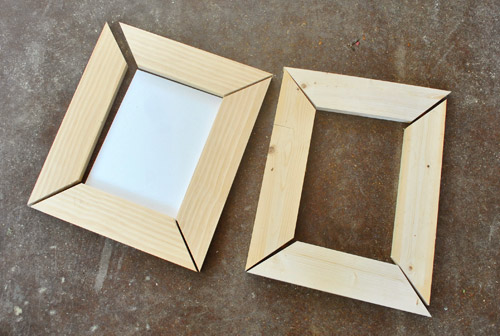
Assemble the Frame
Apply wood glue to the ends of the boards and join them together to form the frame. Use clamps to hold the pieces in place while the glue dries. Make sure the corners are square by measuring diagonally from corner to corner. Adjust if needed.
Once the glue has dried, reinforce the corners with nails. Use a hammer to gently tap the nails into place. Make sure to countersink the nails by hammering them slightly below the surface of the wood.
Finishing Touches
If desired, you can paint or stain the wood frame to match your decor. Apply a thin, even coat and allow it to dry completely before handling.
Finally, insert your picture into the frame, securing it in place with small nails or clips if necessary. Hang your new wood picture frame on the wall or display it on a shelf to showcase your favorite memories or artwork.
Maintaining Your Wood Picture Frame
To keep your wood picture frame looking its best, dust it regularly with a soft cloth. Avoid using harsh chemicals or abrasive cleaners, as they can damage the wood. If any scratches or dings occur, you can touch up the frame with a matching paint or stain.
By following these steps and maintaining your wood picture frame, you can enjoy a personalized and timeless piece of decor that will enhance the beauty of your home for years to come.
Frequently Asked Questions
Here are some commonly asked questions about making a wood picture frame:
Q: What materials do I need to make a wood picture frame?
To make a wood picture frame, you will need the following materials:
– Wood boards or moulding
– Wood glue or screws
– Measuring tape or ruler
– Miter saw or hand saw
– Sandpaper or sanding block
– Clamps or corner clamps
– Picture frame hardware (such as hangers or wire)
– Stain or paint (optional)
– Varnish or sealant (optional)
Q: What are the steps to make a wood picture frame?
Making a wood picture frame involves the following steps:
1. Measure and cut the wood boards to the desired lengths and angles using a miter saw or hand saw.
2. Sand the cut edges of the wood boards to smooth them out.
3. Apply wood glue or use screws to join the corners of the frame together.
4. Use clamps or corner clamps to hold the corners in place while the glue dries.
5. Optional: Apply stain or paint to the frame for a desired finish.
6. Optional: Apply varnish or sealant to protect the wood and enhance its appearance.
7. Attach picture frame hardware, such as hangers or wire, to the back of the frame.
Q: Can I make a wood picture frame without power tools?
Yes, you can make a wood picture frame without power tools. Instead of using a miter saw, you can use a hand saw to cut the wood boards at the desired angles. Sandpaper or a sanding block can be used to smooth the cut edges of the wood. When joining the corners, you can use wood glue and clamps to hold them together until the glue dries. While power tools can make the process faster and more efficient, they are not essential for making a wood picture frame.
Q: How do I ensure the corners of the wood picture frame are aligned?
To ensure the corners of the wood picture frame are aligned, you can use a miter saw or a miter box to cut the angles accurately. It is important to measure and mark the correct angles on the wood boards before cutting. Additionally, using corner clamps or clamps with a right-angle guide can help hold the corners in place while the glue dries. Double-checking the alignment of the corners before the glue sets will ensure a properly aligned wood picture frame.
Q: Can I customize the size of the wood picture frame?
Yes, you can customize the size of the wood picture frame according to your needs. Before cutting the wood boards, measure the dimensions of the picture or artwork you want to frame. Add a little extra width and height to accommodate the picture and any desired borders. Make sure to adjust the measurements accordingly when cutting the wood boards to ensure a properly fitting frame. Remember to consider the aspect ratio of the picture or artwork to maintain its proportions.
Moreover, making your own wood picture frame allows you to customize every detail, from the type and color of wood to the size and style of the frame. This level of personalization ensures that your frame will be a unique and special piece of art in its own right. Whether you are a novice woodworker or an experienced DIYer, this project offers an opportunity to refine your skills and expand your knowledge of woodworking techniques.
So, why settle for generic frames when you can create a one-of-a-kind masterpiece? With a little time, effort, and patience, you can bring your vision to life and proudly display your photographs or artwork in a handcrafted wood picture frame that reflects your personality and style. Embrace the joy of woodworking and start creating your own stunning frames today!
- How to Protect Wood From Termites - April 9, 2024
- How to Treat Wood for Termites - April 9, 2024
- How to Get Rid of Drywood Termites - April 9, 2024