Are you looking to add a touch of rustic charm to your next event or photoshoot? A wooden backdrop might just be the perfect solution! Not only does it create a warm and inviting atmosphere, but it also serves as a stunning focal point that enhances the overall aesthetic. Whether you’re a professional photographer or simply someone with a creative flair, learning how to make a wooden backdrop is a skill that can elevate your artistic endeavors to the next level.
In this guide, we will take you through the step-by-step process of creating a wooden backdrop that is both visually striking and structurally sound. From choosing the right type of wood to the final finishing touches, we’ll cover everything you need to know to bring your vision to life. So, grab your tools and let’s embark on this DIY adventure together, as we unlock the secrets to crafting a stunning wooden backdrop that will leave everyone in awe.
How to Make a Wooden Backdrop:
- Measure and cut the wooden planks to the desired size.
- Sand the planks to create a smooth surface.
- Apply a wood stain or paint of your choice to enhance the look.
- Attach the planks together using screws or nails.
- Secure the backdrop to a wall or frame for stability.
- Optional: Add additional decorations or accessories to personalize.
Introduction
Creating a wooden backdrop can add a touch of rustic charm to any space. Whether you want to use it for a photography backdrop, a wedding backdrop, or simply as a decorative element in your home, making a wooden backdrop is a fun and rewarding project. In this step-by-step guide, we will walk you through the process of creating a wooden backdrop from scratch. From choosing the right wood to assembling and finishing the backdrop, we’ve got you covered. So let’s get started!
Step 1: Selecting the Right Wood
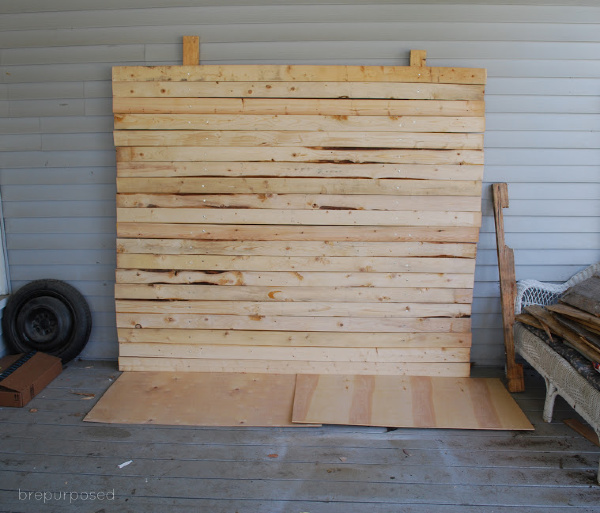
The first step in making a wooden backdrop is to select the right type of wood. You want a wood that is sturdy, durable, and visually appealing. Popular choices for wooden backdrops include reclaimed wood, pallet wood, or plywood. Reclaimed wood adds a unique, weathered look, while pallet wood gives a rustic feel. Plywood provides a smooth surface for painting or staining.
When choosing the wood, consider the size of the backdrop you want to create and the location where it will be displayed. Measure the dimensions you desire and calculate the amount of wood you will need. It’s always a good idea to get a little extra wood to account for any mistakes or unforeseen issues that may arise during the construction process.
Step 2: Preparing the Wood
Once you have selected the wood, it’s time to prepare it for assembly. Start by sanding the wood to remove any rough edges or splinters. Use sandpaper or a sanding block to smooth out the surface. This will ensure a professional finish and prevent any potential injuries from sharp edges.

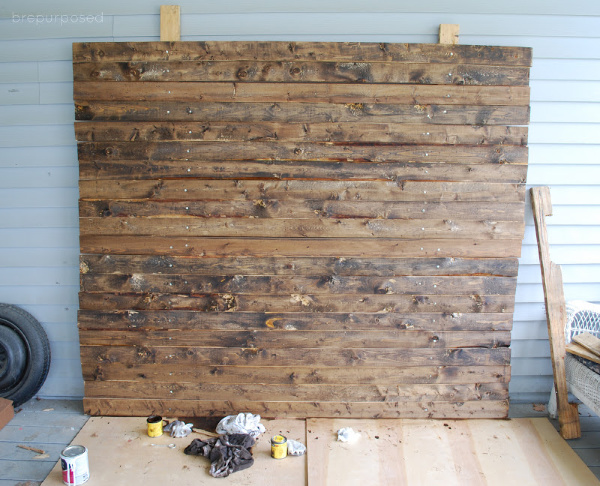
If you plan to paint or stain the wood, now is the time to do it. Choose a paint or stain color that complements your overall design aesthetic. Apply the paint or stain evenly, following the manufacturer’s instructions. Allow the wood to dry completely before moving on to the next step.
Step 3: Assembling the Wooden Backdrop
Now that your wood is prepared, it’s time to assemble the wooden backdrop. Start by laying out the wood pieces in the desired pattern or design. Use a measuring tape and a level to ensure everything is lined up correctly.
Depending on the type of wood you are using, you may need to use screws, nails, or adhesive to secure the pieces together. If using screws or nails, pre-drill holes to prevent splitting the wood. Apply adhesive evenly if using that as your method of assembly. Take your time during this step to make sure everything is secure and aligned properly.
Step 4: Finishing Touches
Once the wooden backdrop is assembled, it’s time to add the finishing touches. This could include adding decorative elements such as flowers, greenery, or string lights. You can also choose to leave the wood as is for a more natural look, or apply a protective sealant to enhance its durability.
Before displaying your wooden backdrop, make sure to clean it thoroughly and check for any loose or protruding pieces. Secure any loose ends or make any necessary repairs. Once everything is in order, you can proudly display your handmade wooden backdrop and enjoy the warmth and beauty it brings to your space.
Frequently Asked Questions
Here are some commonly asked questions about how to make a wooden backdrop:
Q: What materials do I need to make a wooden backdrop?
To make a wooden backdrop, you will need the following materials:
– Plywood sheets
– Wood screws
– Sandpaper
– Wood stain or paint
– Paintbrush or roller
– Saw or circular saw
– Measuring tape
Start by measuring the area where you want to install the wooden backdrop to determine the size of the plywood sheets you will need. Cut the plywood sheets to the desired size using a saw or circular saw. Sand the edges and surfaces of the plywood to smooth out any roughness. Apply wood stain or paint to the plywood, following the manufacturer’s instructions. Allow the stain or paint to dry completely before installing the wooden backdrop.
Q: How do I attach the wooden backdrop to a wall?
To attach the wooden backdrop to a wall, follow these steps:
– Position the wooden backdrop against the wall and use a pencil to mark the desired placement.
– Use a stud finder to locate the wall studs. Mark the stud locations on the plywood.
– Pre-drill pilot holes into the plywood at the marked stud locations.
– Align the pilot holes with the wall studs and secure the plywood to the wall using wood screws.
– Make sure the wooden backdrop is level and secure before proceeding.
Q: Can I customize the color of the wooden backdrop?
Yes, you can easily customize the color of your wooden backdrop. After sanding the plywood, apply a wood stain or paint of your choice using a paintbrush or roller. Make sure to cover the entire surface evenly for a consistent finish. Allow the stain or paint to dry completely before installing the wooden backdrop.
If you want a distressed or weathered look, you can also consider using techniques such as distressing, whitewashing, or dry brushing to achieve the desired effect.
Q: How can I make the wooden backdrop weather-resistant?
To make the wooden backdrop weather-resistant, you can apply a clear protective finish, such as varnish or polyurethane, after staining or painting the plywood. This will help seal the wood and protect it from moisture, UV rays, and other outdoor elements.
Before applying the protective finish, make sure the stain or paint has dried completely. Use a paintbrush or roller to apply a thin, even coat of the protective finish. Allow the finish to dry according to the manufacturer’s instructions before installing the wooden backdrop outdoors.
Q: Can I use reclaimed wood for a wooden backdrop?
Yes, you can use reclaimed wood to create a unique and rustic wooden backdrop. Reclaimed wood refers to wood that has been salvaged from old buildings, barns, or other sources. It adds character and a sense of history to your backdrop.
When using reclaimed wood, make sure to clean and prepare it properly before installation. Remove any nails, screws, or other debris from the wood. Sand the surfaces and edges to smooth out any roughness. Apply a protective finish to enhance the durability and longevity of the reclaimed wood backdrop.
Not only does making a wooden backdrop provide an opportunity for creativity, but it also offers a sense of accomplishment and satisfaction. The process of measuring, cutting, sanding, and assembling the pieces requires concentration and attention to detail, resulting in a finished product that is both visually appealing and durable. Moreover, by engaging in this hands-on project, individuals can develop a deeper appreciation for the beauty of wood and its versatility in design. So, whether you are a DIY enthusiast or simply looking for a unique way to enhance your space, making a wooden backdrop is a worthwhile endeavor that can elevate the ambiance of any setting.
- How to Clean Pottery Barn Wood Furniture - April 25, 2024
- How to Clean Amish Wood Furniture - April 25, 2024
- How to Treat Eucalyptus Wood - April 25, 2024